One of the highlighted additions in the latest release of DHTMLX was dhtmlxDataView, a new component that allows you to display a number of objects according to defined HTML templates and gives you the necessary features to manipulate these objects (e.g., filtering, searching, editing, etc.).
In this tutorial, I will show you how easy it is to use dhtmlxDataView and to implement it in your own HTML pages. As an example, I will guide you on how to build an online store interface using dhtmlxDataView and some other DHTMLX widgets. Don’t worry – the story won’t be too long. It’s mostly screenshots and code snippets :)

dhtmlxDataview is sort of a universal JavaScript component, and can be used to fulfill a whole range of user interface tasks, ranging from a simple image gallery to more sophisticated layouts for online stores. It all depends on your design needs, on the scope of your imagination, and probably, on your HTML knowledge :)
The online book store we’re going to build will not involve complex layouts, but only the required basics: a list of books, the ability to filter books by category, a shopping cart with selected items, and – most important – an order button. So let’s get started.
Step 1 – Page Layout. What Should Be Displayed on Page?
First of all, we’ll define the required functionality in our application and how the store will look. Let’s summarize the features we need in our book store:
- Display the list of books with some necessary info: book name, author, price.
- The ability to filter books by categories.
- The ability to select books and put them into a separate container (shopping cart).
- Calculate the total price of the order.
- Make an order or empty the shopping cart.
To arrange the elements of the store interface, we will use the layout displayed in the sketch below. (In the header, we’ll place a drop-down list with book categories for filtering):

Online Store with dhtmlxDataView - Page Layout
With this simple piece of HTML code, the page layout is ready:
<div id="navigation">
<div id="category">
Category select box will be here
</div>
</div>
<div id="content">
<div id="books_list">
<div id="books_list_cont">Books list will be here</div>
</div>
<div id="books_selected">
<div id="books_selected_cont">
<div id="books_selected_data">Selected books list will be here</div>
</div>
<div class="total">Total price displayed here</div>
</div>
</div>
</div>
In an online store, the number of books can reach hundreds or thousands of items, but with dhtmlxDataView, we can load even big lists quite fast.
Note that dhtmlxDataView loads all the data to the client side, but renders only elements that appear in the visible area (in our case, books in the list). This “smart rendering” feature continues to work when you scroll through the elements in DataView, displaying only those that need to be shown to a user.
At the same time, the information for all the elements is already loaded into the browser, so the elements are available for filtering (or other operations, like sorting or searching). Building structures with DataView is quite easy, so we’ll use it for both lists of books, in the store and in the cart.
Step 2 – DataView Initialization. How to Show Books List in DataView?
According to the page layout we created before, all available books will be shown in the “books_list_cont” container on the left.
All the information about books is stored in the database and the table with books data has the following fields:
- book – book title
- author – book author
- image – the image with book cover
- category – book category: “Medicine”, “Computers & Internet”, and others
- price – book price
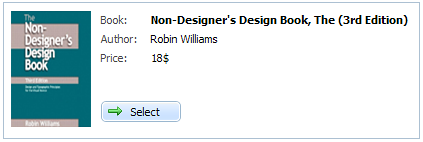
Before initializing dhtmlxDataView, we need to decide what fields to show in a DataView element, in this case, a book item. I think we should display all these fields, except category, and also add a button for book selection. Here is how our book item will look:

Online Store with dhtmlxDataView - Book Item
dhtmlxDataView allows us to use HTML templates, so with the following code we’ll define a template for a book item (data fields are placed in # #):
<img src='codebase/books_icons/#image#' class='book_icon' style=''>
<div>
<div class='book_info'>
<div>
<span class='title'> Book: </span>
<span class='book_name'> #book# </span>
</div>
<div>
<span class='title'> Author: </span>
<span class='author_name'> #author# </span>
</div>
<div>
<span class='title'> Price: </span>
<span class='price'> #price#$ </span>
</div>
</div>
<div class='select_button' onclick="select_clicked('#id#');">Select</div>
</div>
</div>
dhtmlxDataView initialization is very easy. In the dhtmlxDataView constructor, we need to define the HTML container, template, height, and width of a book item. To load data, we need to pass the path to the DataView data into load() method. Like this:
books_list = new dhtmlXDataView({
container: "books_list_cont",
type:{
template: "html->books_list_template",
height:120,
width: 400
}
});
books_list.load("./data/books_connector.php");
</script>
The data is loaded from XML that is generated by the PHP script (“books_connector.php”). We’ll use dhtmlxConnector to retrieve data from the server. So what we need is to:
- Include connector libraries.
- Open database connection.
- Create a connector object for DataView.
- Define the table and its fields which we want to load.
Here is the PHP code:
require_once("./connector/dataview_connector.php");
require_once("./config.php");
$conn = mysql_connect($mysql_host,$mysql_user,$mysql_pass);
mysql_select_db($mysql_db);
$data = new DataViewConnector($conn);
$data->render_table("books","id","book,author,price,image,category");
?>
Now the book list is ready:

Online Store with dhtmlxDataView - Book List
Step 3 – Adding Items and Properties. How to Select Books?
We’ve already implemented the list with all the books in the store. The next step is to create a list with selected books, which will be also done using DataView.
Selected books need to be shown in a separate list. Besides brief information about a book, the quantity ordered should also appear.

Online Store with dhtmlxDataView - Selected Book
For this we’ll define another HTML template:
<div class='selected_title'>
<span class='selected_book'>#book#</span>
<span class='selected_author'>#author#</span>
</div>
<div class='selected_price'>
<span class='title'>Price:</span>
<span class='price'>#price#$</span>
</div>
<div class='selected_quantity'>
<span class='title'>Quantity:</span>
<span class='quantity_name'>#quantity#</span>
</div>
</div>
This DataView initialization is similar to the previous one, but this time we don’t load any data.
books_selected = new dhtmlXDataView({
container: "books_selected_data",
type:{
template: "html->books_selected_template",
height:50,
width: 293
},
height:"auto",
select: true
});
</script>
A book will be added to this list when the “select” button in books_list of DataView is pressed. When a book is selected for the first time, we assign a “quantity” property for it, and increase its value each time the book is selected again. So one book can be ordered several times.
function select_clicked(id) {
//get selected id
var id = books_list.locate(e);
//check is item already was added
var is_added = books_selected.exists(id);
if (!is_added){
//copy item to the cart
books_list.copy(id, 0, books_selected, id);
books_selected.get(id).quantity=1;
books_selected.refresh();
}
else
books_selected.get(id).quantity++;
//mark clicked item
books_list.select(id);
books_selected.select(id);
books_selected.refresh(id);
};
books_list.on_click.select_button = select_clicked;
</script>
Here is what we have on the page – the list of books in the left pane and the list of selected books on the right:

Online Store with dhtmlxDataView - Selected Book List
Now we can select the books from the list and place them in a shopping cart container. But how do we remove them from the cart if they were added by mistake, or if we changed our mind about buying them?
To change the number of ordered books, we set the onItemDblClick event handler. So a user will be able to remove unwanted copies of ordered books with a double-click, or delete a book from the order altogether:
books_selected.attachEvent("onItemDblClick", dec_quantity);
function dec_quantity(id) {
var book = books_selected.get(id);
book.quantity--;
if (book.quantity == 0) {
books_selected.remove(id);
} else {
books_selected.refresh(id);
}
}
</script>
So now we have an interface with the list of books and the shopping cart. We can select books from the list on the left, and they will be placed in the cart. Then we can choose the number of copies we would like to buy or remove the copies from the cart.
Step 4 – Data Filtering. How to Filter Books by Category?
Currently, all the books are loaded at once, and it’s hard to find the item you need. Therefore, we’ll add the option to filter books by category to make the search easier. We’ll use dhtmlxCombo to implement a category selection dropdown.
var category=new dhtmlXCombo("category", "category", 200);
category.readonly(true);
category.loadXML("./data/categories_connector.php");
</script>
To filter the book list by selected category, we set the “onSelectionChange” event for the combo:
category.attachEvent("onSelectionChange", select_category);
function select_category() {
var cat = category.getSelectedValue();
books_list.filter("#category#", cat);
}
</script>
Now we can filter our books by category and, for example, display only books related to the subject of “Medicine”:

Online Store with dhtmlxDataView - Filtering
Step 5 – Data Processing. How to Calculate the Order Price?
Below the list with selected books we need to place a container where the total price will appear:
Each time the list is changed (user adds or removes a book from the cart), the total price should be recalculated:
function total_count() {
var price = 0;
books_selected.data.each(function(book){
price +=book.quantity*book.price;
});
document.getElementById("total").innerHTML = price;
}
</script>
This function should be called when a book is selected/added or deleted (select_clicked and dec_quantity functions in Step 3).

Online Store with dhtmlxDataView - Total Price
Step 6 – Saving Data. How to Save the Order?
If you are still with me, we’re down to the last part of the tutorial – making an order. We’ll use a form to save an order:
<input type="hidden" id="order_list" name="order_list" value="" />
</form>
This form will be submitted when the Order button is clicked. We’ll place this button above selected books:
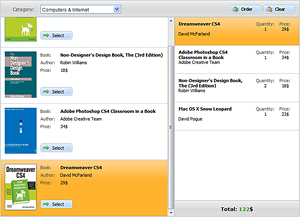
This is how our resulting interface looks:

Online Store with dhtmlxDataView - Final Result
When the Order button clicked, this function will place the selected books and their quantities in the hidden field and submit the form:
function order_selected() {
var ids = '';
books_selected.data.each( function(book){
ids.push(book.id + "=" + book.quantity);
})
document.getElementById('order_list').value = ids;
document.getElementById('books_order').submit();
}
</script>
And that’s all, at last :) I hope that this tutorial was clear and helpful, and now you have an idea how to create your own application interfaces with dhtmlxDataView. To those who read it to the end, thank you for your patience! :) To get a better understanding, you can view the demo, which demonstrates the interface we’ve built, or download the sources.
Posted by Alexandra Klenova