DHTMLX Suite includes 20+ UI widgets that help to develop full-featured web applications. For instance, you can create a comprehensive dashboard to visualize and monitor the performance of a ticketing system.
In this JavaScript dashboard tutorial, we’re going to describe how you can build and configure an interactive dashboard with the help of Suite UI widgets and Optimus micro-framework.
View and download UI dashboard demo >
Demo Overview
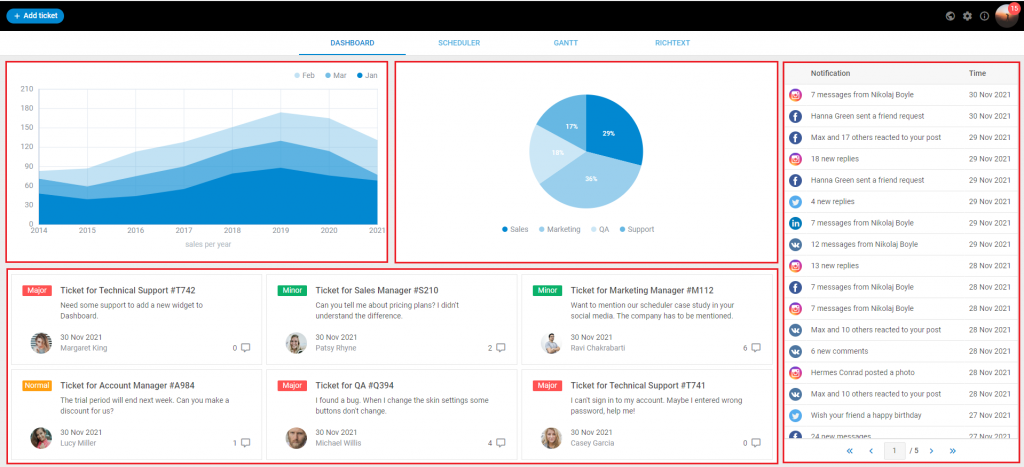
The UI dashboard by DHTMLX allows users to create a new ticket, assign it to different company departments, and monitor their performance. The demo was created using the following widgets:
- Grid to display a list of notifications received,
- Charts to track yearly sales and estimate the performance of sales, marketing, quality assurance, and technical support departments,
- Window to create a new ticket,
- DataView to visualize a list of open tickets,
- Pagination to simplify navigation in the data grid,
- Toolbar to provide navigation across the UI dashboard,
- Layout to attach and arrange all UI components.

Creating JavaScript UI Dashboard
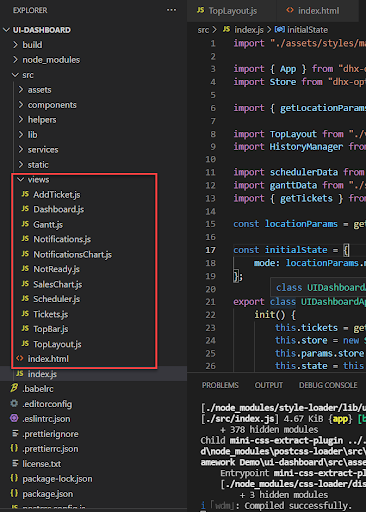
First of all, you have to download the dashboard demo and run it on your device. You may notice that DHTMLX widgets that build up the UI dashboard are divided into Views. You can initialize or configure each widget separately as well as remove it.
Let’s make an overview of the UI dashboard demo based on Optimus Framework.
We are to start with the index.html file. In the head part of the file, you can find suite.js and suite.css. We include DHTMLX Suite with all its components. Also, you can see app.js and app.css to configure webpack:
DHTMLX - UI Dashboard
...
<!-- Suite -->
<script src="./lib/suite/suite.js" type="text/javascript"></script>
<!-- App -->
<script src="./app.js" type="text/javascript"></script>
All these files are included in the demo pack. In the body part, we can see a container to render our demo:
The initialization of the app is made via the render() method:
const app = new uidashboard.UIDashboardApp(); app.render("#top_layout");
// ]]></script>
The next main file of the demo is index.js. It includes the UIDashboardApp class that renders our application. It is used in index.html to initialize the demo as we’ve described above:
init() {
this.tickets = getTickets();
this.store = new Store(initialState);
this.params.store = this.store;
this.state = this.store.getState();
this.subscribe();
dhx.scrollViewConfig.enable = true;
this.show("", TopLayout, {
tickets: this.tickets,
schedulerData,
ganttData
}); // TopLayout view
this.use(HistoryManager);
}
subscribe() {
this.on("modeChanged", (id) => {
this.state.mode = id || "dashboard";
});
this.on("addTicketClicked", (obj) => {
this.tickets.add(
{
title: obj.title,
text: obj.comment,
type: obj.type,
icon: "Avatar_01",
name: `${obj.name} ${obj.lastName}`,
comments: "0",
time: new Date().getTime(),
},
0
);
});
}
}
The UIDashboardApp class is inherited from all the classes included in the index.js file. The TopLayout class is the next important part of the UI dashboard demo:
import { App } from "dhx-optimus";
import Store from "dhx-optimus-store";
import { getLocationParams } from "./helpers/url";
import TopLayout from "./views/TopLayout"; // TopLayout view
import HistoryManager from "./components/HistoryManager";
import { getTickets } from "./services/dataService";
Summing up, index.html and index.js files are the base of the UI dashboard demo. You can learn more about working with these files as well as how to build apps with Optimus in the documentation.
The next component of the dashboard demo is a block of Views files. You can find all of them in the view folder. Each View is a ViewName.js file. Let’s start with the TopLayout.js view that “unites” the demo.
Here you can see how the TopLayout class is built and initiated. It includes Layout and Tabbar:
init() {
this.ui = new dhx.Layout(null, layoutConfig);
this.navigationBar = new dhx.Tabbar(this.ui.getCell("tabbar"), {
mode: "top",
tabAlign: "center",
tabWidth: 200,
noContent: true,
views: [
{ id: "dashboard", tab: "Dashboard" },
],
});
this.navigationBar.events.on("change", (id) => {
this.fire("modeChanged", [id]);
});
this.show(this.ui.getCell("top"), TopBar);
return this.ui;
}
ready() {
this.observe(
(state) => state.mode,
(mode) => {
const cell = this.navigationBar.getCell(this.app.state.mode);
if (cell) {
cell.show();
}
this.changeView(mode);
}
);
}
changeView(id) {
switch (id) {
case "dashboard":
this.show(this.ui.getCell("center"), Dashboard, {
tickets: this.params.tickets
});
break;
default:
this.show(this.ui.getCell("center"), NotReady);
break;
}
}
}
Then you can configure the Layout by dividing it into three cells:
rows: [
{
id: "top",
height: "content",
},
{
id: "tabbar",
height: "content",
},
{
css: "cell_center",
id: "center",
},
],
};
Here you may see an output:

The TopLayout class is inherited from the following:
import TopBar from "./TopBar";
import Dashboard from "./Dashboard"; // Dashboard demo
Now we are ready to overview Dashboard view which initializes the UI dashboard demo. Let’s open Dashboard.js file.
Here you can see the initialization of the Dashboard as well as the configuration of the Layout:
init() {
this.ui = new dhx.Layout(null, {
type: "space",
cols: [
{
type: "wide",
rows: [
{
height: "50%",
cols: [
{
id: "left-top",
},
{
id: "left-bottom",
},
],
},
{
id: "center",
},
],
},
{
id: "right",
width: "30%",
minWidth: 440,
maxWidth: 440,
},
],
});
this.show(this.ui.getCell("right"), Notifications);
this.show(this.ui.getCell("center"), Tickets, {
tickets: this.params.tickets
});
this.show(this.ui.getCell("left-top"), SalesChart);
this.show(this.ui.getCell("left-bottom"), NotificationsChart);
return this.ui;
}
}
Thus, we’ve divided the center cell of the Layout into 4 parts:
The Dashboard class is inherited from the following classes:
import Notifications from "./Notifications";
import Tickets from "./Tickets";
import SalesChart from "./SalesChart";
import NotificationsChart from "./NotificationsChart";
This is the way the DHTMLX UI dashboard demo was created. You’ll find that the structure of the views is quite the same. Each view will build the part of the dashboard demo and inherit from the bottom classes if it’s necessary. You can open the files of each view, explore their structure, and configure them according to your requirements.
Please note that DHTMLX Dashboard is not a ready-made application. It is a demo of the Suite UI library. This demo can be tested under the terms of the Evaluation license. To create a commercial app based on this demo, you need to purchase DHTMLX Suite.