There’s no limit to perfection. And no limit to our intentions of providing you with different possible ways of combining our components with your favorite development tools. For example, you can check this tutorial that describes how you can use our dhtmlxGantt along with the Laravel framework.
This time, we’ll go a little bit further and offer you to add a new skill to your knowledge baggage. Let us introduce to you this step-by-step tutorial that covers the using of dhtmlxGantt along with Ruby on Rails.
Creating a New Project
If you don’t have Ruby on Rails installed, you can follow this installation guide. Installation method may difer according to the operating system you use, but it shouldn’t take long. After you finish installing Rails, you’ll be able to create a new project.
To do so, type in your terminal:
Now, your first Ruby on Rails project is officially created. Before testing the application, let’s deal with creating a controller and routing.
Controllers and Routes
Controller’s primary task is to receive requests that users send to an application. To define which controller will receive a particular request, you use routing. Usually, applications have several routes and controllers. Different routes can be served by different actions. Actions collect the information that will be provided to a view.
Let’s create a new controller named home. Besides the controller, we’ll create a new action named index.
rails generate controller home index
The output should confirm that new files were created. Now, let’s config the routing. Open the file config/routes.rb and find the following line at the very beginning of this file:
Then, replace it with this code:
Now we can test our server. Run in your terminal:
Open in your browser http://localhost:3000/, and you’ll get this result:
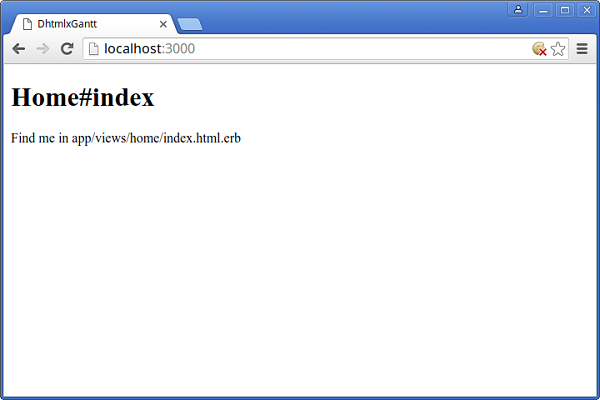
Doesn’t look so impressive at this step, but everything works fine which is a good sign.
Let’s proceed with the views.
Unpacking dhtmlxGantt and Creating the Views
A view’s work is to display the information that was previously collected by an action in a human readable format. Before creating a new view, we need to download the dhtmlxGantt package.
The vendor directory of your project contains third-party code. This is where we’ll unpack the dhtmlxGantt files. It will take two steps:
1. Unpack the file codebase/dhtmlxgantt.js and the directory codebase/ext from the package to the directory vendor/assets/javascripts/ of your project
2. Unpack the file codebase/dhtmlxgantt.css and the directory codebase/skins from the package to the directory vendor/assets/stylesheets/ of your project
Now, we should add this new files to the precompile array. Open the config/initializers/assets.rb file and add the following code:
Rails.application.config.assets.precompile += %w( dhtmlxgantt.js )
Let’s now create a view. If there’s no controller-specific layout, Rails will use the app/views/layouts/application.html.erb. This file is a template for all pages that have common elements. We’ll use it to include dhtmlxgantt.js and dhtmlxgantt.js to our project. Open this file and replace the existing code with the following:
<html>
<head>
<title>Gantt</title>
<%= stylesheet_link_tag 'application', media: 'all', 'data-turbolinks-track' => true %>
<%= stylesheet_link_tag 'dhtmlxgantt', media: 'all', 'data-turbolinks-track' => true %>
<%= javascript_include_tag 'application', 'data-turbolinks-track' => true %>
<%= javascript_include_tag 'dhtmlxgantt', 'data-turbolinks-track' => true %>
<%= csrf_meta_tags %>
</head>
<body>
<%= yield %>
</body>
</html>
Now we can define a view for the home controller that we have created earlier. Open the file app/views/home/index.html.erb and add the DIV container for the Gantt chart along with the code that initializes the chart:
<script>
gantt.init("gantt_here");
</script>
We can check the changes that we’ve made. If you’ve stopped the server you can run it again (rails server), and here’s what you’ll see in your browser:
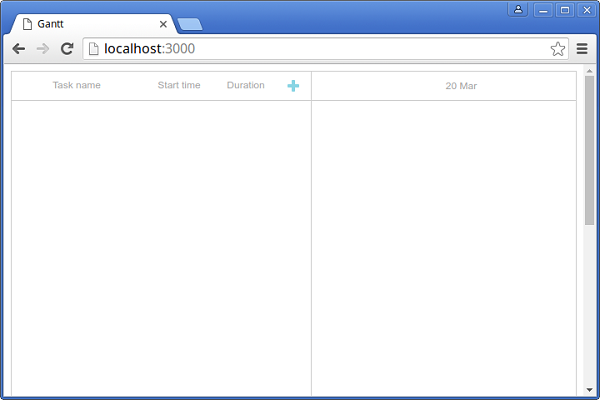
It’s already something. There’s a Gantt chart that allows you create and change new tasks. But at the moment, your application can’t save the changes. Let’s fix it.
Creating the Models
Our application requires two models: one for the tasks and one for the links between them.
Let’s create a model for the tasks first. Run in your terminal:
As you noticed an ordinary task consists of its name, start date, duration, etc.
Now we can create a second model. For the links this time:
And, finally, we can create a new database:
Optionally, you can add some tasks and links to your database. Open the Rails console:
And then, add the new tasks and links. For example:
Task.create :text=>"Task 2", :start_date=>"2015-10-27", :duration=>3;
Link.create :source=>1, :target=>2, :link_type=>"0";
When you finish, just type exit to close the Rails console.
Now we should add the code that allows us to save and load the data.
Creating Controllers to Work with the Data
Let’s create a new action for loading the data. Open the app/controllers/home_controller.rb file and add the following code that creates the data action:
tasks = Task.all
links = Link.all
render :json=>{
:data => tasks.map{|task|{
:id => task.id,
:text => task.text,
:start_date => task.start_date.to_formatted_s(:db),
:duration => task.duration,
:progress => task.progress,
:sortorder => task.sortorder,
:parent => task.parent
}},
:links => links.map{|link|{
:id => link.id,
:source => link.source,
:target => link.target,
:type => link.link_type
}}
}
end
Now we should create a new controller task:
And add new actions for adding, changing, and deleting the data. To do so, open the app/controllers/task_controller.rb and add:
def update
task = Task.find(params["id"])
task.text = params["text"]
task.start_date = params["start_date"]
task.duration = params["duration"]
task.progress = params["progress"]
task.sortorder = params["sortorder"]
task.parent = params["parent"]
task.save
render :json => {:status => "ok"}
end
def add
task = Task.create :text => params["text"], :start_date=> params["start_date"], :duration => params["duration"],
:progress => params["progress"], :sortorder => params["sortorder"], :parent => params["parent"]
render :json => {:tid => task.id}
end
def delete
Task.find(params["id"]).destroy
render :json => {:status => "ok"}
end
As you may have guessed, now it’s time to create the controller named link. Creating a new controller:
And don’t forget to add the code required for adding, changing, and deleting. Open the app/controllers/link_controller.rb file and add:
def update
link = Link.find(params["id"])
link.source = params["source"]
link.target = params["target"]
link.link_type = params["type"]
link.save
render :json => {:status => "ok"}
end
def add
link = Link.create :source => params["source"], :target => params["target"], :link_type => params["type"]
render :json => {:tid => link.id}
end
def delete
Link.find(params["id"]).destroy
render :json => {:status => "ok"}
end
Now we need to define the routes to our new controllers and actions. Open the config/routes.rb file and add:
post "home/data/task", :to => "task#add"
put "home/data/task/:id", :to => "task#update"
delete "home/data/task/:id", :to => "task#delete"
post "home/data/link", :to => "link#add"
put "home/data/link/:id", :to => "link#update"
delete "home/data/link/:id", :to => "link#delete"
We’re almost there. One more step. Open the app/views/home/index.html.erb file and add the code that initializes the chart, loads, and saves the data. Insert it between the <script></script> tags:
gantt.init("gantt_here");
gantt.load("<%= data_path %>");
var dp = new dataProcessor("<%= data_path %>");
dp.init(gantt);
dp.setTransactionMode("REST");
At least, we can check the final result. If you open your application in browser, you’ll see two tasks and a link between them. These are the tasks that we’ve created earlier.
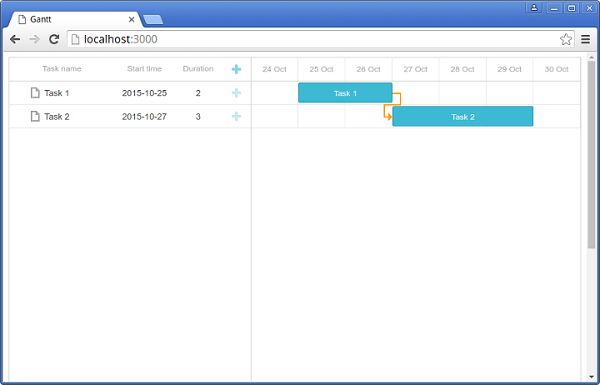
You can create new tasks and links and change them. The application will save the changes to the database.
Hopefully, this article will be useful to you. Here you can also learn how to use dhtmlxScheduler with Ruby on Rails. Do not forget to visit our blog from time to time. There will be more helpful tutorials for you.