In this tutorial we’d like to show you how to use our scheduling calendar, dhtmlxScheduler, with Ruby on Rails, a web application framework written in Ruby. The tutorial consists of two parts: firstly, we’ll create a simple scheduler with data saving and loading, the second part is adding recurring events to it. Let’s start.
Creating a scheduler
Step 1. The first thing we need to do is to create a new project. For this we need to run the next command:
Step 2. After that create a home controller:
Step 3. Open config/routes.rb and replace
with
When it’s done, check the server performance with the following command:
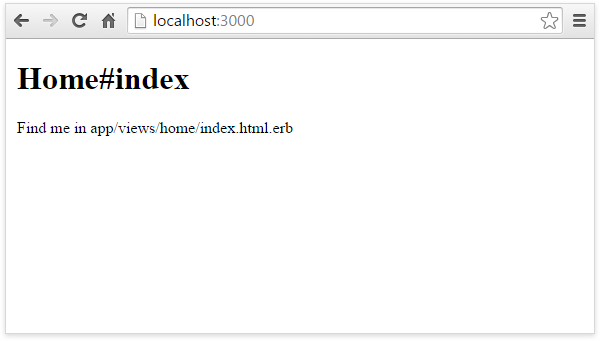
When you open http://localhost:3000/ in browser, you should get this page:
Step 4. Finished with these settings, we’ll proceed to Scheduler component. So, the next step is to download dhtmlxScheduler.
The following files unpack to vendor/assets/javascripts/:
codebase/dhtmlxscheduler.js
codebase/ext
codebase/locale
These files to vendor/assets/stylesheets/:
codebase/dhtmlxscheduler.css
codebase/dhtmlxscheduler_classic.css
codebase/dhtmlxscheduler_flat.css
codebase/dhtmlxscheduler_glossy.css
Then we need to create “assets” folder in the “public” directory and unpack the following files to it:
codebase/imgs
codebase/imgs_dhx_terrace
codebase/imgs_flat
codebase/imgs_glossy
Open config/initializers/assets.rb. We need to add the style sheet and dhtmlxscheduler.js file to the precompile array.
For this, add the next lines to this file:
Rails.application.config.assets.precompile += %w( dhtmlxscheduler.js )
Step 5. Open app/views/layouts/application.html.erb. This file is a template for all the pages that have common elements.
Here we include dhtmlxscheduler.js and dhtmlxscheduler.css
<html>
<head>
<title>Scheduler on Rails</title>
<%= stylesheet_link_tag 'application', media: 'all', 'data-turbolinks-track' => true %>
<%= stylesheet_link_tag 'dhtmlxscheduler', media: 'all', 'data-turbolinks-track' => true %>
<%= javascript_include_tag 'application', 'data-turbolinks-track' => true %>
<%= javascript_include_tag 'dhtmlxscheduler', 'data-turbolinks-track' => true %>
<%= csrf_meta_tags %>
</head>
<body>
<%= yield %>
</body>
</html>
Step 6. In this step we open app/views/home/index.html.erb, the file that is used for a view for our home controller. It will display the scheduler.
Now we add a container for scheduler, and then initialize our calendar:
<div class="dhx_cal_navline">
<div class="dhx_cal_prev_button"> </div>
<div class="dhx_cal_next_button"> </div>
<div class="dhx_cal_today_button"></div>
<div class="dhx_cal_date"></div>
<div class="dhx_cal_tab" name="day_tab" style="right:204px;"></div>
<div class="dhx_cal_tab" name="week_tab" style="right:140px;"></div>
<div class="dhx_cal_tab" name="month_tab" style="right:76px;"></div>
</div>
<div class="dhx_cal_header">
</div>
<div class="dhx_cal_data">
</div>
</div>
<script>
scheduler.init("scheduler_here");
</script>
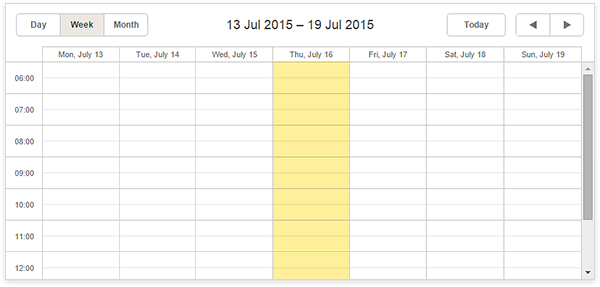
If we run the server now, we should get our scheduler.
Step 7. Well, dhtmlxSheduler is initialized and we may proceed to further settings. Let’s create a model for an event. For this, run the following command:
To create a database, run this:
Step 8. The database is created, but let’s check it and add a record. For this, run:
And add some sample record:
To display all the records, we need to run this command:
For exit we use “exit” command.
Step 9. Now we open config/routes.rb and add the route for data loading:
Step 10. Open app/controllers/home_controller.rb and add “data” action to the controller:
events = Event.all
render :json => events.map {|event| {
:id => event.id,
:start_date => event.start_date.to_formatted_s(:db),
:end_date => event.end_date.to_formatted_s(:db),
:text => event.text
}}
end
Step 11. In this step we open app/views/home/index.html.erb for adding data loading from the server. It’s important to set scheduler.config.xml_date for correct dates parsing.
<div class="dhx_cal_navline">
<div class="dhx_cal_prev_button"> </div>
<div class="dhx_cal_next_button"> </div>
<div class="dhx_cal_today_button"></div>
<div class="dhx_cal_date"></div>
<div class="dhx_cal_tab" name="day_tab" style="right:204px;"></div>
<div class="dhx_cal_tab" name="week_tab" style="right:140px;"></div>
<div class="dhx_cal_tab" name="month_tab" style="right:76px;"></div>
</div>
<div class="dhx_cal_header">
</div>
<div class="dhx_cal_data">
</div>
</div>
<script>
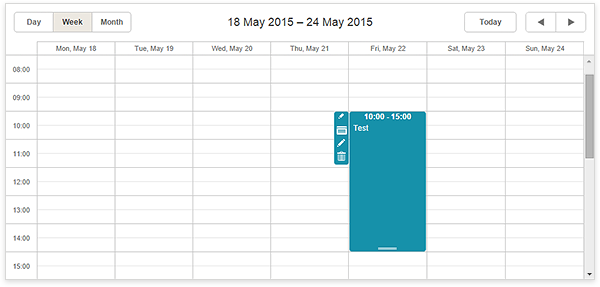
If everything is done correctly, the data loading should be successful.
Step 12. We continue with opening config/routes.rb for adding a route for data handling:
Step 13. Open app/controllers/home_controller.rb. Add “db_action” action to the controller:
mode = params["!nativeeditor_status"]
id = params["id"]
start_date = params["start_date"]
end_date = params["end_date"]
text = params["text"]
case mode
when "inserted"
event = Event.create :start_date => start_date, :end_date => end_date, :text => text
tid = event.id
when "deleted"
Event.find(id).destroy
tid = id
when "updated"
event = Event.find(id)
event.start_date = start_date
event.end_date = end_date
event.text = text
event.save
tid = id
end
render :json => {
:type => mode,
:sid => id,
:tid => tid,
}
end
Step 14. To save the changes in scheduler we need to use DataProcessor. Open app/views/home/index.html.erb.
Add dataProcessor:
dp.init(scheduler);
dp.setTransactionMode("GET", false);
As a result we should have:
<div class="dhx_cal_navline">
<div class="dhx_cal_prev_button"> </div>
<div class="dhx_cal_next_button"> </div>
<div class="dhx_cal_today_button"></div>
<div class="dhx_cal_date"></div>
<div class="dhx_cal_tab" name="day_tab" style="right:204px;"></div>
<div class="dhx_cal_tab" name="week_tab" style="right:140px;"></div>
<div class="dhx_cal_tab" name="month_tab" style="right:76px;"></div>
</div>
<div class="dhx_cal_header">
</div>
<div class="dhx_cal_data">
</div>
</div>
<script>
scheduler.config.xml_date="%Y-%m-%d %H:%i";
scheduler.init("scheduler_here");
scheduler.load("<%= data_path %>", "json");
var dp = new dataProcessor("<%= db_action_path %>");
dp.init(scheduler);
dp.setTransactionMode("GET", false);
</script>
But if you’d like to use POST requests for changing the data in the database, you need to specify Transaction Mode dataProcessor = POST. Moreover, you need to change the corresponding route to:
And you need to open app/controllers/application_controller.rb and set
instead of
Step 15. Finally we’re ready to check our results. So, run the server:
Well, this is everything you need to start using dhtmlxScheduler with Ruby on Rails. The second part of our tutorial that will show you how to set recurring events in dhtmlxScheduler with RoR will be released in a week. Stay tuned!