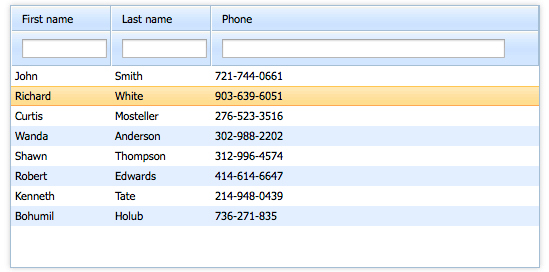
This is the update for the previous tutorial that explains how to use dhtmlxGrid with Ruby on Rails backend. We have rewritten this tutorial to be up to date with the latest RoR version. By following these step-by-step instructions, you will get an editable grid that loads its data from Ruby on Rails and saves back changes made by end-users online.
Download and check out the final demo to see how it is done or follow the instructions below.
Getting Started
To get started, create a new Ruby application that will include dhtmlxGrid. If you are using Linux, be sure to install Node.js, it is the mandatory dependency for Rails 4.x.
To begin with, run the command:
Then go to the created directory grid_on_rails and generate the controller “admin” by running the following command:
After running this command, Rails generates a set of files required for our application.
Now we need to change the line in the file config/routes.rb:
to:
Thus, we make the page “index” the main page of the app.
Let’s check if the page “index” is rendered. Before starting the server, delete the file public/index.html. It is necessary for displaying the needed page and not the home page that was automatically generated while creating the app.
To start the server, run the command:
Then open your browser and go to the page http://localhost:3000/. Here, you should see the following:
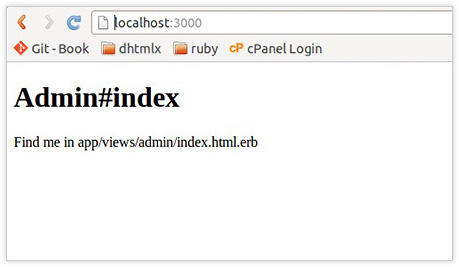
This is the result of rendering the file app/views/admin/index.html.erb.
Rendering Grid on a Page
The next step is to render the grid on the page we’ve created. First, download the dhtmlxGrid package (Standard Edition), unzip it, and copy the following files into the directory vendor/assets/javascripts/:
- dhtmlxGrid/codebase/dhtmlxcommon.js
- dhtmlxGrid/codebase/dhtmlxgrid.js
- dhtmlxGrid/codebase/dhtmlxgridcell.js
- dhtmlxDataProcessor/codebase/dhtmlxdataprocessor.js
- the directory “ext” from dhtmlxGrid/codebase/
To define the styles for the grid, copy the following files into the directory vendor/assets/stylesheets/:
- dhtmlxGrid/codebase/dhtmlxgrid_skins.css
- dhtmlxGrid/codebase/dhtmlxgrid.css
- the directory “skins” from dhtmlxGrid/codebase/
The directory vendor/assets is intended for placing third-party files, such as CSS, JavaScript files, and images.
In the directory “public”, create a directory with the name “assets” and copy the folder “imgs” from dhtmlxGrid/codebase/ into it.
Open the file app/views/layouts/application.html.erb and edit it to look like this:
<html>
<head>
<title>GridOfRails</title>
<%= stylesheet_link_tag "dhtmlxgrid", :media => "all" %>
<%= stylesheet_link_tag "skins/dhtmlxgrid_dhx_skyblue", :media=> "all" %>
<%= javascript_include_tag "dhtmlxcommon" %>
<%= javascript_include_tag "dhtmlxgrid" %>
<%= javascript_include_tag "dhtmlxgridcell" %>
<%= javascript_include_tag "dhtmlxdataprocessor" %>
<%= javascript_include_tag "ext/dhtmlxgrid_filter" %>
<%= csrf_meta_tags %>
</head>
<body>
<%= yield %>
</body>
</html>
This file is a template for all the pages of our app where common elements are placed.
The next step is to change the file app/views/admin/index.html.erb the following way:
<input type="button" value="Add" onclick="grid.addRow(grid.uid(),'new user')" />
<input type="button" value="Delete"
onclick="grid.deleteSelectedRows()" />
<script type="text/javascript" charset="UTF-8">
var grid = new dhtmlXGridObject("grid_here");
grid.setImagePath("assets/imgs/");
grid.setHeader("First name, Last name, Phone");
grid.attachHeader("#text_filter,#text_filter,#text_filter");
grid.setColSorting("str,str,str");
grid.setInitWidths("100,100,*");
grid.setSkin("dhx_skyblue");
grid.init();
</script>
Now, when you start the server and go to the page http://localhost:3000/, you should see an empty grid with the header:
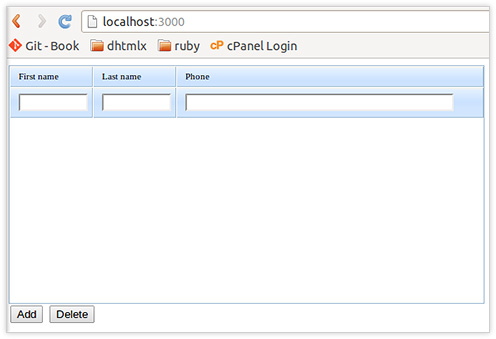
So, we’ve got a working app: on clicking the “Add” button, a new row will be added, and on selecting a row and clicking the “Delete” button, the row will be deleted.
However, our app works only on the client-side at the moment and all the changes will not be saved after the page reload. That’s why our next steps will be creating a database and synchronizing dhtmlxGrid with it.
Creating a Database
To create a database, do the following:
This command will generate a new migration file db/migrate/[…]_create_users.rb and a model file app/models/user.rb. The names of the database table fields and their types are specified in this command after the model’s name – “User”. Thus, the table will have three text fields: first_name, last_name, phone.
Although we’ve created the migration file and the model file, the DB itself isn’t created yet. To create it, run the command:
Now, as the DB is ready, and we can work with it, run the Rails console and add a record in the DB. For that, run the command:
and
Now, to check if there’s a record “John, Smit, 555-33-77” in the “users” table, run the command:
You will see the following text:
created_at: "2013-06-03 10:34:56", updated_at: "2013-06-03 10:34:56">]
This command will output the list of records stored in the DB table. To escape the console, run the command:
Loading Data in Grid
Let’s realize data loading into dhtmlxGrid. Do the following steps:
Open the file config/routes.rb and add into it the path through which dhtmlxGrid will request the list of records. Add the line:
Like this:
root :to => "admin#index"
match "admin/data", :to => "admin#data", :as => "data", :via => "get"
…
end
This line contains the following information:
- “admin/data” — url that the app will respond to
- :to => “admin#data” — specifies that by request to the above url, the action “data” from the controller “admin” will be performed
- :as => “data” — helpers “data_path” and “data_url” will be created; they return relative and absolute url, respectively
- :via => “get” – type of request
Open the file app/views/admin/index.html.erb and add the line:
Like this:
grid.setSkin("dhx_skyblue");
grid.init();
grid.load("<%= data_path %>", "json");
</script>
This line tells dhtmlxGrid the address to send the data to and informs that the data will be received in JSON format. Instead of “<%= data_path %>” the necessary url will be inserted.
Now create the action “data” in the “admin” controller. To do it, open the file app/controllers/admin_controller.rb and add the following code into it:
def index
end
def data
users = User.all
render :json => {
:total_count => users.length,
:pos => 0,
:rows => users.map do |user|
{
:id => user.id,
:data => [user.first_name, user.last_name, user.phone]
}
end
}
end
end
The action “data” will read the list of records and return it to the client in JSON format.
Let’s check, if everything works properly. Start the server and open the page http://localhost:3000/, you should see the following:
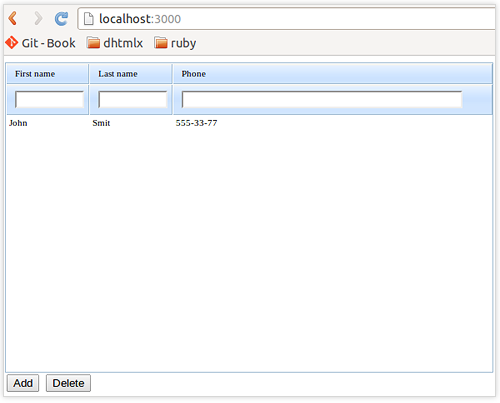
While loading the page, dhtmlxGrid renders the line “John, Smit, 555-33-77”. Now the app can only read data from DB. As for adding, deleting and editing the records in DB, these functions aren’t realized yet. Let’s add this functionality.
Adding, Deleting and Editing Records in DB
First, we define the URL where dhtmlxGrid will send queries to make changes in DB.
Open the file config/routes.rb and add the line:
Like this:
root :to => "admin#index"
match "admin/data", :to => "admin#data", :as => "data"
match "admin/db_action", :to => "admin#db_action", :as => "db_action", :via => "get"
...
end
Open the file app/views/admin/index.html.erb and add into it the line:
Like this:
grid.load("<%= data_path %>", "json");
dp = new dataProcessor("<%= db_action_path %>");
dp.init(grid);
</script>
The first line creates the object “dataProcessor” and assigns to the variable “dp” the link to this object. In place of “<%= db_action_path %>” there will be the URL through which dataProcessor will communicate with the server. In our case, it will be “admin/db_action”. The second line attaches dataProcessor to dxtmlxGrid.
Open the file app/controllers/admin_controller.rb and add the action “db_action” into it:
@mode = params["!nativeeditor_status"]
first_name = params["c0"]
last_name = params['c1']
phone = params['c2']
@id = params["gr_id"]
case @mode
when "inserted"
user = User.create :first_name => first_name, :last_name =>
last_name, :phone => phone
@tid = user.id
when "deleted"
User.find(@id).destroy
@tid = @id
when "updated"
user = User.find(@id)
user.first_name = first_name
user.last_name = last_name
user.phone = phone
user.save
@tid = @id
end
end
This action receives data from dataProcessor, processes them and returns the result of view processing “db_action”. This view doesn’t exist yet, you should create it now.
DataProcessor should receive a response from the server in XML format. Create the file app/views/admin/db_action.xml.erb with the following content:
<data>
<action type="<%= @mode %>" sid="<%= @id %>" tid="<%= @tid %>" />
</data>
All the variables in action, starting from “@”, are available during view processing.
Then start the server and go to the page http://localhost:3000/. You can now edit, add, and delete records in the grid. All the changes should automatically synchronize with DB.
Now we have finished our app. We have an editable Ruby on Rails grid that loads its data from the DB and saves all the changes while the end users edit, add, or delete records in the browser. You can download the final grid demo and see how it works.