We continue disclosing the interoperability potential of DHTMLX products in real-case scenarios. After showing you how to connect our Scheduler component with the JavaScript List control in the previous article, we are excited to share how to empower our Gantt library with the Calendar widget.
In project management, rational time usage plays a critical role. When working with a large number of tasks in a Gantt chart, it will certainly be necessary to spare time for specifying their duration. Therefore, it can be a good idea to complement it with calendar functionality for more convenient time management. Instead of using some third-party tools, you can rely on the time-proven DHTMLX Calendar.
In this blog post, you will learn three scenarios of using the JavaScript calendar widget from the Suite UI library with DHTMLX Gantt.
Calendar in Gantt Inline Editor for Start Date
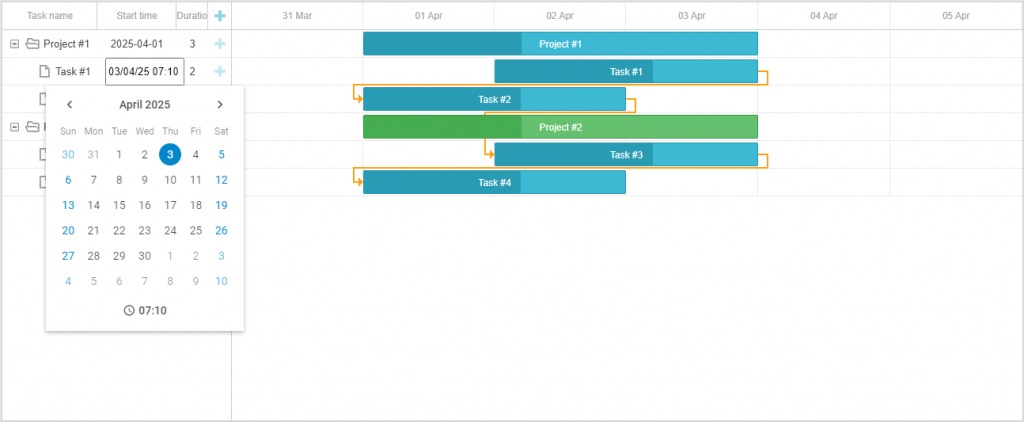
We start with the case of adding a JavaScript calendar to the inline editor in the Gantt grid. The inline editor comes with multiple predefined types of editors. If you need something special such as a calendar to quickly set up a start date and time for tasks, it is necessary to create a custom inline editor.
So let us describe how to do that in more detail.
The first step is to create HTML elements in the show() method. These elements will be displayed when opening your custom editor.
show: function (id, column, config, placeholder) {
const html = `<div class='dhx_calendar_container'>
<input type="text" id="calendar" readonly data-widget-control style="margin-left: 10px;">
</div>`;
placeholder.innerHTML = html;
},
The Calendar widget should be added to the set_value() method.
At the beginning of the function, you get the task object:
const task = gantt.getTask(id)
After that, you need to create a new calendar object:
In the first parameter, you specify the container in which the calendar should appear. You should use null to create a new calendar object but not add it to the page. The second parameter is an object with the calendar configuration.
The value parameter shows the date that will be highlighted when the calendar is opened.
Next goes the date format:
If you want to be able to set not only a date but also a time in the calendar, you can do it by adding the timePicker parameter (set its value to true).
The CSS parameter specifies the names of the classes that the calendar will receive.
This section of our documentation gives the list of CSS classes that will be added when using particular class names.
Then you create the popup object and add a calendar there.
popup.attach(calendar);
After that, you have to find an input element and add the date value you get from the calendar to this element.
dateInput.value = calendar.getValue();
As a result, after clicking on this element, the popup will be displayed with the calendar inside.
popup.show(dateInput);
});
When selecting a date or time in the calendar, the value in the input element will be updated as well.
dateInput.value = calendar.getValue();
// uncomment to hide the popup with calendar after changing the date
// popup.hide();
});
In the current case, users can select a date and then modify it by selecting another one or setting the time while the Calendar popup remains displayed. To save the entered values, you need to click on an empty space in the Gantt chart. As a result, the inline editor will close, and the values will be saved.
If you uncomment the line with the popup.hide() method in the sample, the popup with the calendar will be hidden immediately after the date or time is changed, but the inline editor itself will remain open. To apply the changes, you also need to click on an empty space in the Gantt chart.
In the get_value() method, you get the date value from the input element, convert this value from a string to a date object, and then specify a new date for the task.
const newValue = node.querySelector("input").value;
const dateValue = gantt.date.str_to_date("%d-%m-%y %H:%i")(newValue)
return dateValue;
},
In the is_changed() method, you check whether the current date is different from the one displayed when opening the inline editor.
return +value != +this.get_value(id, column, node);
},
These are the key technical peculiarities that must be taken into account when adding the Suite’s Calendar to the Gantt inline editor.
Two Calendars in Gantt Task Lightbox for Start and End Dates
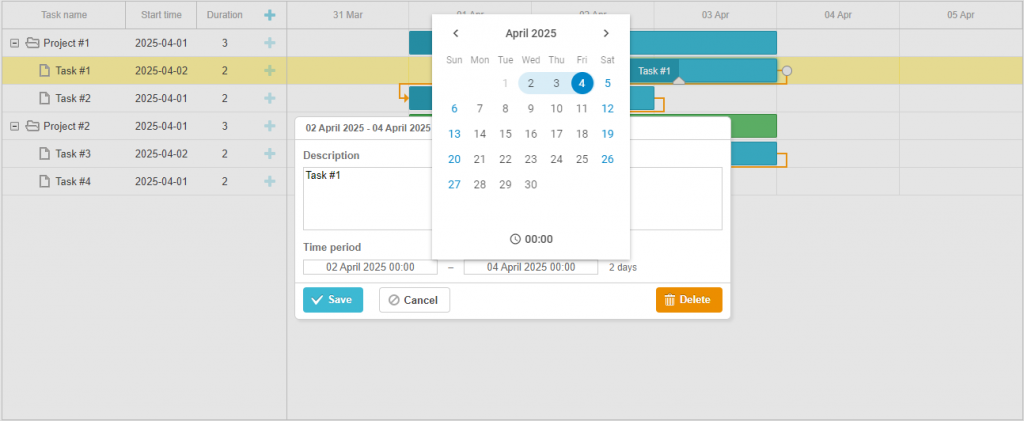
The second scenario will give you an idea of how to enrich the capabilities of the lightbox in tasks with two calendars for start_date and end_date parameters.
In the lightbox, you can set start and end dates for a given task. Therefore, you can display two interconnected calendars, one will be tied to the start date, and the other to the end date.
Standard lightbox sections won’t suit this purpose, so you need to create a custom lightbox section.
Start with the render() method, where you should add HTML elements for displaying two calendars with the task duration. The function is called when the lightbox is opened.
return `<div class='dhx_calendar_cont'>
<input type="text" id="startDateCalendar" readonly data-widget-control style="margin-left: 10px;">
–
<input type="text" id="endDateCalendar" readonly data-widget-control style="margin-left: 10px;">
<label id='duration'></label>
</div>`;
},
In set_value, you add calendars to the containers prepared for them.
First, you create a new calendar object for a start date. We explained the purpose of such parameters above, so we won’t dwell on this question and move on.
After that, you create a new popup object and add the startDate calendar there.
startDatePopup.attach(startDateCalendar);
The subsequent algorithm of actions is similar to the scenario with the inline editor. You need to specify the date value for the input element. When clicking on the element, the popup menu with the calendar should be shown.
startDateInput.value = startDateCalendar.getValue();
startDateInput.addEventListener("click", function () {
startDatePopup.show(startDateInput);
});
When the date or time in the calendar changes, you update the date value of the input element using the updateDuration() method.
startDateInput.value = startDateCalendar.getValue();
updateDuration()
});
You also have to call a function that calculates a new task duration depending on the values of the start_date and end_date input elements. When the value is calculated, you update the value of the duration element. If the duration value is greater than 1, you need to add the “s” postfix to show that the task duration takes several days.
const startDate = strToDate(startDateCalendar.getValue());
const endDate = strToDate(endDateCalendar.getValue());
const duration = gantt.calculateDuration({ start_date: startDate, end_date: endDate, task });
const durationEl = node.querySelector("#duration");
let postfix = " day";
if (duration > 1) {
postfix += "s"
}
durationEl.innerHTML = duration + postfix;
}
The calendar for end_date is added in the same way, only with different variable names.
const endDatePopup = new dhx.Popup();
endDatePopup.attach(endDateCalendar);
const endDateInput = node.querySelector("#endDateCalendar");
endDateInput.value = endDateCalendar.getValue();
endDateInput.addEventListener("click", function () {
endDatePopup.show(endDateInput);
});
endDateCalendar.events.on("change", function () {
endDateInput.value = endDateCalendar.getValue();
// uncomment to hide the popup with calendar after changing the date
// endDatePopup.hide();
updateDuration()
});
Now it is time to connect calendars. One fundamental condition here is that the date of the first calendar (start_date calendar) cannot be greater than the date of the second calendar (end_date calendar). So, if you have to postpone a particular task to a later date, first, you’ll have to change its end date. If calendars are not linked to each other, then it will be possible to set incorrect dates for tasks and they won’t be displayed in the timeline.
The get_value() method is called when data is saved in the lightbox. In this method, you update task dates depending on the values of the input elements.
const startDateInput = node.querySelector("#startDateCalendar");
const endDateInput = node.querySelector("#endDateCalendar");
task.start_date = strToDate(startDateInput.value);
task.end_date = strToDate(endDateInput.value);
return task;
},
That’s pretty much all you should know to successfully expand the lightbox functionality with DHTMLX Calendar.
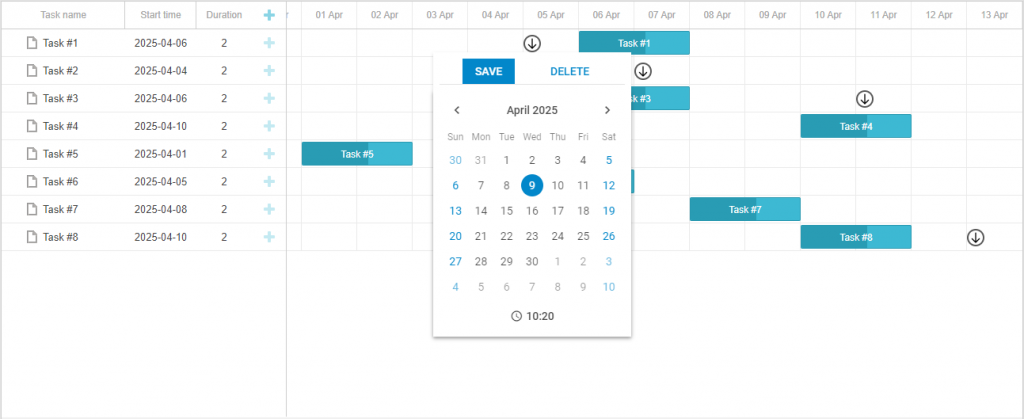
Calendar in Popup Menu for Editing Deadlines
 Check the code snippet >
And finally, we want to share with you how the Calendar widget from the Suite library can be used for demonstrating task deadlines in the Gantt timeline.
This customization looks quite unusual, so let us clarify how it should work in practice. After the double click on the deadline element in the timeline, it will be possible to change the deadline date or remove it. If a given task has no deadline and end-users want to add this parameter, all they have to do is to double-click on the needed task row in the timeline and add a deadline.
Now, we can proceed to the implementation stage of this customization.
In this scenario, deadlines are drawn using an additional layer. A custom element is complemented with an attribute, where the task ID should be specified.
gantt.addTaskLayer(function drawPlanned(task) {
if (task.deadline) {
const sizes = gantt.getTaskPosition(task, task.deadline, task.deadline);
const el = document.createElement('div');
el.className = 'deadline';
el.setAttribute("data-taskId", task.id);
el.style.left = sizes.left + 'px';
el.style.top = sizes.top + 7 + 'px';
return el;
}
return false;
});
});
An event handler for the double mouse click is added the following way:
Using this handler, you check if there is already an open dialog window for editing the deadline date. If so, it is necessary to terminate the function using the return statement.
return
}
The next thing you should do is to get the DOM element of the deadline or the task row in the timeline.
const taskRowNode = e.target.closest(".gantt_task_row");
const targetNode = deadlineNode || taskRowNode;
The DOM element’s attributes help you get the task ID, which will be used in the getTask() method to get the task object.
const task = gantt.getTask(taskId);
If, after a double-click on the cell in the timeline, it already has the deadline, then this operation is most likely aimed not at changing the deadline date but at something else. Therefore, in this case, you should terminate the function with the return statement.
return
}
Then you have to set the deadline date for a task. Take it from the corresponding deadline property of the task. If the task does not have a deadline, you need to take the date from the click in the timeline. To do this, make use of the getRelativeEventPosition() method. The first argument of this method will be the click event itself (`e`), and the second argument will be the DOM element of the timeline. The method will return the click position in the timeline. Next, you use the dateFromPos() method to get the date from the click position.
if (task.deadline){
deadlineDate = new Date(task.deadline);
}
else {
const clickPos = gantt.utils.dom.getRelativeEventPosition(e, gantt.$task_data);
deadlineDate = gantt.dateFromPos(clickPos.x);
}
The following step is to create a popup instance and add HTML content to it. There will be buttons for saving changes, deleting a deadline, and the calendar itself for selecting a date and time.
css: "deadline_editor dhx_widget--bordered"
});
popup.attachHTML("<div id='form_container'></div><div id='calendar_container'></div>");
After that, the calendar is shown under the clicked element.
The calendar can be added to the popup only after it is redrawn. Therefore, you need to put the following code inside the function, which will be actuated after the popup redrawing:
// code
});
When the popup is redrawn, you need to add a new calendar instance. In this case, you specify the ID of the container, where the Calendar should be initialized.
value: deadlineDate,
dateFormat: gantt.config.date_format,
timePicker: true,
css: "dhx_widget--bordered"
});
The next move is to add an event handler that will fire when a date or time is selected in the calendar and add the selected date to the deadlineDate variable.
deadlineDate = date;
});
Now it is time to create a form, in which you can show two buttons. In the CSS property, you specify dhx_widget–border_bottom to render the frame under the buttons and visually separate the form with buttons from the calendar. In the align parameter, you set the alignment on the width of the page.
rows: [
{
css: "dhx_widget--border_bottom",
align: "evenly",
cols: [
{ name: "save", view: "flat", text: "Save", type: "button", },
{ name: "delete", view: "link", text: "Delete", type: "button", },
]
},
]
});
And lastly, you have to add event handlers to the form. These handlers will fire when the buttons get clicked on. In one of the event handlers you specify the deadline value to the task, while in the other one, you should remove the deadline property. After that, update the task and hide the popup.
task.deadline = deadlineDate;
gantt.updateTask(task.id);
popup.hide();
});
form.getItem("delete").events.on("click", function (events) {
if (task.deadline) {
delete task.deadline;
gantt.updateTask(task.id);
}
popup.hide();
});
That’s how you can implement task deadlines in the Gantt timeline using the calendar widget from the Suite library.
Conclusion
With the instructions provided in the guides above, you get three options for effective usage of the Suite’s calendar widget in project management apps based on DHTMLX Gantt. You have an opportunity to try these options in your app by downloading free 30-day trial versions of both products. Stay tuned for more tutorials dedicated to the customization of DHTMLX libraries in the future.
Related Materials:
- Calendar in Gantt inline editor for start date (sample)
- Two calendars in Gantt task lightbox for start and end dates (sample)
- Calendar in popup menu for editing deadlines
- How to connect DHTMLX Scheduler with Suite’s List control
- How to integrate DHTMLX Suite widgets into Scheduler’s lightbox
- Free 30-day trial versions