If you face the necessity to include a slider control into your app or website and want to customize it to meet your design requirements, then this article for you – here you will learn how to create new skins for the simple JavaScript slider control, dhtmlxSlider.
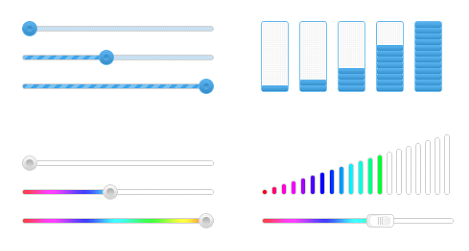
As a basis, we take a standard slider bar from the dhtmlxSuite package.
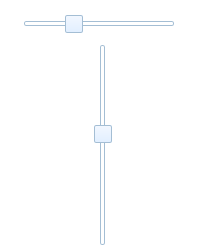
To create a new design, we need two slider elements – runner and track. These elements can be both a div and an image (depends on the complexity of the required view). Remember of the image for a vertical slider, if you need it. We’ll describe both horizontal and vertical sliders.
Initially, the following styles are responsible for the runner and track:
.dhtmlxslider_dhx_skyblue .dhxsl_cont_vr .dhxsl_track { } – // for a horizontal track
.dhtmlxslider_dhx_skyblue .dhxsl_cont_hr .dhxsl_track { } – // for a vertical track
.dhtmlxslider_dhx_skyblue .dhxsl_track { } – // the common style in case of using images
We need to modify them to achieve the needed result.
With images:
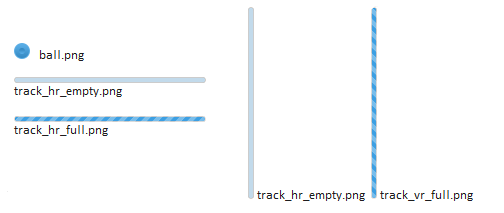
background-image: url(newSkin/ball.png);
border: none !important;
}
.dhtmlxslider_dhx_skyblue .dhxsl_cont_vr .dhxsl_track {
width: 6px;
background-image: url(newSkin/track_vr_empty.png);
border: none !important;
}
.dhtmlxslider_dhx_skyblue .dhxsl_cont_hr .dhxsl_track {
height: 6px;
background-image: url(newSkin/track_hr_empty.png);
border: none !important;
}
Color styles:
background-color: #E6F7D1;
background-image: none !important;
border: 1px solid #2A3A15;
border-radius: 2px;
width: 18px;
height: 18px;
}
.dhtmlxslider_dhx_skyblue .dhxsl_cont_vr .dhxsl_track {
width: 18px;
background: linear-gradient(to bottom, #fefcea, #8FAE68);
border: 1px solid #77A63B;
}
.dhtmlxslider_dhx_skyblue .dhxsl_cont_hr .dhxsl_track {
height: 18px;
background: linear-gradient(to left, #fefcea, #8FAE68);
border: 1px solid #77A63B;
}
The next step is to create a folder for a new skin, we call it “newSkin”, and then use the following names for the images:
1) horizontal (mySlider1)
parent: "sliderObj1",
size: 150,
value: 5,
step: 1,
min: 0,
max: 150
});
2) vertical (mySlider2)
parent: "sliderObj2",
size: 200,
value: 15,
step: 5,
min: 10,
max: 90,
vertical: true
});
To calculate how to fill the track, we need the following values:
– Max slider value:
max2 = mySlider2.getMax();
– Slider containers:
var sliderDiv2 = document.getElementsByClassName("dhxsl_track")[1];
– Length of the horizontal slider and height of the vertical sliders on the client side:
var sliderHeight = sliderDiv2.clientHeight;
The position of the runner that was initially set should be considered for color/image filling at the initialization stage. Since this function is called just once (at init), we call it “colorize”. It has two properties – the values of mySlider1 и mySlider2.
Colorize() fucntion for two sliders will look like this:
With images:
sliderInnerDiv1.style.width = Math.max(Math.round(value1*sliderWidth/max1)+5, 0) + "px";
sliderInnerDiv1.style.height = "6px";
sliderInnerDiv1.style.backgroundImage = "url(newSkin/track_hr_full.png)";
sliderDiv1.appendChild(sliderInnerDiv1);
sliderInnerDiv2 = document.createElement("div");
sliderInnerDiv2.style.height = Math.max(Math.round(value2*sliderHeight/max2)-5, 0) + "px";
sliderInnerDiv2.style.width = "6px";
sliderInnerDiv2.style.position = "absolute";
sliderInnerDiv2.style.bottom = 0;
sliderInnerDiv2.style.backgroundImage = "url(newSkin/track_vr_full.png)";
sliderDiv2.appendChild(sliderInnerDiv2);
Color styles:
sliderInnerDiv1.style.width = Math.max(Math.round(value1*sliderWidth/max1)+5, 0) + "px";
sliderInnerDiv1.style.height = "20px";
sliderInnerDiv1.style.backgroundColor = "#8FAE68";
sliderDiv1.appendChild(sliderInnerDiv1);
sliderInnerDiv2 = document.createElement("div");
sliderInnerDiv2.style.height = Math.max(Math.round(value2*sliderHeight/max2)-5, 0) + "px";
sliderInnerDiv2.style.width = "18px";
sliderInnerDiv2.style.position = "absolute";
sliderInnerDiv2.style.bottom = 0;
sliderInnerDiv2.style.backgroundColor = "#8FAE68";
sliderDiv2.appendChild(sliderInnerDiv2);
When we change the position of the slider runner or if it stops moving, we need to recount the length (height) of the color/image. We call this function “reColorize”. It includes the following properties:
slider – the object of the slider that is used at the moment
value – a new set value of the slider that is used at the moment
width – the length of the horizontal slider //isn’t necessary if we don’t use this slider
height – the height of the vertical slider //isn’t necessary if we don’t use this slider
if (slider == mySlider1) {
sliderInnerDiv1.style.width = width;
}
if (slider == mySlider2) {
sliderInnerDiv2.style.height = height;
}
}
reColorize function will be called in the “onChange” and “onSlideEnd” events.
With images:
newWidth = Math.max(Math.max(value*sliderWidth/max1)+5, 0) + "px";
reColorize(this, value, newWidth, newHeight)
});
mySlider1.attachEvent("onChange", function(value){
newWidth = Math.max(Math.round(value*sliderWidth/max1)+5, 0) + "px";
reColorize(this, value, newWidth, newHeight)
});
mySlider2.attachEvent("onSlideEnd", function(value){
newHeight = Math.max(Math.round(value*sliderHeight/max2)-5, 0) + "px";
reColorize(this, value, newWidth, newHeight);
});
mySlider2.attachEvent("onChange", function(value){
newHeight = Math.max(Math.round(value*sliderHeight/max2)-5, 0) + "px";
reColorize(this, value, newWidth, newHeight)
});
Color styles:
newWidth = Math.max(Math.round(value*sliderWidth/max1)+5, 0) + "px";
reColorize(this, value, newWidth, newHeight)
});
mySlider1.attachEvent("onChange", function(value){
newWidth = Math.max(Math.round(value*sliderWidth/max1)+5, 0) + "px";
reColorize(this, value, newWidth, newHeight)
});
mySlider2.attachEvent("onSlideEnd", function(value){
newHeight = Math.max(Math.round(value*sliderHeight/max2)-5, 0) + "px";
reColorize(this, value, newWidth, newHeight);
});
mySlider2.attachEvent("onChange", function(value){
newHeight = Math.max(Math.round(value*sliderHeight/max2)-5, 0) + "px";
reColorize(this, value, newWidth, newHeight)
});
As a result, we have nice-looking custom sliders. Drag the runner, try the live demo below!
So, that’s all. Hope this article was useful for you. Feel free to leave your comments below.