In this tutorial we’ll show how js Gantt chart can be added into Node.js app. Unlike our previous tutorial, this time we’ll connect Gantt to the REST API for performing CRUD operations on the backend. As a result, you’ll see that this approach will provide a much cleaner and simpler code compared to what we did before.
As a data storage we’ll use MySQL, the same as we did last time. Let’s begin.
A ready sample of the described integration is available on GitHub. To learn how it works, continue reading the tutorial.
Besides, watch a brand new video tutorial on integrating Gantt with Node.js, where you’ll learn how to create a basic Gantt chart, populate it with data and send changes made by users back to the backend >
Initializing the project
1. Create a project folder, for this tutorial we’ll name it “gantt-node-mysql”. Then we’ll add the required dependencies and create the main executable which we’ll call “server.js”.
Dependencies are pretty basic: we’ll need express and body-parser modules, MySQL adapter for the database access and a small module named “date-format-lite” which we’ll use to convert dates of Gantt entries into the format compatible with the client-side Gantt API.
Create a project folder:
cd gantt-node-mysql
Then create a package.json file, we’ll use it to specify dependencies:
It should walk you through the process of creating a package file.
When it is done, you’ll need to open package.json and add the required dependencies into it. As a result, you should get something like this:
"name": "gantt-node-mysql",
"version": "1.0.0",
"description": "",
"main": "server.js",
"dependencies": {
"body-parser": "^1.15.0",
"date-format-lite": "^0.7.4",
"express": "^4.13.4",
"mysql": "^2.10.2"
},
"devDependencies": {},
"scripts": {
"test": "echo \"Error: no test specified\" && exit 1",
"start": "node server.js"
},
"keywords": [],
"author": "",
"license": "MIT"
}
Install project dependencies with the following command:
And create an empty code file named “server.js”, we’ll return to it later.
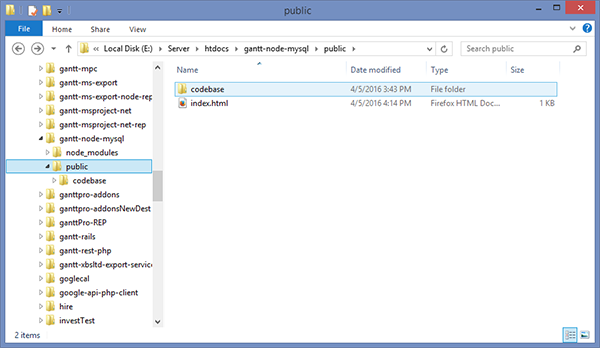
2. Create a folder named “public”. Here we’ll put dhtmlxGantt codebase and the main page of our app. Name it “index.html”, the content may look as follows:
<head>
<meta http-equiv="Content-type" content="text/html; charset=utf-8">
</head>
<script src="./codebase/sources/dhtmlxgantt.js" type="text/javascript" charset="utf-8"></script>
<link rel="stylesheet" href="./codebase/dhtmlxgantt.css" type="text/css" charset="utf-8">
<style type="text/css">
html, body{ height:100%; padding:0px; margin:0px; overflow: hidden;}
</style>
<body>
<div id="gantt_here" style='width:100%; height:100%;'></div>
<script type="text/javascript">
gantt.config.xml_date = "%Y-%m-%d %H:%i:%s";
gantt.init("gantt_here");
gantt.load("/data");
var dp = new gantt.dataProcessor("/data");
dp.init(gantt);
dp.setTransactionMode("REST");
</script>
</body>
Here we create a simple page layout, add the required js and css files from gantt codebase and add the code that initializes a gantt with a dataProcessor. We’ve specified “/data” url as a datasource and the entry point for dataProcessor requests, we’ll explain it a bit later. Note that data processor is initialized in the REST mode.
At this step you’ll have the following folder structure:
3. The next step is to prepare a database. We create tables as shown here.
4. Then open server.js and add the following code into it:
var bodyParser = require('body-parser');
var path = require('path');
require("date-format-lite");
var port = 1337;
var app = express();
var mysql = require('mysql');
var db = mysql.createConnection({
host : 'localhost',
user : 'sampleUser',
password : 'samplePassword',
database : 'sampleGanttBase'
});
app.use(express.static(path.join(__dirname, "public")));
app.use(bodyParser.urlencoded({ extended: true }));
app.listen(port, function(){
console.log("Server is running on port "+port+"...");
});
So, here we’ve opened MySql connection to our database (we’ll need it later, for now just make sure you’ve specified actual connection parameters), specified the “public” folder as the root dir for an app and attached the app to 1337 port of the localhost.
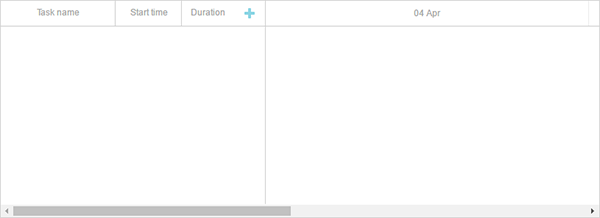
We’ll implement actual database loading and saving later, but now we can run the app and make sure everything goes as expected so far. Go to the project folder and run the following line from the command line:
Now open http://127.0.0.1:1337 in a browser. You should see a page with an empty gantt like the one shown here:
Loading tasks into the chart
For starters, let’s add some test data into the gantt_tasks table. You can use the following sql:
INSERT INTO `gantt_tasks` VALUES ('2', 'Task #1', '2013-04-06 00:00:00', '4', '0.5', '10', '1');
INSERT INTO `gantt_tasks` VALUES ('3', 'Task #2', '2013-04-05 00:00:00', '6', '0.7', '20', '1');
INSERT INTO `gantt_tasks` VALUES ('4', 'Task #3', '2013-04-07 00:00:00', '2', '0', '30', '1');
INSERT INTO `gantt_tasks` VALUES ('5', 'Task #1.1', '2013-04-05 00:00:00', '5', '0.34', '10', '2');
INSERT INTO `gantt_tasks` VALUES ('6', 'Task #1.2', '2013-04-11 13:22:17', '4', '0.491477', '20', '2');
INSERT INTO `gantt_tasks` VALUES ('7', 'Task #2.1', '2013-04-07 00:00:00', '5', '0.2', '10', '3');
INSERT INTO `gantt_tasks` VALUES ('8', 'Task #2.2', '2013-04-06 00:00:00', '4', '0.9', '20', '3');
Now, let’s enable data loading. As you might remember, when we initialized gantt in index.html we added the following line:
It will send an ajax request to the specified url, expecting to get a JSON response with gantt data (here are the format details).
And now we’ll add a server route for this url which will generate an appropriate response.
Open server.js and add the following code:
db.query("SELECT * FROM gantt_tasks", function(err, rows){
if (err) console.log(err);
db.query("SELECT * FROM gantt_links", function(err, links){
if (err) console.log(err);
for (var i = 0; i < rows.length; i++){
rows[i].start_date = rows[i].start_date.format("YYYY-MM-DD");
rows[i].open = true;
}
res.send({ data:rows, collections: { links : links } });
});
});
});
In the above code we read task and links from db tables (note that links table is empty at this step, since we haven’t added any data), format dates so the client side could parse them and specify the “open” property to ensure that tasks tree will be initially expanded.
After that we’ll send the collected data to http response.
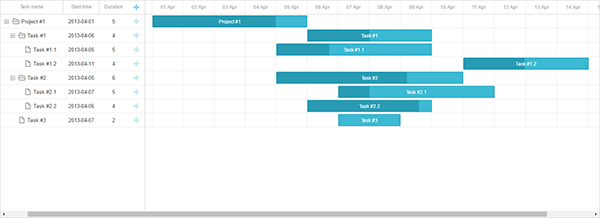
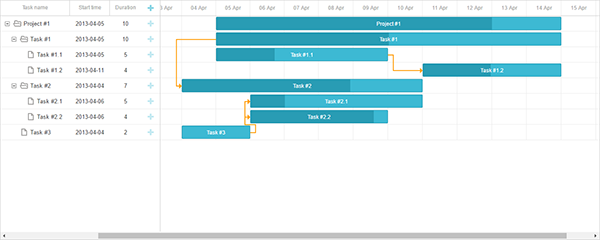
If we run the application now and open http://127.0.0.1:1337 we should see that the test data we’ve previously added to the database is loaded into gantt:
Saving changes
The following code from index.html is responsible for sending updates that happen on the client side back to the server:
dp.init(gantt);
dp.setTransactionMode("REST");
Each time the user adds, modifies or deletes something from the chart, dataprocessor will send an ajax request containing all the data required to save changes into the database.
We’ve initialized it in the REST mode, which means it will use different HTTP verbs for each type of operation, here you can find route schema.
Now we’ll add the required routes and handlers that will put the changes into the database. Open server.js and add the following code:
var task = getTask(req.body);
db.query("INSERT INTO gantt_tasks(text, start_date, duration, progress, parent) VALUES (?,?,?,?,?)",
[task.text, task.start_date, task.duration, task.progress, task.parent],
function(err, result){
sendResponse(res, "inserted", result ?result.insertId:null, err);
});
});
app.put("/data/task/:id", function(req, res){
var sid = req.params.id,
task = getTask(req.body);
db.query("UPDATE gantt_tasks SET text = ?, start_date = ?, duration = ?, progress = ?, parent = ? WHERE id = ?",
[task.text, task.start_date, task.duration, task.progress, task.parent, sid],
function(err, result){
sendResponse(res, "updated", null, err);
});
});
app.delete("/data/task/:id", function(req, res){
var sid = req.params.id;
db.query("DELETE FROM gantt_tasks WHERE id = ?", [sid],
function(err, result){
sendResponse(res, "deleted", null, err);
});
});
app.post("/data/link", function(req, res){
var link = getLink(req.body);
db.query("INSERT INTO gantt_links(source, target, type) VALUES (?,?,?)",
[link.source, link.target, link.type],
function(err, result){
sendResponse(res, "inserted", result ?result.insertId:null, err);
});
});
app.put("/data/link/:id", function(req, res){
var sid = req.params.id,
link = getLink(req.body);
db.query("UPDATE gantt_links SET source = ?, target = ?, type = ? WHERE id = ?",
[link.source, link.target, link.type, sid],
function(err, result){
sendResponse(res, "updated", null, err);
});
});
app.delete("/data/link/:id", function(req,res){
var sid = req.params.id;
db.query("DELETE FROM gantt_links WHERE id = ?", [sid],
function(err, result){
sendResponse(res, "deleted", null, err);
});
});
function getTask(data){
return {
text: data.text,
start_date: data.start_date.date("YYYY-MM-DD"),
duration: data.duration,
progress: data.progress || 0,
parent: data.parent
};
}
function getLink(data){
return {
source: data.source,
target: data.target,
type: data.type
};
}
function sendResponse(res, action, tid, error){
if(error) {
console.log(error);
action = "error";
}
var result = {
action: action
};
if(tid !== undefined && tid !== null)
result.tid = tid;
res.send(result);
}
Since gantt operates with two kinds of entities – tasks and links – we need two sets of routes, one for each entity. Requests that contain operations performed with tasks will come to the “/data/task” url, and the ones related to links will go to “/data/link”.
POST request means that a new item needs to be inserted into db, PUT updates an existing record and DELETE goes for deleting.
All actions return a json response containing the type of the performed operation or “error” if something went wrong. Note that a response for the insert action also contains a database id of the new record. It will be applied on the client side, so the new item could be mapped to the database entity.
If we run the application now and open http://127.0.0.1:1337, we should have a fully operational gantt chart:
We hope this tutorial was useful for you. Please find a demo on GitHub and feel free to leave your comments.