When integrating the DHTMLX JavaScript Gantt component in project management apps, our customers face the necessity to customize Gantt to their requirements. The lightbox editor is one of the Gantt elements that is frequently customized to enhance the efficiency of handling tasks. It is possible to solve this issue using the Gantt API but we want to offer one more viable alternative.
There is a new Gantt demo delivered by our team, where the lightbox editor is based on DHTMLX Suite UI widgets and provides extra editing options for end-users. In this blog post, we review the Gantt lightbox editor built with Suite widgets in more detail.
New Capabilities of Gantt Lightbox Editor Based on Suite Widgets
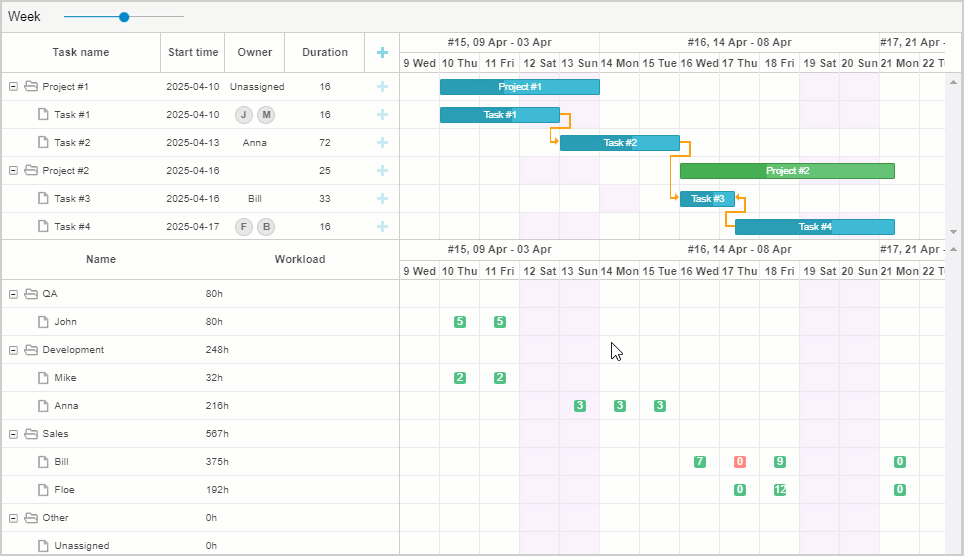
In our new demo, the Gantt lightbox is rendered with the use of the Suite library. So it is easy to add any Suite widgets to the lightbox. In our case, we used 6 different Suite UI widgets in the Gantt editor such as Slider, Window, Tabbar, Form, Grid, and Layout. And that’s the result of our efforts:
 Check the demo >
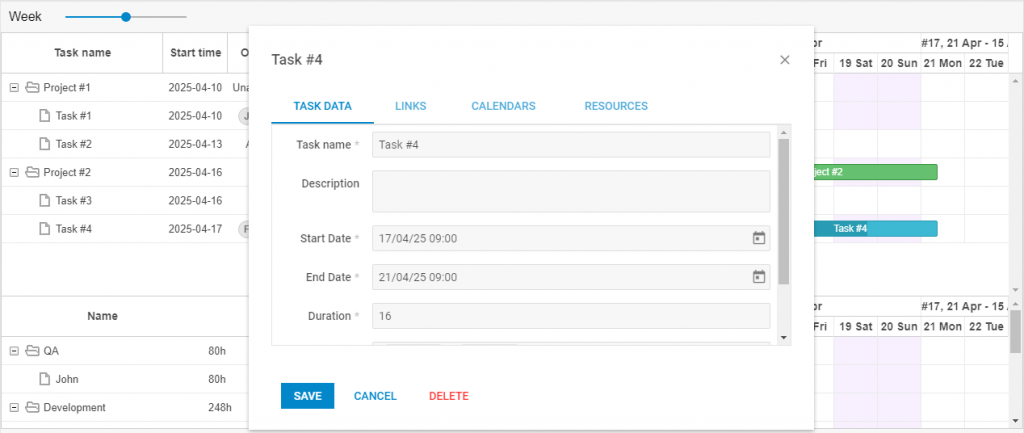
As you can see in the demo, the lightbox editor has four separate tabs providing various editing options for editing a particular Gantt functionality. We also complemented the demo with a slider to make it more convenient for end-users to change the scale of the Gantt timeline on the fly. Now let us consider each tab in more detail.
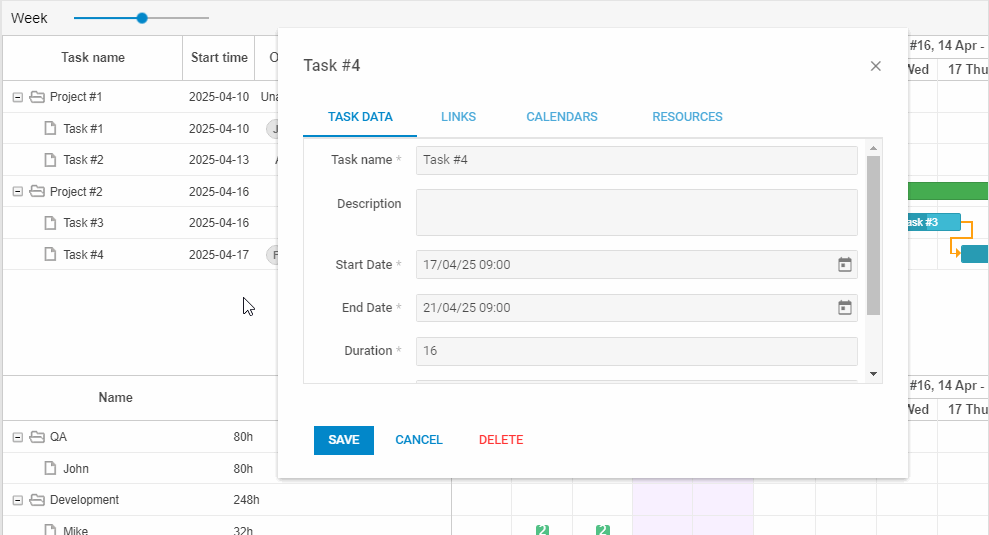
Task Data
The first “Task Data” tab includes almost all settings that can be specified in the default lightbox of our Gantt (except for the progress slider). Thanks to the use of the Suite Form widget, we can have user-friendly date picker inputs. In the “Task Data” tab, for instance, you can see the practical application of Form widget controls that allow specifying the following parameters: task name, start/end dates, duration, description, and task priority.
And now we get down to the most interesting part of the story, namely the new editing capabilities that are available in this demo thanks to the use of Suite widgets.
Links
In the second tab, you have an opportunity to manipulate dependency links for regular tasks, milestones, and projects. Apart from basic operations such as creating or deleting links, it is also possible to change the type of dependency, select an opposite direction for the link (from Successor to Predecessor and vice versa), and set the lag time for tasks linked with the given dependency.
Dependency links can be edited in real time but all changes will be displayed after rendering or when the lightbox is closed. When adding or deleting a link, the operation will be completed only after clicking on the “Save” button.
Calendars
The work time calendar is one more significant feature of our Gantt component that can be modified in the “Calendars” tab.
The upper “Assign calendar” section allows selecting the required calendar type. In general, the working time in Gantt projects can be managed via three types of calendars: global calendar (default option), full-time calendar, and custom calendar.
After selecting the needed calendar type for a task, you can perform the following operations using the corresponding icons provided in the same section:
- add a calendar
- clone a calendar (i.e. the same settings but a different name)
- rename a calendar
- delete a calendar (note that a global calendar cannot be deleted)
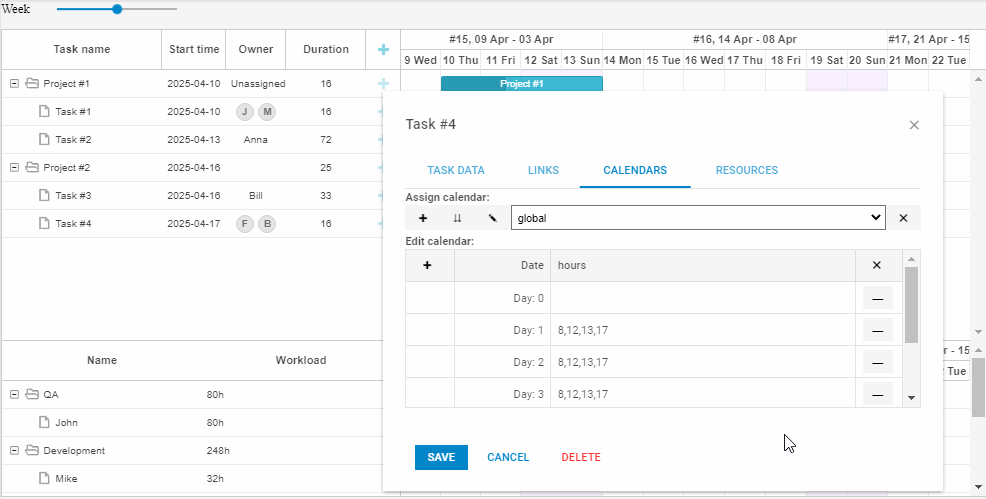
The lower “Edit calendar” section is dedicated to calendar settings. Here you can see the list of days in the “Date” column and working hours for these days in the adjacent “hours” column. Both parameters can be modified right in the UI. The use of the “Reset hours” button on the right expands working hours for the whole day. Days without specified working hours are non-working.
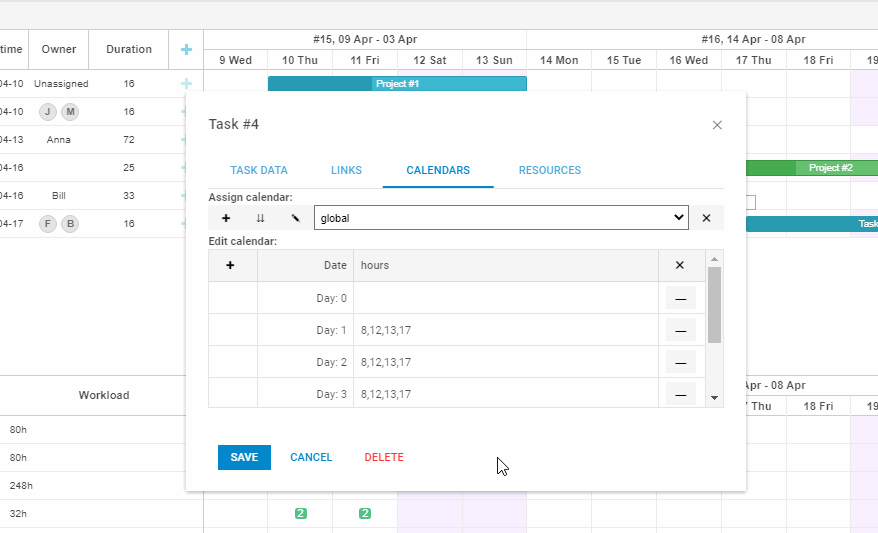
It is possible to add a custom date using the “+” button and then specify its working hours. If you need to apply the hour settings of the added date to the other one, just clone these settings with the help of the button on the left. The newly added dates and their settings can be removed via the corresponding button on the right.
All changes take place in real time. If you decide to change the type of calendar for a given task, you should click on the save button for the new calendar to be displayed in Gantt.
Resources
And finally, we proceed to explore the last but most notable “Resources” tab intended for editing project resources. This tab just like the previous one is divided into two sections.
The “Assign resources” section on the top displays tasks with resources assigned to them. In the header of this section, you have the ability to add a new resource assignment (“+” button) and remove all assignments at once (“X” button). For each assignment, you can specify a range of parameters such as:
- Name – the name of the resource selected for a given task
- Value – the value of the assigned resource to be used during the appointed time
- Mode – the calculation mode of the time allotted to resource usage
- Start – the start date for applying this resource
- End – the end date for applying this resource
- Delay – the time gap between the assignment start date and when the task is actually started
By default, the resource is assigned to be used from start to finish of the task. When you reschedule the task or change its duration, the resource assignment will be changed correspondingly. But the mode parameter can help you set limitations for the use of resources. This parameter includes two additional modes – fixedDuration and fixedDates. With the fixedDuration mode, the resource will be available for a given task during a particular period of time even if you change the task duration. The fixedDates mode strictly binds the resource assignment to certain dates that won’t change even if you reschedule the task.
More information on setting the time of resource assignments can be found in the documentation.
The “Edit resources” section, as the name suggests, offers a number of opportunities to edit resources. Apart from standard manipulations with resources (adding, cloning, deleting), there are some more peculiar settings. For instance, you can divide resources into groups using the “department” option.
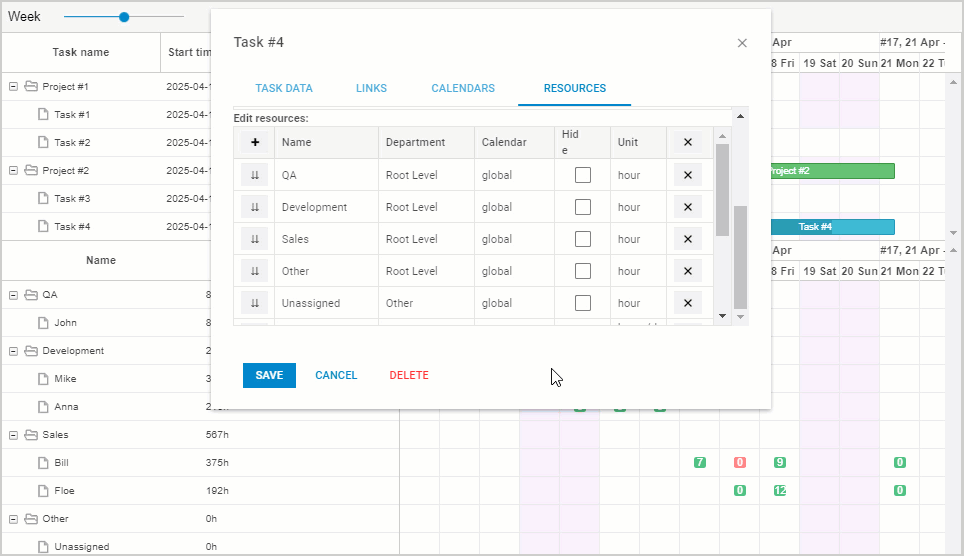
The hide option helps to hide a specific resource from the resource panel. Unit is a custom field, where end-users can make any notes related to a resource.
Moreover, it is possible to change calendars for resources in the corresponding column. The calendar of a specific resource is applied to all tasks that are assigned to this resource. But since only one calendar can be assigned to one task, there are some priority rules. The resource calendar is applied for the selected task only if the global calendar is set for this task in the “Calendars” tab. Other types of calendars have a higher priority and override the resource calendar settings.
Wrapping Up
The demo described in this blog post is a vivid example of how you can make the Gantt lightbox editor much more functional. With the use of our Suite widgets, we added a range of new things to the Gantt editor that can be really helpful in real-case scenarios. Previously, we did something similar for ourJavaScript scheduling component and were very pleased with the result. The fact that our libraries are mutually compatible significantly simplified the whole process under the hood. If you want to create a custom lightbox editor in your JavaScript Gantt chart, this guide in our documentation will provide you with useful tips on the matter.
All newcomers can test DHTMLX Gantt and Suite UI widgets (as well as any other DHTMLX library) by downloading a free 30-day trial version.