It is time to continue our quest for discovering the powerful customization capabilities of DHTMLX Gantt. Last time, we started to become familiar with the examples of using custom content in the timeline of JavaScript Gantt with the help of the addTaskLayer method. Now we will take a step further and explore more complex cases of enriching Gantt charts with custom elements.
Today, you will learn how to place custom items on tasks, add a draggable baseline and insert a progress knob in it, apply custom milestones, and even take advantage of recurring events.
Let’s get to it!
Custom elements on tasks
If it is necessary to add several custom elements for each task, you don’t have to apply multiple layers (by using addTaskLayer several times). Instead, it is possible to create a single HTML element and specify it after the return statement. You can add any number of child elements to this element.
mainDiv.className = 'icons'
//generate custom elements
for (var i = 0; i < 4; i++) {
var elementDate = task['custom_element_date_' + icons[i]] || gantt.date.add(task.start_date, i, 'day')
var sizes = gantt.getTaskPosition(task, elementDate);
var el = document.createElement('div');
mainDiv.appendChild(el);
}
return mainDiv;
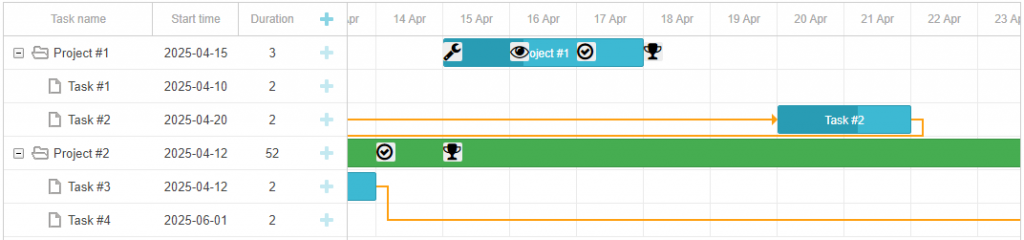
Our goal here is to add several elements for each task. In this example, you assign the icon property (that is actually the element’s name) to each element to make them distinguishable. This name is also used inside the class element to specify the font awesome icon.
'wrench',
'eye',
'check-circle-o',
'trophy'
]
var el = document.createElement('div');
el.setAttribute("data-task", task.id);
el.setAttribute("data-icon", icons[i]);
el.className = 'icon fa fa-' + icons[i];
Given that each element will get different dates, you have to save these dates under the corresponding names in the task properties. To avoid any confusion with other properties, add custom_element_date_ to each property name.
After that, you get a custom element with several icons that can be placed on a project task in the timeline.
Drag-and-drop for custom elements
Before we continue exploring the following two examples of using custom content in DHTMLX Gantt, it is necessary to focus on the question of enabling drag-and-drop for custom elements. The thing is that there is no built-in function for the implementation of a custom drag-and-drop in DHTMLX Gantt. But it can be done manually and the whole process is rather simple.
Here you need to capture three DOM events (mousedown, mousemove, mouseup) and define a couple of flags to store the state of drag-and-drop between these events.
1. The mousedown event signals that drag-and-drop is starting. However, this may also be the first stage of a regular click event, which shouldn’t activate drag-and-drop. At this step, you have to set a flag, meaning that drag-and-drop is requested, and remember the initial mouse position as well as any other data that will be required later.
var dndActivated = false;
var startPosition = null;
var startTimestamp = null
var taskId = null;
var domUtils = gantt.utils.dom;
// in this sample we'll drag `.baseline` elements inside `gantt.$task_data` container
gantt.event(gantt.$task_data, 'mousedown', function(e) {
// use element.closest or gantt.utils.dom.closest to locate the draggable element
var draggableElement = domUtils.closest(e.target, '.baseline');
if (draggableElement) {
// we don't know yet whether a user is going to drag the element or just click it
// store the event info, we'll check it at 'mousemove'
dndRequested = true;
startTimestamp = Date.now();
startPosition = domUtils.getRelativeEventPosition(e, gantt.$task_data);
taskId = draggableElement.getAttribute("data-task");
}
});
Note that the event handler is added using gantt.event rather than native Element.addEventListener. It is done because Gantt can be destroyed using the gantt.destructor method and all events attached using gantt.event will be cleared automatically. If you make use of the native method and gantt.destructor, you may need to clear event handlers manually in order to avoid memory leaks.
2. The actual drag-and-drop will start in the mousemove handler. Instead of initiating drag-and-drop when a user clicks the mouse, compare the current mouse position with the initial position saved in mousedown. This way you can start drag-and-drop only when the current position differs enough from the initial one. If you don’t want to set a minimum threshold for drag-and-drop, you can also estimate the time passed since mousedown.
Once you determine that drag-and-drop has started, you can use the mousemove event handler to update the position of the dragged element on the screen. If you drag a custom layer element, the expected approach for refreshing it is to modify the underlying object and repaint it using Gantt API (gantt.refreshTask), rather than modifying the DOM element directly.
if (dndRequested && gantt.isTaskExists(taskId)) {
// we captured 'mousemove' after 'mousedown' event
var currentPosition = domUtils.getRelativeEventPosition(e, gantt.$task_data);
if (!dndActivated) {
// 'mousemove' may be a part of the regular click process, we don't want to invoke dnd on regular click
// we check whether mouse position has changed significantly, or if the user holds a mouse longer than it usually happens for regular click
if(Math.abs(currentPosition.x - startPosition.x) > 5 || (Date.now() - startTimestamp) > 500) {
// if so - we assume dnd has started
dndActivated = true;
}
}
if (dndActivated) {
// here we can update the position of the dragged element.
// when we drag an element added via `gantt.addTaskLayer`, it's better to update the task object
// and repaint it via `gantt.refreshTask`
// you can also get the corresponding date of the time scale:
var pointerDate = gantt.dateFromPos(currentPosition.x);
gantt.getTask(taskId).baseline_date = pointerDate;
gantt.refreshTask(taskId);
}
}
});
3. Finally, you should capture the mouseup event. If drag-and-drop has been started – apply changes to the moved object, call the gantt.updateTask method, if necessary, and clear all temporary flags.
// apply changes if drag-and-drop was in progress
if (dndActivated) {
// validate and finalize changes if needed
var task = gantt.getTask(taskId);
task.baseline_date = gantt.roundDate({
date: task.baseline_date,
unit: "hour",
step: 1
});
// call gantt.updateTask to invoke the update of data
gantt.updateTask(taskId);
}
// clear all flags we've set at previous stages
dndRequested = false;
dndActivated = false;
startPosition = null;
startTimestamp = null;
taskId = null;
});
With this knowledge at hand, let us proceed to more practical cases including drag-and-drop functionality.
Draggable baselines
As we’ve learned from the previous section, you’ll need to write some code to make baselines draggable.
Before implementing drag-and-drop, you need to make a small change to the addTaskLayer function. Namely, you have to add an ID of a related task to attributes of a rendered baseline element. Use this attribute in the mousedown handler to find out to which task the baseline belongs to.
el.setAttribute("data-task", task.id);
Now, you can get to the actual implementation. The mousedown handler will look very similar to the one we had in the example above. However, there is an important difference – a baseline is an element with variable width. A user can start drag-and-drop from any point of the bar and the baseline should be moved smoothly regardless of the initial cursor position.
You don’t want to assign a start date of the baseline to a cursor position, since the user may start drag-and-drop by pointing to the middle of the bar. In such a case, the start date of baseline will immediately jump to the pointer position. Instead, when drag-and-drop starts, you can remember the horizontal distance from the left edge of the baseline bar to the cursor position – this is the position of the start date of baseline relative to the pointer position. Then, when you need to calculate the new start date of the baseline, you calculate it as follows:
Pay attention to the clickOffset variable:
var taskId = null;
var clickOffset = null;
var dndRequested = false;
var dndActivated = false;
var startTimestamp = null;
var startPosition = null;
gantt.event(gantt.$task_data, 'mousedown', function(e){
var draggableElement = domUtils.closest(e.target, '.baseline');
if (draggableElement) {
taskId = draggableElement.getAttribute("data-task");
clickOffset = domUtils.getRelativeEventPosition(e, draggableElement).x;
dndRequested = true;
startTimestamp = Date.now();
startPosition = domUtils.getRelativeEventPosition(e, gantt.$task_data);
}
});
In the mousemove event handler, you obtain the mouse position and calculate the date of the baseline.
if (dndRequested && gantt.isTaskExists(taskId)) {
var position = domUtils.getRelativeEventPosition(e, gantt.$task_data).x;
if (!dndActivated) {
if(Math.abs(position - startPosition.x) > 2 || (Date.now() - startTimestamp) > 500) {
dndActivated = true;
}
}
if(dndActivated) {
var task = gantt.getTask(taskId);
var plannedDuration = gantt.calculateDuration({
start_date: task.planned_start,
end_date: task.planned_end,
task: task
});
task.planned_start = gantt.dateFromPos(position - clickOffset);
task.planned_end = gantt.calculateEndDate({
start_date: task.planned_start,
duration: plannedDuration,
task: task
});
gantt.refreshTask(taskId);
}
}
});
The mouseup event handler looks exactly the same as in the previous example. You just need to submit the changes and reset all temporary variables:
if(dndActivated){
gantt.updateTask(taskId);
}
taskId = null;
clickOffset = null;
dndRequested = false;
dndActivated = false;
startTimestamp = null;
startPosition = null;
});
As a result, you get a draggable baseline that can be easily moved along the timeline with a mouse.
Baselines with a draggable progress knob

Custom baselines can also be equipped with other HTML elements such as a progress bar. It is also possible to add the ability to change and save progress values with a knob. Here you need 3 elements – baseline, progress bar, and progress knob.
First of all, you have to add one extra property to our task object. As an example, you can call it task.baseline_progress. It will contain the progress value as a number between zero and one:
Then you’ll be able to use it to show the progress bar of the baseline. That is how the modified gantt.addTaskLayer function will look like this:
el.setAttribute("data-task", task.id);
el.className = 'baseline';
...
// adding progress bar
var progress = document.createElement('div');
progress.className = 'baseline_progressbar';
progress.style.width = task.baseline_progress * 100 + "%";
el.appendChild(progress);
//adding progress bar drag
var progress_drag = document.createElement('div');
progress_drag.className = 'baseline_progress_drag';
progress_drag.style.left = task.baseline_progress * 100 + "%";
el.appendChild(progress_drag);
return el;
The progress bar inside the baseline element is filled according to the value of the task.baseline_progress property. Once you implement the drag-and-drop function, it will modify the task.baseline_progress property when the user drags the progress knob.
After changing the markup of the draggable element, the overall logic remains mainly the same. The draggable element is now baseline_progress_drag, and in order to get the ID of the task you need to traverse elements upwards until you get to the baseline element which stores the task’s ID:
var draggableElement = domUtils.closest(e.target, '.baseline_progress_drag');
if (draggableElement) {
taskId = domUtils.closest(draggableElement, ".baseline").getAttribute("data-task");
dndRequested = true;
startTimestamp = Date.now();
startPosition = domUtils.getRelativeEventPosition(e, gantt.$task_data);
}
});
It is the same story with the mousemove handler. The code is very similar to the previous examples.
The new progress value can be calculated with the gantt.utils.dom.getRelativeEventPosition (event, node) helper – a relative position of the pointer inside the element. In other words, if the mouse pointer is in the upper left corner of the node, the {x: 0, y: 0) object will be returned. When the pointer is in the lower right corner, you will get {x: node.offsetWidth, y: node.offsetHeight} regardless of the element’s position on the page.
Using this method and the offset size of the baseline, you can determine the position of the task pointer relative to the size of the baseline element (at 0%, 50%, 90% of the full width) and calculate the percentage with the necessary precision.
Alternatively, you could use a pointer date using gantt.dateFromPos and calculate the progress from the date difference between the pointer date and the start/end dates of the baseline rather than from coordinates.
if (dndRequested && gantt.isTaskExists(taskId)) {
var position = domUtils.getRelativeEventPosition(e, gantt.$task_data).x;
if (!dndActivated) {
if(Math.abs(position - startPosition.x) > 2 || (Date.now() - startTimestamp) > 500) {
dndActivated = true;
}
}
if(dndActivated) {
var baselineElement = gantt.$root.querySelector(".baseline[data-task='"+taskId+"'");
var task = gantt.getTask(taskId);
var positionRelative = domUtils.getRelativeEventPosition(e, baselineElement);
var dragPos = Math.max(positionRelative.x, 0);
var fullWidth = baselineElement.offsetWidth || 1;
var computedProgress = Math.min(dragPos, fullWidth) / fullWidth;
var roundedProgress = Math.round(computedProgress * 100) / 100;
task.baseline_progress = roundedProgress;
gantt.refreshTask(taskId);
}
}
});
Like in the previous examples, you can use the mouseup event to check (via flags) if the drag-and-drop action actually happened, invoke custom functions if needed, and clear the flags.
if(dndActivated){
gantt.updateTask(taskId);
var task = gantt.getTask(taskId);
gantt.message(task.text + " baseline progress is now " + task.baseline_progress);
}
taskId = null;
dndRequested = false;
dndActivated = false;
startTimestamp = null;
startPosition = null;
});
A fancier way of calling custom functions after drag-and-drop would be to call a custom API event, which you could capture in other parts of your code:
if(dndActivated){
// signal that baseline progress has changed
gantt.callEvent("onAfterBaselineProgressDrag", [taskId]);
gantt.updateTask(taskId);
}
taskId = null;
dndRequested = false;
dndActivated = false;
startTimestamp = null;
startPosition = null;
});
Then, you can catch this event the following way:
var task = gantt.getTask(taskId);
gantt.message(task.text + " baseline progress is now " + task.baseline_progress);
});
After all these code manipulations, we’ll get a custom baseline complemented with a progress bar and a knob allowing users to alter and save progress values.
Custom milestones
If a milestone is not seen on the screen, it can be useful to draw a vertical line going up to the top to remind users about important dates on the project.
By default, elements of an additional layer are rendered only when the taskbar, to which this element belongs, is visible on the screen. But you can use a more complex configuration of the additional layer to change it. The addTaskLayer method uses a function, but you can also set an object with specific parameters inside this method. In this object, you need to use the renderer property – an object with functions responsible for rendering elements.
renderer: {
render: function draw_planned(task) {
},
// define getRectangle in order to hook layer with smart rendering
getRectangle: function(task, view){
}
}
});
The render is a function that helps to create custom elements, and the getRectangle parameter defines the position of these elements. Inside the render parameter, add the function for creating custom elements utilized in the previous examples. In the getRectangle function, you have to define the position of the task using the getTaskPosition method.
if (task.type == 'milestone') {
var sizes = gantt.getTaskPosition(task, task.start_date, task.end_date);
var el = document.createElement('div');
el.className = 'milestoneLine';
el.style.left = sizes.left + 'px';
el.style.width = 0 + 'px';
el.style.height = sizes.height + sizes.top + 'px';
el.style.top = '0px';
return el;
}
return false;
},
The next step is to change the parameters of the object that returns this method. You need to replace the value of the top parameter with 0 so that the upgoing line will start from the timeline. The height of the element is set as infinite. Since the Gantt chart consists of multiple elements, the custom element will not go outside the Gantt container.
var position = gantt.getTaskPosition(task, task.start_date, task.end_date);
position.top = 0;
position.height = Infinity;
return position;
}
As an alternative to the customization approach to adding custom milestones into your project described above, now you can provide a high-level project summary using rollup tasks. This feature was added to DHTMLX Gantt in the latest update (v7.1).
Recurring tasks
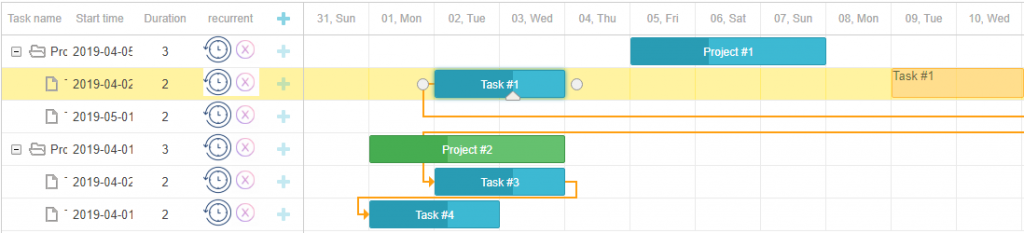
If the project includes a range of similar tasks that must be performed at specific time intervals, you can make them recur.
For this purpose, you have to create buttons in the grid that will allow you to add or remove recurring elements (tasks). To do this, use the template intended for displaying any data or HTML elements.
{name:"recurrency", label:"recurrency", width:70, template: function (task){
var add = "<img class='add_recurrency' height=30 alt='v' src='https://encrypted-tbn0.gstatic.com/images?q=tbn:ANd9GcRctAwCv6r8ffBNojuSyf2PZ5CxcDYMp6i4OxmMOiQ76S2AbPAK2g'>"
var remove = "<img class='remove_recurrency' height=30 alt='x' src='https://img.freepik.com/free-vector/letter-x-alphabet-inside-circle-icon-design_7095-384.jpg?size=338&ext=jpg'>"
return add + remove
}},
];
Then add the onTaskClick event handler that will fire when the mouse button is pressed. It is a more preferable option to adding onclick events inside HTML elements in the grid, which won’t work in Salesforce and other frameworks with limitations on inline functions.
When the onTaskClick event gets triggered in the grid after the click, take the custom element and use the closest method to find out if the right element was clicked. If the element for adding recurring elements is clicked, use the built-in prompt method and indicate the entered value for the task. Otherwise, you have to remove this value.
var domHelpers = gantt.utils.dom;
if (domHelpers.closest(e.target, ".add_recurrency")){
var task = gantt.getTask(id);
task.recurrency = prompt("Enter the number of recurrency", 1);
gantt.updateTask(task.id);
}
else if (domHelpers.closest(e.target, ".remove_recurrency")){
var task = gantt.getTask(id);
task.recurrency = false;
gantt.updateTask(task.id);
}
return
Check if the task has a value in the recurrency property of the function for adding an extra layer. If yes, depending on this value, create the number of elements for repeating the task.
if (task.recurrency) {
var main_div = document.createElement('div');
main_div.className = 'recurring_tasks';
for (var i = 1; i <= task.recurrency; i++) {
var el = document.createElement('div');
var el_start_date = gantt.date.add(task.start_date, i, 'week');
var el_end_date = gantt.calculateEndDate(el_start_date, task.duration);
var sizes = gantt.getTaskPosition(task, el_start_date, el_end_date);
el.className = 'recurring_task';
el.style.left = sizes.left + 'px';
el.style.width = sizes.width + 'px';
el.style.top = sizes.top + 'px';
el.style.height = sizes.height + 'px';
el.innerHTML = task.text
main_div.appendChild(el)
}
return main_div;
}
return false;
});
Following these steps, you can display recurring events in the Gantt timeline the same way as in the DHTMLX Scheduler component.
Final words
The ability to work with custom content is really important for project managers working with Gantt charts via web apps. A range of useful examples reviewed in this and previous articles on the topic prove that DHTMLX Gantt has a lot to offer in this regard.
If you are looking for a project management tool with enhanced customization capabilities, try DHTMLX Gantt for free by downloading a 30-day trial version.