Updated on February 07, 2022
We won’t stop till show you that you can use our Gantt chart library with any technology! And today is the turn of ReactJS, a popular JavaScript component-based library. Following the steps of this tutorial, you’ll know how to create React Gantt chart app with some basic features. So, let’s start.
As always, you can find React gantt chart component demo on GitHub.
Creating a Simple React App
The very first thing we need to do is to initialize the application structure. For this, we are going to use Create React app tool. It can be installed with the following command:
You can find some additional information in this article.
Then we create an app:
When our app is created, we go to the folder and run it for the first time:
yarn start
The first steps are completed, and as a result, our app should be started on http://localhost:3000/
Style agreement
In this tutorial, we’ll use the following folder structure:
– Each component will be placed inside a separate folder, named after the component.
– Each folder will contain an index.js file, which will explicitly specify which classes are exported by the component, and a file with the component implementation.
For example, when we create our Gantt component, it will have the following structure:
|- Gantt.js
|- index.js
|- Gantt.css
Gantt.js will contain the implementation of the component, and index.js will export it:
import './Gantt.css';
export default Gantt;
And the outer code will import the folder
That way if we add extra components to our Gantt, they will be defined under the same folder and it won’t affect imports and won’t clutter our folder structure.
Now, when we’ve sorted it out, we can proceed.
Let us start with our Gantt component.
The first thing you need is to add dhtmlxGantt package to your project.
A free version of it can be added via npm or yarn:
Then, create the src/components/Gantt folder.
Here we’ll add a React Component wrapper for dhtmlxGantt.
Create Gantt.js file and open it:
src/components/Gantt/Gantt.js:
import { gantt } from 'dhtmlx-gantt';
import 'dhtmlx-gantt/codebase/dhtmlxgantt.css';
import './Gantt.css';
export default class Gantt extends Component {
componentDidMount() {
gantt.config.date_format = "%Y-%m-%d %H:%i";
const { tasks } = this.props;
gantt.init(this.ganttContainer);
gantt.parse(tasks);
}
render() {
return (
<div
ref={ (input) => { this.ganttContainer = input } }
style={ { width: '100%', height: '100%' } }
></div>
);
}
}
Then add this code to Gantt.css:
height: 100%;
}
And create an index.js file with the following content:
export default Gantt;
What we have done here – we’ve created a react component that currently serves as a wrapper for dhtmlxGantt js library. dhtmlxGantt itself is a regular JS library that lives outside ReactJS world, thus we created a wrapper component.
Once our component is mounted, we initialize dhtmlxGantt and attach it to DOM. We can also populate it with the data passed via props.
Note, that since a free version of dhtmlxGantt has no destructor, we do not define the componentWillUnmount method. It also means that if we remove a component from React at some point, the instance of dhtmlxGantt will stay in memory and will be reused next time when the component is mounted again.
We have also specified the date_format config, which sets the format of dates that will come from the data source so that Gantt could parse them correctly.
The next step is to add Gantt to our App component. Note that we use hard-coded data for this sample:
./src/App.js:
import Gantt from './components/Gantt';
import './App.css';
const data = {
data: [
{ id: 1, text: 'Task #1', start_date: '2019-04-15', duration: 3, progress: 0.6 },
{ id: 2, text: 'Task #2', start_date: '2019-04-18', duration: 3, progress: 0.4 }
],
links: [
{ id: 1, source: 1, target: 2, type: '0' }
]
};
class App extends Component {
render() {
return (
<div>
<div className="gantt-container">
<Gantt tasks={data}/>
</div>
</div>
);
}
}
export default App;
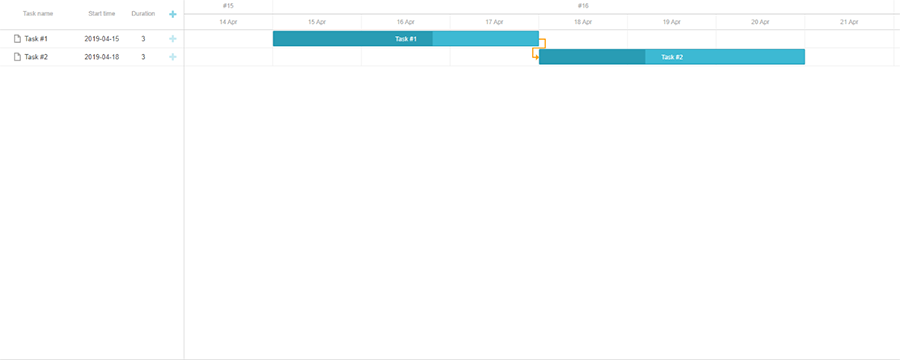
If we run the app now, we should see a Gantt chart with initial tasks on a page:
Configuring Gantt chart
Let us explore the API of the component a bit more. If you complement an app with the Gantt chart, at some moment the client will ask you to add the ability to zoom the time scale of the Gantt chart.
How it’s usually done:
- the time scale of dhtmlxGantt is defined by a number of settings, such as number of rows, time step of each row, format of labels, etc.
- these settings can be changed dynamically
- adittionally, there is a special API for zoom levels of the time scale
So you need to define several configuration presets for different zoom levels (minutes/hours/days/months/…) and give a user some kind of UI, usually a toggle or a slider, to switch between them.
We can implement it in React using zooming API. Firstly, we implement a couple of presets for time scale configuration in the Gantt component.
Open Gantt.js. to add the following function to it:
gantt.ext.zoom.init({
levels: [
{
name: 'Hours',
scale_height: 60,
min_column_width: 30,
scales: [
{ unit: 'day', step: 1, format: '%d %M' },
{ unit: 'hour', step: 1, format: '%H' }
]
},
{
name: 'Days',
scale_height: 60,
min_column_width: 70,
scales: [
{ unit: 'week', step: 1, format: 'Week #%W' },
{ unit: 'day', step: 1, format: '%d %M' }
]
},
{
name: 'Months',
scale_height: 60,
min_column_width: 70,
scales: [
{ unit: "month", step: 1, format: '%F' },
{ unit: 'week', step: 1, format: '#%W' }
]
}
]
});
}
Here we’ve defined all levels of zoom that will be available in our Gantt. Each level has its own name which will be used to activate it.
Then we need the following code to activate zoom levels:
if(!gantt.$initialized){
this.initZoom();
}
gantt.ext.zoom.setLevel(value);
}
shouldComponentUpdate(nextProps) {
return this.props.zoom !== nextProps.zoom;
}
Bear in mind that repainting of Gantt is quite a costly procedure, we’ll make sure that it’ll be called only when it’s needed by checking whether props have actually changed in shouldComponentUpdate.
And add the setZoom call at the beginning of the render function of the component:
const { zoom } = this.props;
this.setZoom(zoom);
return (
<div
ref={(input) => { this.ganttContainer = input }}
style={{ width: '100%', height: '100%' }}
></div>
);
}
The zoom plugin must be initialized by gantt.ext.zoom.init call before the first usage.
Each time we call gantt.ext.zoom.setLevel, it will apply the specified zoom level and call the gantt.render() function to repaint the Gantt and apply changes. Thus, we don’t call this function explicitly in our code.
If we don’t use the Zoom plugin and change the Gantt configuration manually, it will be needed to add call Gantt repaint from the componentDidUpdate hook:
gantt.render();
}
Other than that, everything should be straightforward. setLevel is called for the first time before Gantt is rendered on a page, so we use this moment to initialize our zoom settings:
if(!gantt.$initialized){
this.initZoom();
}
gantt.ext.zoom.setLevel(value);
}
Now Gantt chart scales should be defined with the zoom property. If this property is changed we should call the render function to redraw Gantt with new scales.
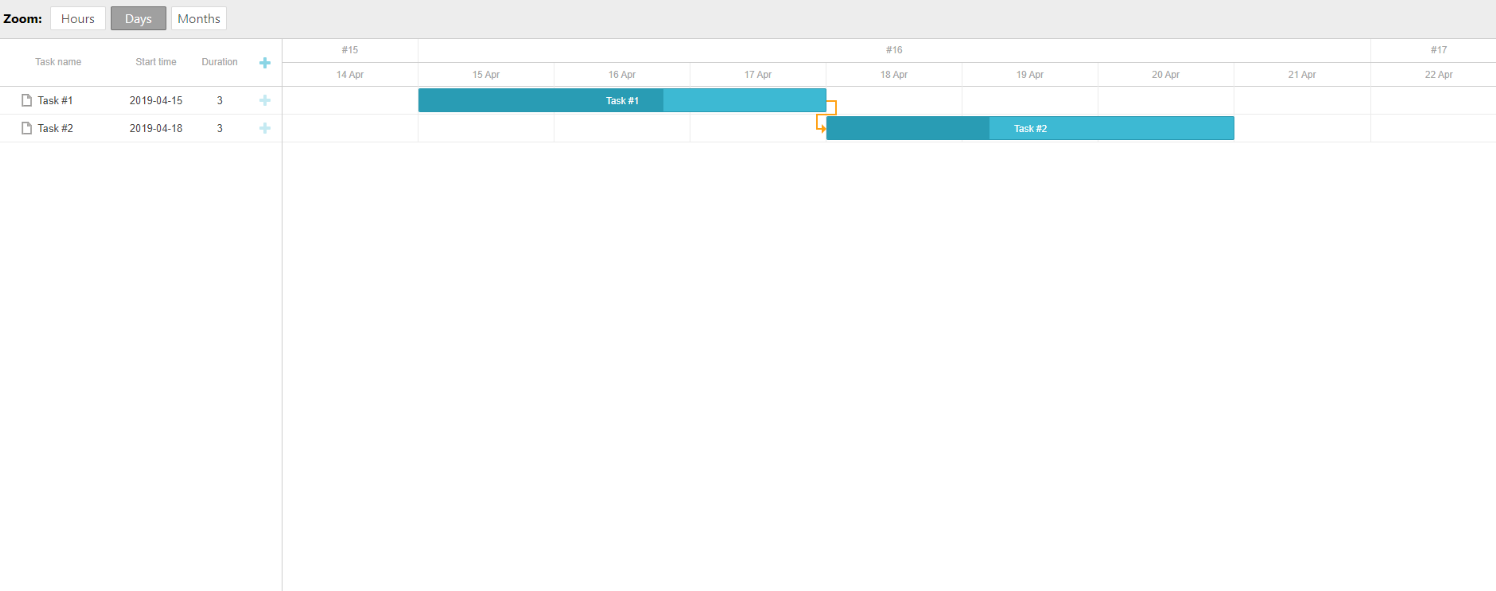
Now, let us add UI for selecting a zoom level. We’ll go with a simple toolbar and toggles.
Create the Toolbar component:
src/components/Toolbar/index.js:
export default Toolbar;
src/components/Toolbar/Toolbar.js:
export default class Toolbar extends Component {
handleZoomChange = (e) => {
if (this.props.onZoomChange) {
this.props.onZoomChange(e.target.value)
}
}
render() {
const zoomRadios = ['Hours', 'Days', 'Months'].map((value) => {
const isActive = this.props.zoom === value;
return (
<label key={ value } className={ `radio-label ${isActive ? 'radio-label-active': ''}` }>
<input type='radio'
checked={ isActive }
onChange={ this.handleZoomChange }
value={ value }/>
{ value }
</label>
);
});
return (
<div className="tool-bar">
<b>Zooming: </b>
{ zoomRadios }
</div>
);
}
}
As you can see it is quite plain – we add a group of radio buttons and provide onZoomChange handler for a parent component.
Here we add a toolbar to the App component:
and a handler for the change event:
currentZoom: 'Days'
};
handleZoomChange = (zoom) => {
this.setState({
currentZoom: zoom
});
}
JSX:
const { currentZoom } = this.state;
return (
<div>
<div className="zoom-bar">
<Toolbar
zoom={currentZoom}
onZoomChange={this.handleZoomChange}
/>
</div>
<div className="gantt-container">
<Gantt
tasks={data}
zoom={currentZoom}
/>
</div>
</div>
);
}
Now, each time a user selects a specific zoom level in a toolbar, changes will be captured by the App, which will then pass an updated state to our Gantt.
Processing Changes Made in Gantt
What else would you need while adding a Gantt chart to your app? Most probably you’ll need to do something with changes that users make in a Gantt chart – send changes to the backend or update other components.
In this tutorial, we won’t cover saving changes to the database. Instead, we’ll show how to capture these changes, and then pass them somewhere in the app.
You can capture Gantt changes using a special dataProcessor module, embedded into dhtmlxGantt. It can serve as a way for tracking user actions inside Gantt.
Here is how it can be used. Open src/components/Gantt/Gantt.js and add the following method:
const onDataUpdated = this.props.onDataUpdated;
this.dataProcessor = gantt.createDataProcessor((entityType, action, item, id) => {
return new Promise((resolve, reject) => {
if (onDataUpdated) {
onDataUpdated(entityType, action, item, id);
}
return resolve();
});
});
}
componentWillUnmount() {
if (this.dataProcessor) {
this.dataProcessor.destructor();
this.dataProcessor = null;
}
}
Also update the componentDidMount method:
gantt.config.date_format = "%Y-%m-%d %H:%i";
this.initGanttDataProcessor();
const { tasks } = this.props;
gantt.init(this.ganttContainer);
gantt.parse(tasks);
}
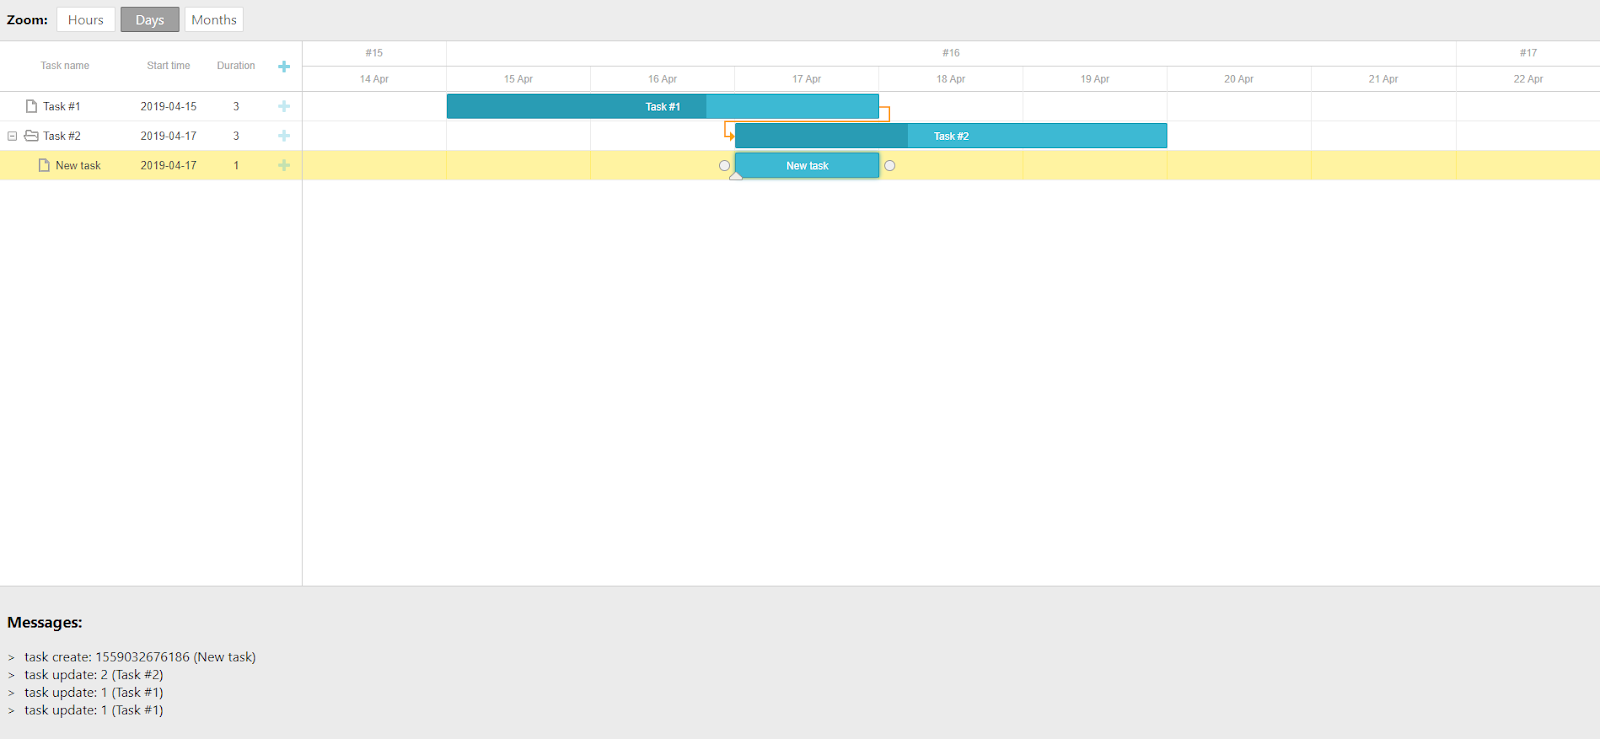
That’s how we can capture all changes made in Gantt and send them to the parent component.
We also save the dataProcessor instance returned from createDataProcessor and clean it up in componentWillUnmount.
Now update the App component – what we want to do here is to simply catch events, create descriptive messages for them and put those messages into the local state:
currentZoom: 'Days',
messages: [],
};
addMessage(message) {
const maxLogLength = 5;
const newMessage = { message };
const messages = [
newMessage,
...this.state.messages
];
if (messages.length > maxLogLength) {
messages.length = maxLogLength;
}
this.setState({ messages });
}
logDataUpdate = (entityType, action, itemData, id) => {
let text = itemData && itemData.text ? ` (${itemData.text})`: '';
let message = `${entityType} ${action}: ${id} ${text}`;
if (entityType === 'link' && action !== 'delete' ) {
message += ` ( source: ${itemData.source}, target: ${itemData.target} )`;
}
this.addMessage(message);
}
After that, it is necessary to set a component that will display these messages on a page.
First of all, create a new folder src/components/MessageArea, we’ll define all files of the component there.
Add a file src/components/MessageArea/MessageArea.js and define the component. We don’t need anything too fancy, our message area will show the data using basic html list:
export default class MessageArea extends Component {
render() {
const messages = this.props.messages.map(({ message }) => {
return <li key={ Math.random() }>{message}</li>
});
return (
<div className="message-area">
<h3>Messages:</h3>
<ul>
{ messages }
</ul>
</div>
);
}
}
MessageArea.defaultProps = {
messages: []
};
To display the message, you need to change the height of the gantt-container. For this purpose, you have to update the Gantt.css file with the following code:
height: calc(100vh - 50px - 200px);
}
Add styles for the message area:
src/components/MessageArea/MessageArea.css:
background: #ebebeb;
height: 200px;
overflow: auto;
padding: 10px;
box-sizing:border-box;
}
.message-area ul{
margin: 0;
padding: 0;
list-style: none;
}
.message-area li:before {
content: "\003e";
padding-right: 10px;
}
Then create another file src/components/MessageArea/index.js, which will be the point of import for this component:
import './MessageArea.css';
export default MessageArea;
And finally, connect this component to the App. Note that we’ve created /MessageArea/index.js specificly to simplify the import of this component. MessageArea may consist of multiple files, yet we import them via index.js as one module:
imports:
JSX:
const { currentZoom, messages } = this.state;
return (
<div>
<Toolbar
zoom={ currentZoom }
onZoomChange={ this.handleZoomChange }
/>
<div className="gantt-container">
<Gantt
tasks={ data }
zoom={ currentZoom }
onDataUpdated ={ this.logDataUpdate }
/>
</div>
<MessageArea
messages={ messages }
/>
</div>
)
}
How everything works now – each time a user changes something in Gantt, we call the promise handler in the App component and update MessageArea, which prints action details on the page. It’s exactly what we wanted.
If we run the app now and change some tasks or links, we should see appropriate messages under the Gantt chart.
Download React gantt chart component demo from GitHub
Conclusion
Today we have shown you how to add a Gantt chart to the ReactJS app, how to configure the Gantt chart and to process changes made by the user. As you can see, dhtmlxGantt allows doing it quite easily.
What would you like to see in our next articles about dhtmlxGantt?
We need your feedback to provide the right integrations at the right time. Please leave your requests in the comment section below.
Thank you in advance and stay tuned for new tutorials!