Today, we’ll talk about creating a Gantt chart application with ASP.NET and REST API on the server-side. We will make use of ASP.NET MVC 5 web platform and Web API 2 Controller for REST API to create a Gantt application. To organize communication with the database, we will use the Entity Framework. We will build our application with the help of the MS Visual Studio 2015 IDE.
And now, let’s start by running Visual Studio and creating a new project.
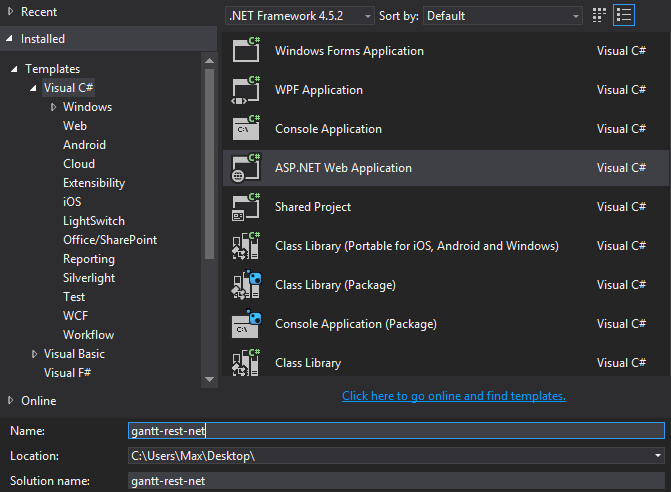
Step 1. Creating a New Project
Open the File menu tab and choose: New -> Project. Then select ASP.NET Web Application and give it a name. We’ll name it gantt-rest-net for our example:
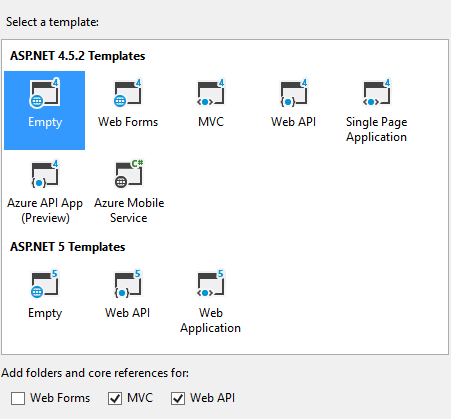
Select an Empty project among available templates and check MVC and Web API checkboxes below the list of templates:
Now, we need to install dhtmlxGantt using NuGet. Run the following command in the Package Manager Console:
Step 2. Adding Models, Views, and Controllers
At this step we have three main tasks:
- Creating Models, special objects that will represent data in the Gantt chart
- Creating Views that will visualize the data
- Creating Controller that will process the requests that come from the user and run the needed logic. It’ll call a particular view to generate a necessary HTML for the request
We’ll start from creating a controller.
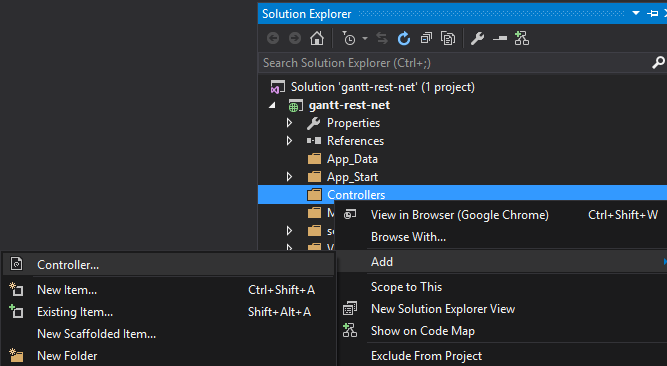
Creating a Controller
Call the context menu for the Controllers folder and choose Add->Controller.
In the opened window select MVC 5 Controller -> Empty and name a newly added controller “HomeController”.
Our controller has the Index() method of the ActionResult class by default, so it doesn’t require any additional logic. All we need to do is to add a view for it:
using System;
using System.Collections.Generic;
using System.Linq;
using System.Web;
using System.Web.Mvc;
namespace gantt_rest_net.Controllers
{
public class HomeController : Controller
{
// GET: Home
public ActionResult Index()
{
return View();
}
}
}
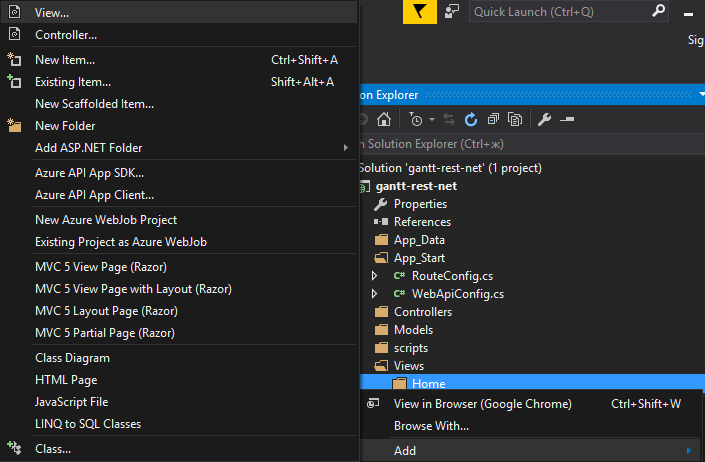
Creating a View
In the Views folder find the Home directory. Right click on it to call the context menu and select Add -> View.
Name the new view “Index”, then open the newly created view and put the following code into it:
ViewBag.Title = "Index";
}
<script src="~/scripts/dhtmlxgantt.js" type="text/javascript"></script>
In the above code we have done the following:
- set a container for the Gantt chart
- specified the dates format to load data from the server side
- initialized the Gantt chart
- enabled data loading
- initialized dataProcessor in the REST mode to work with the server side
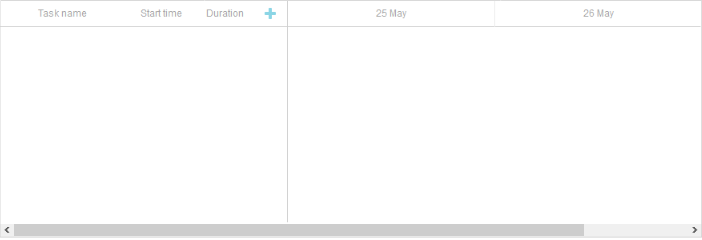
The server side will be implemented a bit later. Now, you can run the application and see that the Gantt chart is rendered on the page:
Creating Models
There are two types of data representation in Gantt: Tasks shown as horizontal bars and Links between them. Thus, we should create two models.
Task Model
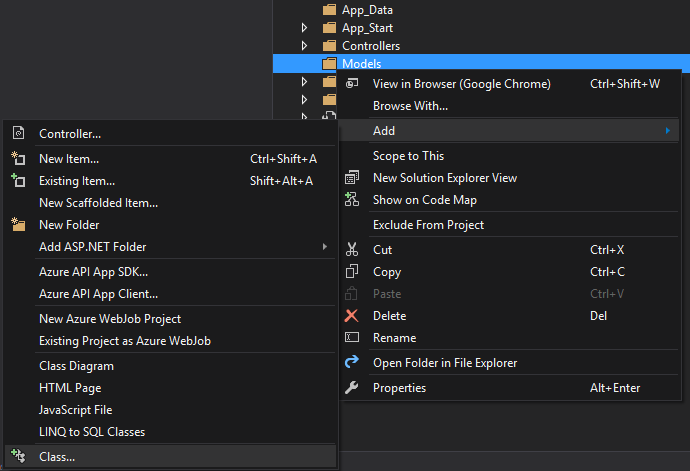
Right-click on the Models folder to call the context menu and select Add->Class.
Name the created class “Task”, then open it and add the necessary properties:
using System.Collections.Generic;
using System.Linq;
using System.Web;
namespace gantt_rest_net.Models
{
public class Task
{
public int id { get; set; }
public string text { get; set; }
public DateTime start_date { get; set; }
public int duration { get; set; }
public double progress { get; set; }
public int parent { get; set; }
}
}
Link Model
To create the Link model, create the Link class in the Models folder and add the following obligatory properties:
using System.Collections.Generic;
using System.Linq;
using System.Web;
namespace gantt_rest_net.Models
{
public class Link
{
public int id { get; set; }
public int source { get; set; }
public int target { get; set; }
public string type { get; set; }
}
}
Step 3. Configure DataBase Connection
As we have mentioned earlier, we’ll use the Entity Framework for working with the database. To install it, run the following command in the Package Manager Console:
To use the Entity Framework functionality, we need to apply the following namespace:
Creating Context
Context represents a session with the DataBase and allows loading and saving data.
Call the context menu for the Models folder and select Add->Class. The new class will be called “GanttContext” and will have the following content:
using System.Collections.Generic;
using System.Data.Entity;
using System.Linq;
using System.Web;
namespace gantt_rest_net.Models
{
public class GanttContext: DbContext
{
public DbSet Tasks { get; set; }
public DbSet Links { get; set; }
}
}
Adding Records to Database
The Entity Framework can automatically create a database when application runs. We should specify that a database should be dropped and re-created whenever the model changes.
First, we should create a database initializer. To do so, we need to add a new class in the App_Start folder that will be inherited from the DropCreateDatabaseIfModelChanges class. Let’s call it “GanttContextInitializer”.
In this class we’ll redefine the Seed() method to add some test data. Then we’ll add a collection of entities into the context using the AddRange() method.
The full code of the GanttContextInitializer class is given below:
using System;
using System.Collections.Generic;
using System.Data.Entity;
using System.Linq;
using System.Web;
namespace gantt_rest_net.App_Start
{
public class GanttContextInitializer: DropCreateDatabaseIfModelChanges
{
protected override void Seed(GanttContext context)
{
context.Tasks.AddRange(new List
{
new Task { id = 1, text = “Test Event 1”,
start_date = new DateTime(2016, 5, 26), duration = 4 },
new Task { id = 2, text = “Test Event 2”,
start_date = new DateTime(2016, 5, 25), duration = 6 },
new Task { id = 3, text = “Test Event 3”,
start_date = new DateTime(2016, 5, 27), duration = 8 },
new Task { id = 4, text = “Test Event 4”,
start_date = new DateTime(2016, 5, 31), duration = 2 },
new Task { id = 5, text = “Test Event 5”,
start_date = new DateTime(2016, 5, 26), duration = 7 },
});
context.Links.AddRange(new List {
new Link { id = 1, source = 1, target = 4, type = “0” },
new Link { id = 2, source = 3, target = 4, type = “1” },
});
}
}
}
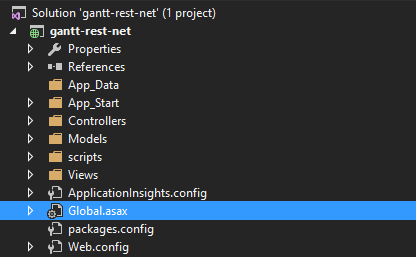
Open the Global.asax file. It contains code that runs on the application start.
Add the necessary namespace and the code line that will set Initializer for our context into theApplication_Start() method:
using System.Collections.Generic;
using System.Linq;
using System.Web;
using System.Web.Mvc;
using System.Web.Routing;
using System.Web.Security;
using System.Web.SessionState;
using System.Web.Http;
using System.Data.Entity;
using gantt_rest_net.App_Start;
namespace gantt_rest_net
{
public class Global : HttpApplication
{
void Application_Start(object sender, EventArgs e)
{
Database.SetInitializer(new GanttContextInitializer()); AreaRegistration.RegisterAllAreas();
GlobalConfiguration.Configure(WebApiConfig.Register);
RouteConfig.RegisterRoutes(RouteTable.Routes);
}
}
}
Adding Response Helpers
Helpers will form answers on CRUD requests. Let’s create the Helpers folder and add a class named GanttResponseHelper. Place the following code into the newly created class:
using System.Collections.Generic;
using System.Linq;
using System.Web;
using System.Web.Http.Results;
namespace gantt_rest_net.Helpers
{
public class GanttResponseHelper
{
public static Dictionary<string, string> GetResult(string action, int? tid)
{
var res = new Dictionary<string, string>();
res.Add(“action”, action);
if (tid != null)
res.Add(“tid”, tid.ToString());
return res;
}
}
}
The GetResult() method will generate an appropriate response for Data Processor according to its parameters. Each response will contain the name of an action.
There is also an optional parameter tid. It will be used for “insert” actions when database specifies a new id for the newly inserted entity.
Step 4. Creating API for Loading and Editing Data
Adding object containing Gantt data
Gantt holds both tasks and links within a single object. Let’s create a controller that will be responsible for the loading tasks and links data into the Gantt chart.
Open a context menu for the Controllers folder and select Add -> Controller.
Choose the Web API 2 Controller -> Empty and call a new controller “DataController”. Then, fill it with the following code:
using System;
using System.Collections.Generic;
using System.Linq;
using System.Net;
using System.Net.Http;
using System.Web.Http;
namespace gantt_rest_net.Controllers
{
public class DataController : ApiController
{
private string _dateFormat = “yyyy-MM-dd HH:mm”;
private GanttContext db = new GanttContext();
[HttpGet]
public IHttpActionResult Get()
{
var events = new List