Updated on June 13, 2023
The importance of automating the behavior of a project schedule increases manifold as the project’s complexity grows. By saying “complex”, we don’t necessarily mean the overall quantity of tasks that your project consists of. The relationships between these tasks also play a great role. For example, in some cases, the dependent activity shouldn’t strictly start after its predecessor is finished, but it can start after some delay.
Since it can be pretty hard to predict how things may unfold, unforeseen delays can cause a chain of changes that you’ll have to make in the project. Besides adding extra time resources to the working plan, the possibility of using auto scheduling can save you from a headache caused by the necessity of manual changes.
In this article, we’ll take a look at the feature of Gantt that provides you with the ability to schedule tasks automatically depending on relations between them. Besides that, you can create complex relations named Leads and Lags between the tasks scheduled in the Gantt chart.
Auto Scheduling in Gantt Chart
Auto scheduling updates the start date of the second (dependent) task, if the end date of the first task changes. This feature allows you to generate and maintain the project schedule by specifying relations between tasks with no need to set or update the dates of each task manually.
DHTMLX Gantt comes with several ways of automatic task planning within Gantt. Commonly, users prefer forward planning, which takes into account the start date or the date of the earliest task. But, you can also apply backward planning, i.e., plan tasks from the end of the project.
Still we will consider forward planning as a more common approach to scheduling Gantt tasks. This approach includes two scheduling modes:
- Simple mode
- Constraint mode
As the name of the second mode suggests, it makes use of time constraints that help to facilitate the project planning process.
Let us consider each mode in more detail.
Simple mode
We assume that you already know how to add the Gantt Chart to your page and initialize it. If not, have no fear. This getting started guide will take you by the hand and walk you through all the required stages.
To add the auto scheduling functionality to your app, you have to take two steps.
Firstly, it is required to enable the auto_scheduling plugin with the gantt.plugins method:
auto_scheduling: true
});
And secondly, use the following line of code to enable auto scheduling in Gantt:
To put auto scheduling in simple mode, you should also add the following config:
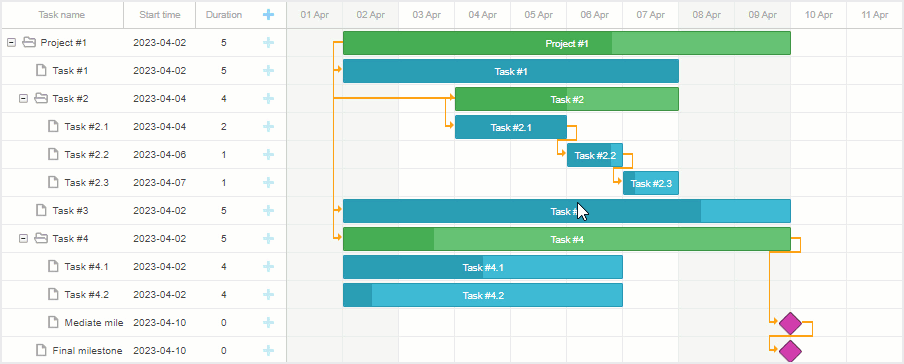
By default, the auto scheduling comes into action when the next task starts before the end date of the previous one. As a result, the next task will start where the previous one ends. But you can also make tasks always rescheduled each time to the earliest possible date by enabling the strict mode:
If needed, you can disable auto scheduling for individual tasks like this:
task.auto_scheduling = false;
To see how auto scheduling work, you can check this demo.
Constraint mode
DHTMLX Gantt offers 8 types of time constraints for more flexible project planning:
- As soon as possible (ASAP)
- As late as possible (ALAP)
- Start no earlier than (SNET)
- Start no later than (SNLT)
- Finish no earlier than (FNET)
- Finish no later than (FNLT)
- Must start on (MSO)
- Must finish on (MFO)
You can apply any of the given constraints in two ways:
- via the constraint control in the lightbox of a task
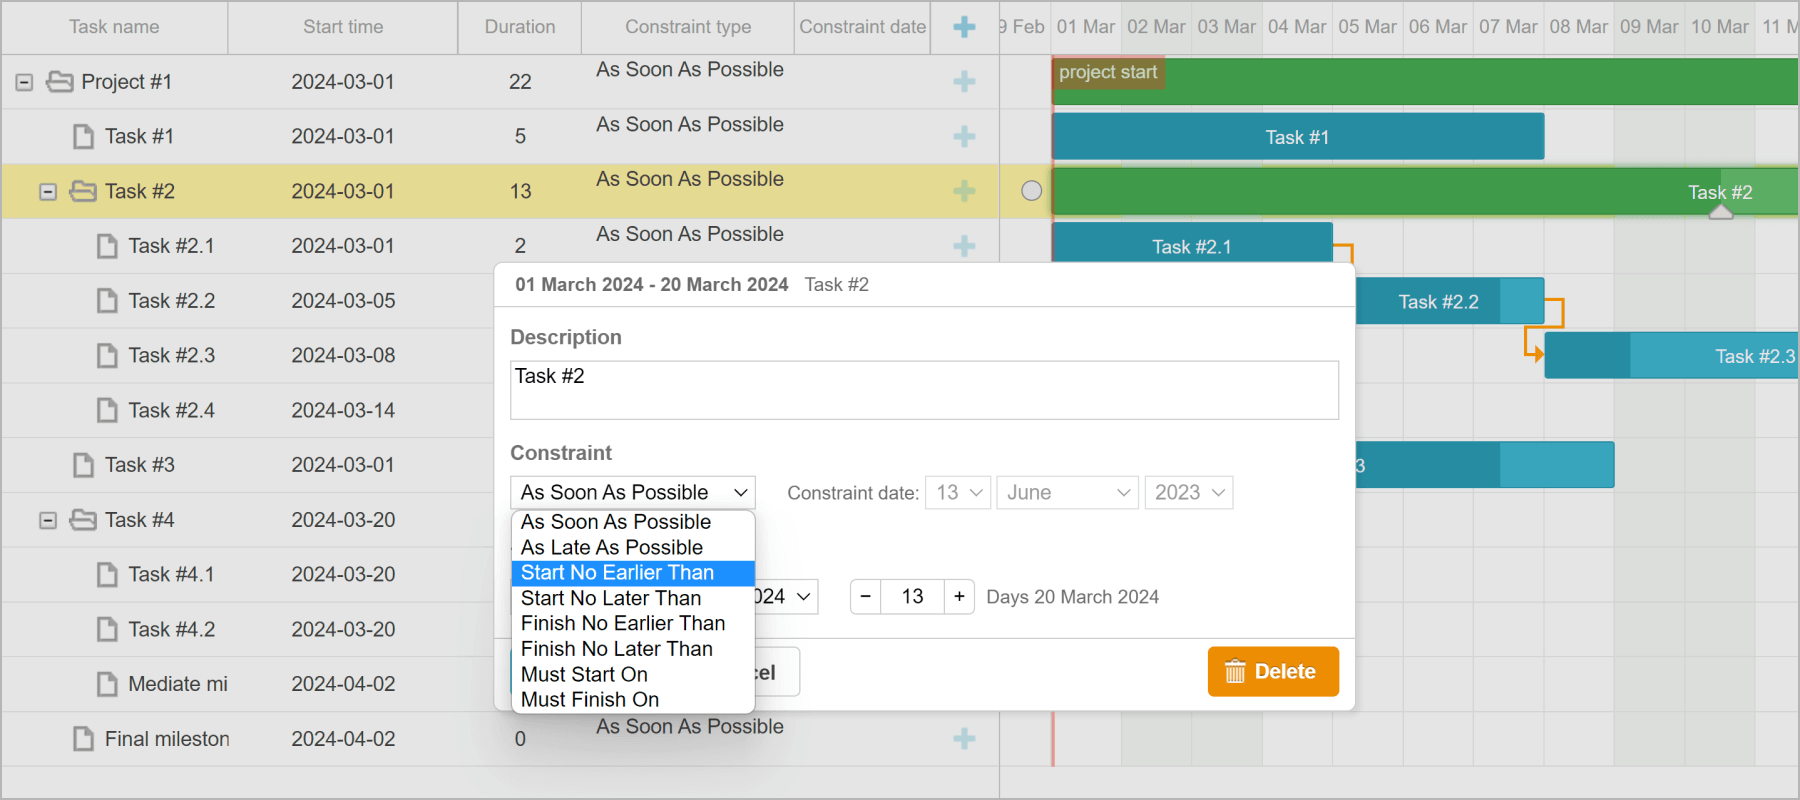
- via the inline editor in the Gantt grid
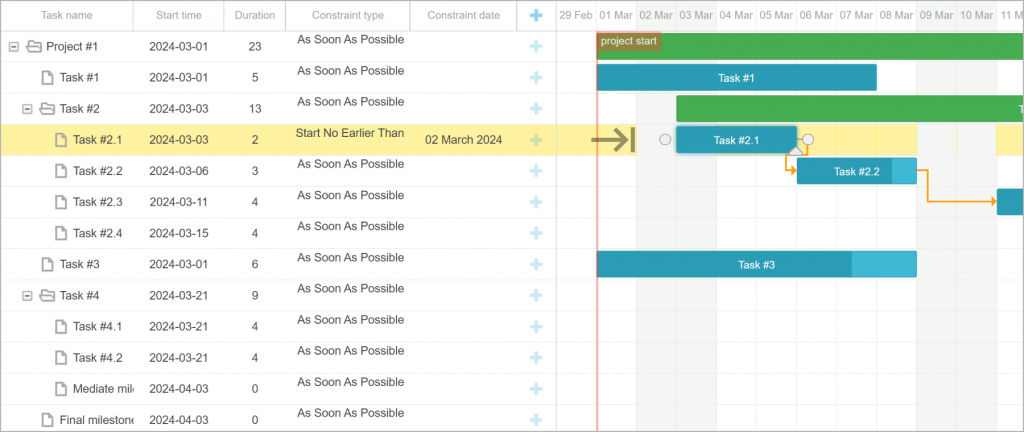
Neither constraint columns nor the lightbox section for editing constraints are enabled by default. They should be added to the config manually. Also, note that Gantt does not display constraints in the chart. If you want them to be visible, you can use the addTaskLayer method to do so. This sample will help to simplify this task. When the auto scheduling feature is enabled, end-users still will be able to schedule individual tasks manually.
Learn more details about each constraint type and how to set them in the documentation.
Interestingly, our Gantt component also allows inheriting constraints of project-type tasks (or simply projects) in their child tasks:
Now we proceed to explore other features of DHTMLX Gantt used in auto scheduling. They are lead and lag times. These features make things much easier when the number of project tasks is growing and the relations between them become more intricate.
Leads and Lags. A Brief Introduction
Let’s start from the theoretical part. In project management, there are four types of dependencies between the tasks:
- Finish to Start (FS)
- Finish to Finish (FF)
- Start to Start (SS)
- Start to Finish (SF)
There’s a simple rule that can help you remember the meaning of each of them: the first letter defines the behavior of the predecessor, and the second one represents the behavior of the successor. For example, Finish to Start (FS) means that after the previous task is finished, the next task starts.
In some cases, predefined constraints require adding a time gap between the tasks. Let’s look at a classical example. Imagine that you want to build a house. You need to add plaster to the wall and then paint it. Since you should finish the first task before painting, we have the Finish to Start (FS) dependency between the tasks. But we want to give the plaster some time to set up before painting. Thus, we should add a delay to the project. If you want to wait for two days (or other units of time that you prefer to use) before starting the next task, the relationship between the tasks will look like this: FS+2. This amount of time that we want to add to the project to delay the successor activity called Lag.
To meet deadlines, you may want to keep some extra time. For example, you have two tasks that have FS dependency: write the documentation and then edit it. But you don’t have to wait until the first task is finished. Instead, you can start the editing process after some part of the documentation is ready. Let’s say, you want to start the second task three days before the first one is finished. In this case, the dependency between these tasks will be FS-3, and this is what we call Lead.
We hope that you now have a common understanding of how leads and lags work and how you can improve the project management process using them. Now, let’s learn how you can implement them using DHTMLX Gantt.
Using Lags and Leads in Gantt
You may need to have an opportunity to create complex relations between linked tasks in Gantt. If you want them not just to follow each other, but overlap or have a delay between the end of the first one and the start of the second one, lag and lead time features will be of great help. Lead and lag times describe relations between activities, which means that in the case of Gantt, they allow us to manipulate dependencies (links) between tasks.
With DHTMLX Gantt, it is possible to specify lag and lead times right in the UI or via API.
In the Gantt grid, it is done using the inline predecessor editor. To set lag/lead time together with the required type of task link, it is necessary to apply the Link Formatter module and provide an instance of the LinksFormatter in the predecessor editor:
Programmatically, lead and lag times are added to task links (dependencies) in the links object with the lag property. You should use a positive value to add a lag and a negative value to specify a lead.
link.lag = 5
/*the successor activity will be precipitated with respect to the predecessor activity*/
link.lag = -5
Bear in mind that time constraints have a higher priority than lag times. Therefore, you should be careful when setting both parameters for the same task. In case of any conflict between these values, the lag time parameter will be ignored.
Conclusion
After analyzing the above, it becomes clear why auto scheduling is one of the most popular Gantt features. In this article, we’ve highlighted only the main features of DHTMLX Gantt related to the automatic planning of projects and regular tasks. You can get acquainted with other useful auto scheduling capabilities of our JavaScript Gantt in the corresponding section of our documentation.