Today we’ll show you the way of using JavaScript Scheduling Calendar with Scalatra Web Framework. Scalatra is a free and open source web application framework written in Scala. To install it, please follow the instructions you could find here. When installation is completed, we can start.
The demo is available on GitHub, so you’re welcome to check it right now.
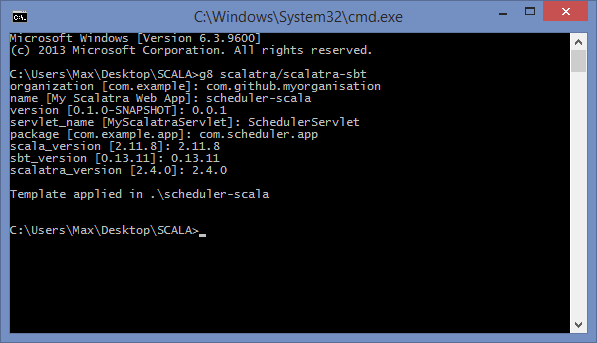
Step 1: Create a new scalatra app
Open a folder where you want to create a new project and run the following command:
There will be some questions about the application, so you need to fill them out and then you may continue. As a result, we should get something like this:
Now, let’s go to the app directory and make sure that it works.
sbt
jetty:start
To open the page, call “browse” command in the console or open http://127.0.0.1:8080 in a browser. We should get the Hello World app to proceed to the next steps.
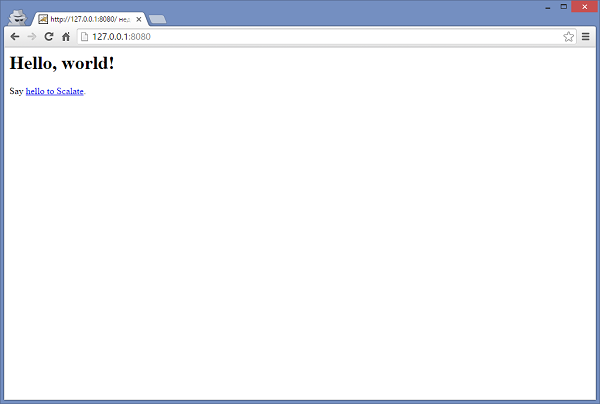
Got it? Great! Let’s move on.
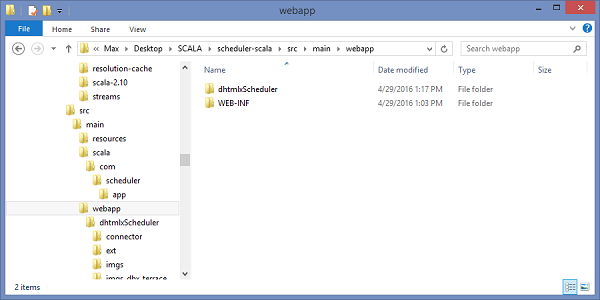
We can’t proceed without Scheduler, so it’s high time to download it. Now we can open scheduler-scala\src\main\webapp, create dhtmlxScheduler folder and unpack the scheduler codebase content to it:
Then open scheduler-scala\src\main\webapp\WEB-INF\templates\views and create index.jade file with the following content:
script(type='text/javascript' src='/dhtmlxScheduler/dhtmlxscheduler.js')
link(rel='stylesheet' href='/dhtmlxScheduler/dhtmlxscheduler.css')
#scheduler_here.dhx_cal_container(style='width: 100%; height: 700px')
.dhx_cal_navline
.dhx_cal_prev_button
.dhx_cal_next_button
.dhx_cal_today_button
.dhx_cal_date
.dhx_cal_tab(name='day_tab')
.dhx_cal_tab(name='week_tab')
.dhx_cal_tab(name='month_tab')
.dhx_cal_header
.dhx_cal_data
script
|scheduler.config.xml_date="%Y-%m-%d %H:%i:%s";
|scheduler.init("scheduler_here",new Date(2016,3,18));
|scheduler.load("/data", "json");
|var dp = new dataProcessor("/data/");
|dp.init(scheduler);
|dp.setTransactionMode("REST");
That’s how we’re creating a simple page layout for scheduler and adding required scripts and styles from scheduler codebase. We also need to initialize “/data” url as a datasource for the calendar. We’ll add the handlers to the server side later.
Now open scheduler-scala\src\main\scala\com\scheduler\app\SchedulerServlet.scala and replace this part:
<html>
<body>
<h1>Hello, world!</h1>
Say <a href="hello-scalate">hello to Scalate</a>.
</body>
</html>
}
By this one:
contentType = "text/html"
jade("/index")
}
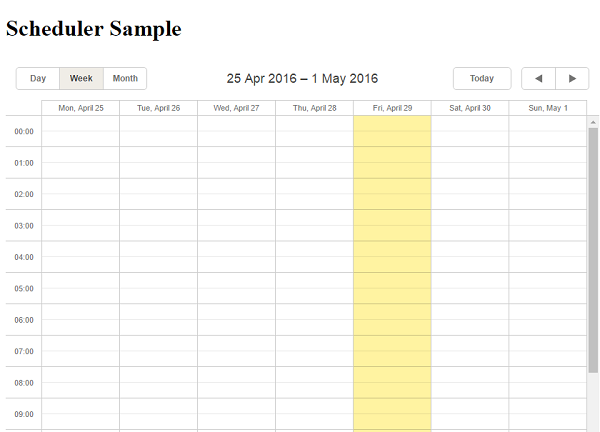
As you can see, we start using index.jade as the main app page. If everything is done correctly in the previous steps, we should see an empty scheduler when we start the app:
All the fundamental preparations are done, so we can move to the next step and load our scheduler app with data.
Step 2: Data loading
First of all, we need to add route handlers for data loading. For this, open scheduler-scala\project\build.scala and add the following dependency to libraryDependencies:
As a result, we get the following:
"org.mongodb" %% "casbah" % "2.7.2",
"org.scalatra" %% "scalatra" % ScalatraVersion,
"org.scalatra" %% "scalatra-scalate" % ScalatraVersion,
"org.scalatra" %% "scalatra-specs2" % ScalatraVersion % "test",
"ch.qos.logback" % "logback-classic" % "1.1.5" % "runtime",
"org.eclipse.jetty" % "jetty-webapp" % "9.2.15.v20160210" % "container",
"javax.servlet" % "javax.servlet-api" % "3.1.0" % "provided"
),
Open scheduler-scala\src\main\scala\ScalatraBootstrap.scala and put following code:
import com.scheduler.app._
import org.scalatra._
import javax.servlet.ServletContext
import com.mongodb.casbah.commons.conversions.scala.{RegisterConversionHelpers, RegisterJodaTimeConversionHelpers}
class ScalatraBootstrap extends LifeCycle {
override def init(context: ServletContext) {
RegisterConversionHelpers()
RegisterJodaTimeConversionHelpers()
val mongoClient = MongoClient()
val mongoColl = mongoClient("scheduler")("events")
context.mount(new SchedulerServlet(mongoColl), "/*")
}
}
Here we have created connection to MongoDB, got the link to MongoDB collection and passed it to our controller (with the mongoColl variable).
Since we’ve passed a collection into the controller, we need to modify its signature and add the necessary parameter into it. So open scheduler-scala\src\main\scala\com\scheduler\app\SchedulerServlet.scala and put following code:
import java.text.SimpleDateFormat
import java.util.Date
import com.mongodb.casbah.Imports._
import org.joda.time.DateTime
import org.joda.time.format.DateTimeFormat
class SchedulerServlet(mongoColl: MongoCollection) extends SchedulerscalaStack {
var dateFormat = DateTimeFormat.forPattern("yyyy-MM-dd HH:mm:ss")
def getEvent(params: Map[String, String]): MongoDBObject = {
MongoDBObject(
"text" -> params("text"),
"start_date" -> dateFormat.parseDateTime(params("start_date")),
"end_date" -> dateFormat.parseDateTime(params("end_date"))
)
}
get("/") {
contentType = "text/html"
jade("/index")
}
get("/init") {
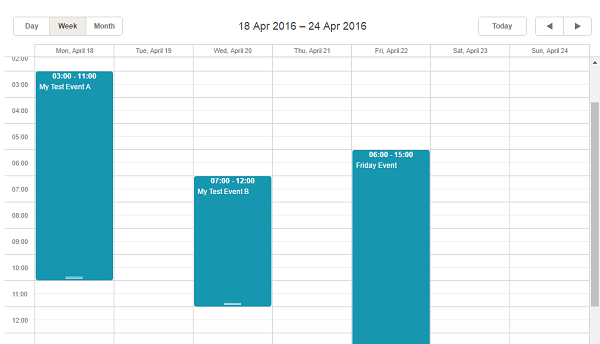
mongoColl += getEvent(Map("text" -> "My Test Event A", "start_date" -> "2016-04-18 03:00:00", "end_date" -> "2016-04-18 11:00:00"))
mongoColl += getEvent(Map("text" -> "My Test Event B", "start_date" -> "2016-04-20 07:00:00", "end_date" -> "2016-04-20 12:00:00"))
mongoColl += getEvent(Map("text" -> "Friday Event", "start_date" -> "2016-04-22 06:00:00", "end_date" -> "2016-04-22 15:00:00"))
}
get("/data") {
val evs = for{
x <- mongoColl
} yield MongoDBObject("id" -> x.get("_id").toString(),
"text" -> x("text"),
"start_date" -> x.as[DateTime]("start_date").toString(dateFormat),
"end_date" -> x.as[DateTime]("end_date").toString(dateFormat))
contentType = "application/json"
"[%s]".format(evs.mkString(","))
}
}
In the above code we’ve added the MongoCollection parameter for controller – SchedulerServlet(mongoColl: MongoCollection) and created the “/init” and “/data” handlers.
The “/init” handler is made just to generate some test data for the collection.
The “/data” handler is intended for loading data into scheduler. It gets all the records from database and sends them to the client side in the JSON format.
As you may remember, we have the following string in our index.jade:
It sends a request to the server to load data to the scheduler in JSON format.
Now we can restart our server and open http://127.0.0.1:8080/init. After this initial data for scheduler should be generated. Then we just need to open http://127.0.0.1:8080/ and scheduler with initial events will appear.
Step 3: Adding, editing and deleting data
We have a scheduler with events, but it doesn’t possess any useful features yet. Let’s provide it with such necessary abilities as adding, deleting and editing data.
Open scheduler-scala\src\main\scala\com\scheduler\app\SchedulerServlet.scala and add the insert, update, and delete handlers. We will also add a function that will get responses.
The resulting code will look like this:
import java.text.SimpleDateFormat
import java.util.Date
import com.mongodb.casbah.Imports._
import org.joda.time.DateTime
import org.joda.time.format.DateTimeFormat
class SchedulerServlet(mongoColl: MongoCollection) extends SchedulerscalaStack {
var dateFormat = DateTimeFormat.forPattern("yyyy-MM-dd HH:mm:ss")
def getEvent(params: Map[String, String]): MongoDBObject = {
MongoDBObject(
"text" -> params("text"),
"start_date" -> dateFormat.parseDateTime(params("start_date")),
"end_date" -> dateFormat.parseDateTime(params("end_date"))
)
}
def getResponse(mode: String, tid: String): String = {
var response = Map("type" -> mode)
if(tid != null) response += ("tid" -> tid)
"{%s}".format((response map {case (k,v) => "\""+k+"\":\""+v+"\""}).mkString(","))
}
get("/") {
contentType = "text/html"
jade("/index")
}
get("/init") {
mongoColl += getEvent(Map("text" -> "My Test Event A", "start_date" -> "2016-04-18 03:00:00", "end_date" -> "2016-04-18 11:00:00"))
mongoColl += getEvent(Map("text" -> "My Test Event B", "start_date" -> "2016-04-20 07:00:00", "end_date" -> "2016-04-20 12:00:00"))
mongoColl += getEvent(Map("text" -> "Friday Event", "start_date" -> "2016-04-22 06:00:00", "end_date" -> "2016-04-22 15:00:00"))
}
get("/data") {
val evs = for{
x <- mongoColl
} yield MongoDBObject("id" -> x.get("_id").toString(),
"text" -> x("text"),
"start_date" -> x.as[DateTime]("start_date").toString(dateFormat),
"end_date" -> x.as[DateTime]("end_date").toString(dateFormat))
contentType = "application/json"
"[%s]".format(evs.mkString(","))
}
post("/data/:id"){
val newEvent:MongoDBObject = getEvent(params)
mongoColl += newEvent
contentType = "application/json"
getResponse("inserted", newEvent("_id").toString())
}
put("/data/:id") {
val query = MongoDBObject("_id" -> new ObjectId(params("id")))
val event:MongoDBObject = getEvent(params)
mongoColl.findAndModify(query, event)
contentType = "application/json"
getResponse("updated", null)
}
delete("/data/:id"){
val query = MongoDBObject("_id" -> new ObjectId(params("id")))
mongoColl.remove(query)
contentType = "application/json"
getResponse("deleted", null)
}
}
When we restart the server and open http://127.0.0.1:8080 in browser again, our calendar will be able to create, edit and delete events. What is more, now all the changes will be automatically saved in the database and won’t disappear after reloading the page.
The demo is available on GitHub, so you’re welcome to check it right now.