Node.js is a flexible JavaScript platform that’s becoming more and more popular these days. In the previous article, we have described how it can be used with MongoDB. However, you can use Node.js with relational databases as well. It may require a bit more coding but it still results in a quick and flexible solution. Let’s see how to create an online grid with the help of dhtmlxGrid, JavaScript sortable grid component, Node.js, and MySQL database.

Download the final demo from GitHub or continue reading this tutorial to get the details.
Creating a Node.js Site
Just like in the previous tutorial, we start from creating a simple Node.js site. We use the Express framework and node-mysql, an open source Node.js driver for MySQL.
First, we create a directory called, for example, ‘grid-node’, and install the necessary libraries into this directory by running the following command:
cd grid-node
npm install express
npm install mysql@2.0.0-alpha9
Then we need to create the base of our demo application. It will be ‘app.js’ file in the ‘grid-node’ directory with the following content:
var path = require('path');
//connect to the MySQL
var mysql = require('mysql');
var db = mysql.createConnection({
host : 'localhost',
user : 'sampleDB',
password : 'sampleDB',
database : 'sampleDB'
});
//create express app, use public folder for static files
var app = express();
app.use(express.static(path.join(__dirname, 'public')));
//is necessary for parsing POST request
app.use(express.bodyParser());
app.listen(3000);
With the Express framework, our demo app is created with a few lines of code. It doesn’t execute any complex functionality, just serves static files from the ‘public’ directory.
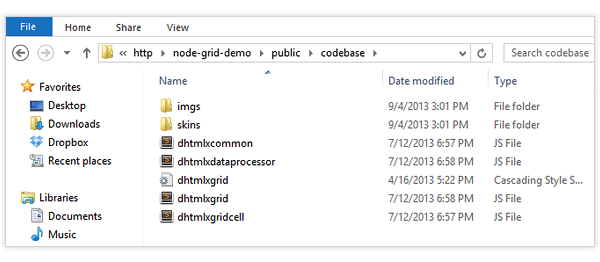
Then we create a ‘public’ directory. Download dhtmlxGrid Standard (open source, GPL) and unpack the folder ‘codebase’ from the Grid’s package into the ‘public’ directory. After that, the whole files structure will look like this:

Next, we create an index.html file in the ‘public’ directory. It will be the main page of our demo app that will contain a grid. The content of the index.html:
<head>
<meta http-equiv="Content-type" content="text/html; charset=utf-8">
<title>Basic initialization</title>
</head>
<script src="codebase/dhtmlxcommon.js" type="text/javascript" charset="utf-8"></script>
<script src="codebase/dhtmlxgrid.js" type="text/javascript" charset="utf-8"></script>
<script src="codebase/dhtmlxgridcell.js" type="text/javascript" charset="utf-8"></script>
<script src="codebase/dhtmlxdataprocessor.js" type="text/javascript" charset="utf-8"></script>
<link rel="stylesheet" href="codebase/dhtmlxgrid.css" type="text/css" media="screen" title="no title" charset="utf-8">
<link rel="stylesheet" href="codebase/skins/dhtmlxgrid_dhx_skyblue.css" type="text/css" media="screen" title="no title" charset="utf-8">
<script type="text/javascript" charset="utf-8">
function init() {
mygrid = new dhtmlXGridObject("grid_here");
mygrid.setImagePath("../../codebase/imgs/");
mygrid.setHeader("Sales, Author, Title, Price");
mygrid.setColumnIds("sales,author,title,price");
mygrid.setInitWidths("70,150,*,70");
mygrid.setColTypes("dyn,ed,ed,ed");
mygrid.setColSorting("int,str,str,int");
mygrid.setSkin("dhx_skyblue");
mygrid.init();
}
</script>
<body onload="init();">
<div id="grid_here" style="width:550px; height:150px;"></div>
</body>
This is the minimum HTML code needed for working with dhtmlxGrid. The JavaScript files included at the top of the code contain dhtmlxdataprocessor.js, which is not required for basic grid initialization but will be used later for data saving.
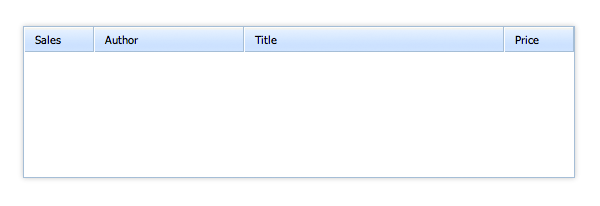
If you would like to check what we’ve got, you can start the nodejs server and open http://localhost:3000 address in a browser (to start nodejs server, run “nodejs app.js” command). If everything is done correctly, you will see an empty grid.

Loading Data in Grid
Now we need to fill our grid with data and add some records in it. First, we load data dump in the database:
`id` int(11) NOT NULL AUTO_INCREMENT,
`sales` int(11) NOT NULL,
`author` varchar(255) CHARACTER SET utf8 COLLATE utf8_bin NOT NULL,
`title` varchar(255) CHARACTER SET utf8 COLLATE utf8_bin NOT NULL,
`price` decimal(8,2) NOT NULL,
PRIMARY KEY (`id`)
) ENGINE=InnoDB AUTO_INCREMENT=9 ;
INSERT INTO `books` (`id`, `sales`, `author`, `title`, `price`) VALUES
(1, 450, 'Jon Duckett', 'HTML and CSS: Design and Build Websites', 16.79),
(3, -800, 'Steve Krug', 'Don''t Make Me Think', 40.95),
(4, 800, 'Douglas Crockford', 'JavaScript: The Good Parts', 15.59),
(5, 1250, 'John Resig', 'Secrets of the JavaScript Ninja', 23.99);
After that, we add one more handler to app.js:
db.query("SELECT * FROM books", function(err, rows){
if (err) console.log(err);
res.send(rows);
});
});
This new handler will be used to load data in the grid. Here we choose all records from the database and send them to the client-side as JSON structure. The code is quite straight and simple. As our table has ID field called “id”, we don’t need to apply any transformations to the data.
There are also some changes required in the index.html file:
mygrid.load("/data", "js")
We have added one more line that initiates data loading using the url described above. “Load” command defines data format (the second parameter) as “js”. It allows loading data in unified JSON format. The grid will map data from JSON to columns depending on column IDs (we’ve set IDs earlier with setColumnIds command).
If we now restart the server and open http://localhost:3000 in a browser, we will see our grid with a few rows loaded from the database.
Add, Delete, Edit Records in Grid
Now we need to make the grid editable, which means the end users will be able to add/delete/edit grid records and these changes will be automatically saved to the database.
First, we add UI for data operations in the client-side code of index.html. The following code will add two buttons to create/remove rows:
<div id="grid_here" style="width:550px; height:150px;"></div>
<br>
<input style="padding:6px;" type="button" value="Add a new record" onclick="addrow()">
<input style="padding:6px;" type="button" value="Delete the selected record" onclick="deleterow()">
</body>
Then, we add the code that initializes dataprocessor in the same index.html file:
/* ... skipping the previously added code ... */
var dp = new dataProcessor("/data");
dp.init(mygrid);
dp.enableDataNames(true);
dp.setTransactionMode("POST", false);
}
function addrow(){
var id = mygrid.uid();
mygrid.setActive(true);
mygrid.addRow(id, "100,New Author,New Book");
}
function deleterow(){
mygrid.deleteSelectedRows();
}
As you can see, after initialization of the dataprocessor, we have issued a couple of extra commands:
- enableDataNames – enables the mode, in which the dataprocessor uses columns’ IDs as names of parameters
- setTransactionMode – switches dataprocessor to the mode of simple POST sending
From now on, each time when the grid data is changed, the dataprocessor will call “/data” url and will pass the properties of the changed event to the server side.
“addrow” and “deleterow” functions, combined with related user interface, will allow the end users to add and delete rows in the grid. They are using common grid’s API.
Now, we’ll go over to the server code and will add one more handler to the app.js:
var data = req.body;
var mode = data["!nativeeditor_status"];
var sid = data.gr_id;
var tid = sid;
var sales = data.sales;
var author = data.author;
var title = data.title;
var price = data.price;
function update_response(err, result){
if (err){
console.log(err);
mode = "error";
}
else if (mode == "inserted")
tid = result.insertId;
res.setHeader("Content-Type","text/xml");
res.send("<data><action type='"+mode+"' sid='"+sid+"' tid='"+tid+"'/></data>");
}
if (mode == "updated")
db.query("UPDATE books SET sales = ?, author = ?, title = ?, price = ? WHERE id = ?",
[sales, author, title, price, sid],
update_response);
else if (mode == "inserted")
db.query("INSERT INTO books(sales, author, title, price) VALUES (?,?,?,?)",
[sales, author, title, price],
update_response);
else if (mode == "deleted")
db.query("DELETE FROM books WHERE id = ?", [sid], update_response);
else
res.send("Not supported operation");
});
Here we use “app.post” because all saving operations use POST queries. The first part of the code defines the type of the operation and gets the data fields from the incoming request. Important note: in case of grid, the ID of the record is contained in the data.gr_id property (not data.id as it might be expected).
Next, depending on the type of the operation, we execute the necessary SQL query. Each type of operation (adding/saving/deleting) has its own query text.
As the operations with database are asynchronous, we pass the specified earlier callback function “update_response” as the last parameter. The client side expects to get the confirmation of saving operation or an error message. This is what the “update_response” function is responsible for. It generates an XML response in the necessary format and sends it to the client side (details of the format can be found in the documentation).
In case of adding a new record, this the “update_response” function also includes ID generated by MySQL for the new record into the response to update the element’s ID on the client side, too.
If we restart the server and open http://localhost:3000 in browser again, we’ll get a grid with a few rows. By clicking on the “Add record” button, we can add new rows to the grid. Using the “Delete record” button, we can delete the selected record in the grid. What’s more, all the changes are automatically saved in the database and will be available after reloading the page.
What is the Result?
Maybe this server solution is not as flexible as in case of MongoDB, but it is still quite simple to add extra fields or change the logic of data update. It all can be done by tweaking SQL commands. It also won’t be difficult to add data validation or to format data before loading, if needed.
We hope this tutorial helped you to understand how to create an editable datagrid that loads data from MySQL and manages client-server data connection using the Node.js layer. By slightly customizing this code, you can get a solution that allows several users to edit the grid simultaneously (update the data on the client-side without reloading pages). It can be described in a separate tutorial. Leave a comment and tell us if you are interested in such a tutorial.