It is time to remind you that DHTMLX Gantt is a highly customizable tool that can be complemented with additional functionalities required for your project management app. Today, you will learn how to complement a DHTMLX-based JavaScript Gantt chart with a custom context menu for improving users’ efficiency and productivity in task management. Taking into account the great intercompatibility of DHTMLX products, the Suite’s Menu widget is a perfect addition to the Gantt component for achieving the goal of this tutorial.
Let us review this demo in more detail and provide you with technical details that will help you integrate a similar feature into your project.
Initializing and Configuring a Context Menu
In our use case scenario, a context menu is a useful UI element that can display different options based on the context of the user’s interaction with the Gantt chart.
If you right-click on any task in the Gantt chart in the sample below, you can play around with all available task operations.
Check the sample >
To save time, we’ll omit the initialization stage of our Gantt component that is clearly described in the documentation, and go straight to implementing a context menu with DHTMLX Menu.
The first step is to create a new instance of the context menu.
After that, use the onContextMenu event handler, which fires after the rightclick on a task.
In the menu configuration, different menu items are shown depending on the click location. When calling a context menu for a regular task in the timeline, it will include the “Split Task” item. However, this option is not available in the context menu for tasks with the project type and when calling the menu for tasks in the grid area since it is assumed that tasks should be split right at the click location.
At the very beginning of the function in the event handler, it is necessary to collect the information where exactly the context menu is called.
if (taskId) {
const task = gantt.getTask(taskId);
For this purpose, you’ll need several configs (variables):
- isTaskBar – shows whether the taskbar in the timeline (the type of task is not taken into account here) is clicked.
- isParentTask – shows if the task has child tasks.
- isSplitTask – shows if the task is rendered in split mode, when all of its child tasks (taskbars) are displayed on a single line in the timeline.
- barHidden – shows if the task is displayed in the timeline.
If a task has a parent, it is necessary to determine whether its parent is displayed in the split mode. It is done the following way:
if (task.parent) {
const parent = gantt.getTask(task.parent);
hasSplitParent = parent.render === "split";
}
After that, you need to add all parameters to the itemsConfig object.
For the custom context menu, you need to remove all previous context menu items, and then add new ones returned by the generateMenuItems function.
contextMenu.data.parse(generateMenuItems(itemsConfig));
Now it is time to show the context menu in the click position.
Next, you need to calculate the position of the mouse click relative to the timeline. And from the resulting click position, you’ll get the click date, which should be added to the clickDate parameter. It will be used in various context menu actions.
clickDate = gantt.dateFromPos(clickPosition)
The function of the onContextMenu event handler must return false to disable the default context menu function (i.e. the browser should not display the default context menu).
Now let us get back to the generateMenuItems function. In this function, data for context menu items is generated. Each object for a context menu item contains an icon, item type, ID, and text.
icon: "dxi dxi-chevron-up",
type: "menuItem",
id: "add_sibling_above",
value: "Add sibling above",
},
Next, you need to create objects for two menu items – “Cancel copy/cut operation” and “Show all hidden tasks”.
icon: "dxi dxi-close",
type: "menuItem",
id: "cancel_paste",
value: "Cancel copy/cut operation",
};
const showAllHidden = {
icon: "dxi dxi-eye",
type: "menuItem",
id: "show_hidden",
value: "Show all hidden tasks",
};
After a click on a taskbar in the grid or in the timeline, the function will be invoked with the config and various elements will be added to the context menu.
When clicks occur in other areas of the Gantt chart, you need to check if there are tasks selected for copying and cutting. If so, you add this object to the array of menu items. If some tasks are hidden, then a second menu item is added. Under the mentioned conditions, these menu items will always be visible, regardless of click positions in the Gantt chart.
if (tasksToCopy.length + tasksToCut.length > 1) {
menuItems.push(cancelCopyCut);
}
if (Object.keys(hiddenTasks).length) {
menuItems.push(showAllHidden);
}
return menuItems;
Now get back to the context menu configuration. Before creating an instance of the context menu, it is reasonable to consider the generateMenuItems function in order not to return to this matter later.
You have to add an event handler for clicks on context menu items. With each click, the click function will be invoked. This function will use the ID of the menu item.
applyCommand(id);
targetId = null;
});
Now we can focus on the configuration of each context menu option separately.
Create/Update/Delete
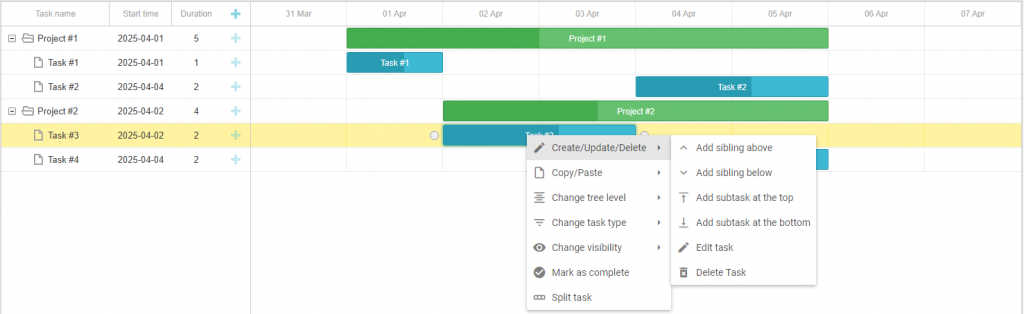
First, we describe the Create/Update/Delete section. This section includes the following nested menu items:
- Add sibling above
This item adds a task at the same level, only on top of the task being clicked on:
gantt.createTask({ id: gantt.uid(), text: "New task", start_date: task.start_date, duration: 1 }, task.parent, gantt.getTaskIndex(task.id));
break;
To do this, you need to specify the parent of the task as the second parameter and the index of the task inside the branch as the third parameter.
- Add sibling below
This item adds a task at the same level, only below the task being clicked on.
gantt.createTask({ id: gantt.uid(), text: "New task", start_date: task.start_date, duration: 1 }, task.parent, gantt.getTaskIndex(task.id) + 1);
break;
To do this, you need to specify the parent of the task as the second parameter and increase the index of the task inside the branch by 1 as the third parameter.
- Add subtask at the top
This item adds a subtask at the top of the branch (above all other subtasks):
gantt.createTask({ id: gantt.uid(), text: "New subtask", start_date: task.start_date, duration: 1 }, task.id, 0);
break;
To do this, you specify the task ID as the second parameter and set zero index as the third parameter.
- Add subtask at the bottom
This item adds a subtask at the bottom of the branch (below all other subtasks):
gantt.createTask({ id: gantt.uid(), text: "New subtask", start_date: task.start_date, duration: 1 }, task.id);
break;
To do this, you should specify the task ID as the second parameter and omit the third parameter. In the same way, tasks are added using the built-in “+” button in the grid area of the Gantt chart.
- Edit task
This item opens a task’s lightbox (edit form).
gantt.showLightbox(task.id);
break;
- Delete task
This item opens a confirm message box on task deletion.
gantt.confirm({
text: "Delete task?",
ok: "Yes",
cancel: "No",
callback: function (result) {
if (result && gantt.isTaskExists(task.id)) {
gantt.deleteTask(task.id);
}
}
});
break;
If a user is positive on the question in the message box, the task is deleted.
Copy/Paste
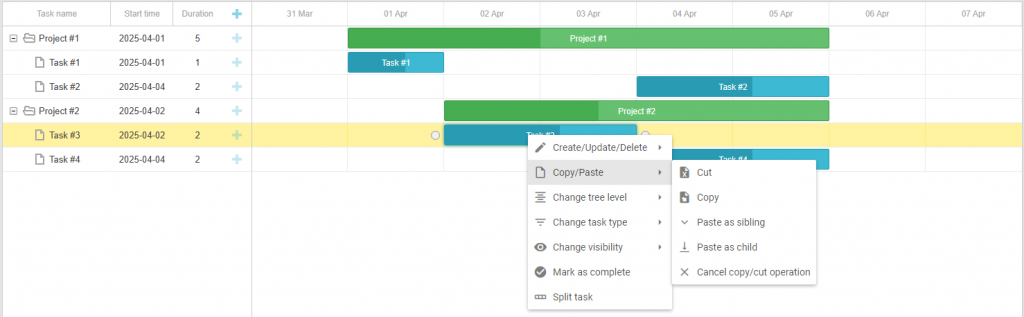
Using this section of the context menu, end-users can perform cut, copy, and paste operations with tasks.
- Cut
Here the task is marked for cutting so that it can later be moved to some other position. Since an end-user may decide that the task should not be copied but cut, it is necessary to check if the ID with the task is present in the tasksToCopy array. If the ID with the task is in there, you should remove it from the array.
Next, you check that the task ID is not in the tasksToCut array to exclude duplicate IDs. If the task with the ID is not in the array, add it there. After that, you refresh the task to highlight it using styles.
const copyIndex = tasksToCopy.indexOf(task.id) > -1;
if (copyIndex) {
tasksToCopy.splice(copyIndex, 1)
}
// exclude duplicates
if (tasksToCut.indexOf(task.id) === -1) {
tasksToCut.push(task.id);
}
gantt.refreshTask(task.id);
break;
- Copy
Here the task is marked for copying so that it can later be added to some other position. Since an end-user may decide that the task should not be cut but copied, you need to check if the task ID is in the tasksToCut array. If so, you remove it from the array. Next, check that the task ID lacks in the taskToCopy array to exclude duplicate IDs. If the task ID is not in the array, add it there. After that, you redraw the task to highlight it using styles.
const cutIndex = tasksToCut.indexOf(task.id) > -1;
if (cutIndex) {
tasksToCut.splice(cutIndex, 1)
}
// exclude duplicates
if (tasksToCopy.indexOf(task.id) === -1) {
tasksToCopy.push(task.id);
}
gantt.refreshTask(task.id);
break;
- Paste sibling
Here the pasteTasks function is executed. It copies and moves the marked tasks below the task on which the context menu is called.
pasteTasks(task.parent, gantt.getTaskIndex(task.id) + 1);
break;
- Paste as child
Like in the previous option, here the pasteTasks function is executed. It will copy and move marked tasks inside the task on which the context menu is called.
pasteTasks(task.id);
break;
- Cancel copy/cut operation
Here copying and cutting marks are removed from tasks.
tasksToCopy = [];
tasksToCut = [];
gantt.render();
break;
Change Tree Level
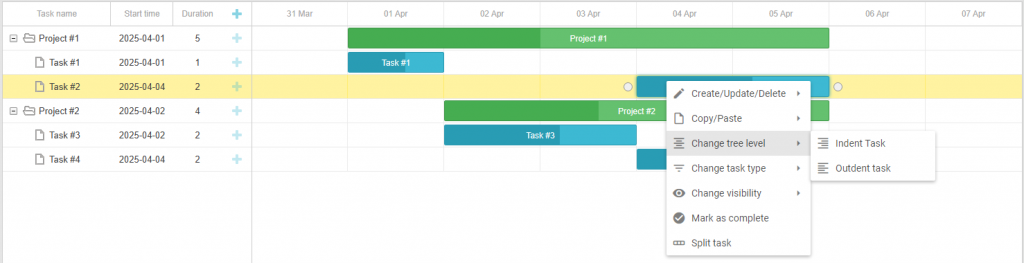
This section helps organize the hierarchical structure within the project. You can add hierarchy to the project by:
- choosing a task and indenting it, thereby making it a subtask, and the task above turns into a project task:
const prevId = gantt.getPrevSibling(task.id);
if (prevId) {
const newParent = gantt.getTask(prevId);
gantt.moveTask(task.id, gantt.getChildren(newParent.id).length, newParent.id);
newParent.type = gantt.config.types.project;
newParent.$open = true;
gantt.updateTask(task.id);
gantt.updateTask(newParent.id);
return task.id;
}
break;
- and vice versa – outdenting a task, making it not a subtask of the previous parent task:
const oldParent = task.parent;
if (gantt.isTaskExists(oldParent) && oldParent != gantt.config.root_id) {
var index = gantt.getTaskIndex(oldParent) + 1;
gantt.moveTask(task.id, index, gantt.getParent(task.parent));
if (!gantt.hasChild(oldParent)) {
gantt.getTask(oldParent).type = gantt.config.types.task;
}
gantt.updateTask(task.id);
gantt.updateTask(oldParent);
return task.id;
}
break;
You can play around with this useful feature in this sample.
Change Task Type
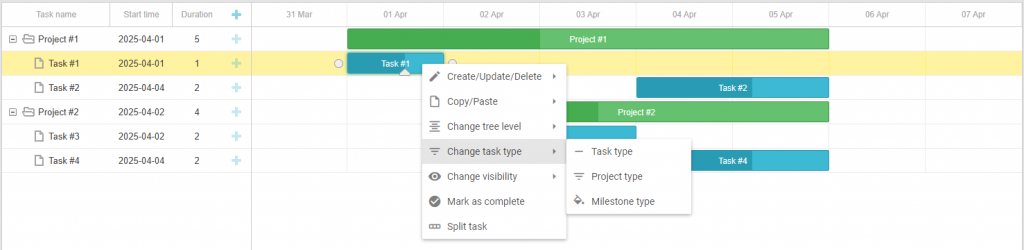
In this part of the context menu, you can specify a task type for the selected task.
- Regular task
Here you set the “task” type. As previously, it could be a milestone with a zero duration, you should set the task duration and update the end_date parameter. After that update the task.
task.type = "task";
task.duration = task.duration || 1;
task.end_date = gantt.calculateEndDate(task);
gantt.updateTask(task.id);
break;
- Project task
You set the “project” type for a task and update it.
task.type = "project";
gantt.updateTask(task.id);
break;
- Milestone task
You set the “milestone” type for a task and update it.
task.type = "milestone";
gantt.updateTask(task.id);
break;
Change Visibility

This context menu item focuses on managing the visibility of tasks and related elements and includes the following options:
- Rollup
We start with the rollup parameter of tasks. Rolled-up elements are displayed on the project bar and offer a quick overview of the project schedule. First, change the rollup parameter so that the task is displayed on the project bar. Update the task and its parent to render the changes.
task.rollup = !task.rollup;
gantt.updateTask(task.id);
gantt.updateTask(task.parent);
break;
- Hide task bar
For this option, you need to change the task’s hide_bar parameter to hide the task in the timeline. Update the task to render changes.
task.hide_bar = !task.hide_bar;
gantt.updateTask(task.id);
break;
- Hide task row
Add a task to the hiddenTasks object to hide the entire task row. Then update the task to render the changes. The task won’t be shown in the grid and in the timeline.
hiddenTasks[task.id] = true;
gantt.updateTask(task.id);
break;
- Show all hidden tasks
Empty the hiddenTasks object to display all previously hidden tasks. Then, execute the render command to render the changes.
hiddenTasks = {};
gantt.render();
break;
Mark as Complete

With this context menu item, end-users can show that a given task is complete.
In code, the value of the task progress parameter should be set to 1 (i.e. 100%).
task.progress = 1;
gantt.updateTask(task.id);
break;
Split Task

This feature comes in handy when you need to divide large tasks into several more manageable pieces.
When clicking on this option, it seems that the selected task is divided into 2 parts at the click location. In fact, there are two copies of an original task, where you change their IDs and start_date or end_date parameters. The original task becomes a project shown in split mode.
gantt.batchUpdate(function () {
if (gantt.hasChild(task.id)) {
gantt.message("The task already has children, so, it won't be split to new sub tasks");
return;
}
const leftChild = gantt.copy(task);
leftChild.id = gantt.uid();
leftChild.end_date = new Date(clickDate);
leftChild.parent = task.id;
leftChild.type = "task";
const rightChild = gantt.copy(task);
rightChild.id = gantt.uid();
rightChild.start_date = new Date(clickDate)
rightChild.parent = task.id;
rightChild.type = "task";
task.render = 'split';
task.type = "project";
gantt.updateTask(task.id);
gantt.close(task.id);
gantt.addTask(leftChild);
gantt.addTask(rightChild);
})
break;
If one task has already been divided into 2, then each of the parts can also be divided into 2. Under the hood, changes take place in the tree structure.
To bring it back, it is necessary to click “Unsplit parent”. Here you need to call the unsplit function. It is invoked only in tasks with the “project” type. This option is available in the grid only, but if the task is expanded, it will no longer be displayed in the split mode, and then the option will be available in the timeline.
unsplit(task)
break;
The unsplit function is also used for the same purpose in the parent task.
const parent = gantt.getTask(task.parent);
unsplit(parent)
break;
This function deletes all descendants of the task, and the task itself receives the task type. The start and end dates of the task do not change, and it no longer appears in the split mode.
gantt.batchUpdate(function () {
gantt.eachTask(function (child) {
if (gantt.isTaskExists(child.id)) {
gantt.deleteTask(child.id);
}
}, task.id)
delete task.render;
task.type = "task";
gantt.updateTask(task.id);
})
}
That’s all we have to say about context menu operations. Now we want to show you how to implement some other things such as hide tasks or mark tasks for cutting and copying
To hide tasks, you need to use the onBeforeTaskDisplay event handler. If it returns false, the task will not be displayed in the Gantt chart. Check if the task ID is in the hiddenTasks object. If the ID is there with the true value for the task, the task will be hidden.
gantt.attachEvent("onBeforeTaskDisplay", function (id, task) {
return !hiddenTasks[task.id]
});
Now, let us proceed to the pasteTasks function.
First, you iterate through the tasksToCopy array. In this array, you get the task object by ID, perform a deep copy of the task, change its ID, and add the task to Gantt.
const task = gantt.getTask(id);
const clone = gantt.copy(task);
clone.id = gantt.uid();
gantt.addTask(clone, parentId, index);
});
After that, you iterate through the TasksToCut array. Here you should use the moveTask() method to move the task to a different parent and a new position.
gantt.moveTask(id, index, parentId);
});
In case the task where you copy or move the task becomes a parent, open it. Then you need to empty the tasksToCopy and tasksToCut arrays.
tasksToCopy = [];
tasksToCut = [];
In the grid_row_class and task_class templates, you return the class name task_to_copy when the task ID is in the tasksToCopy array and return task_to_cut in case the task ID is presented in the tasksToCut array.
gantt.templates.task_class = function (start, end, task) {
if (tasksToCopy.indexOf(task.id) > -1) {
return "task_to_copy"
}
if (tasksToCut.indexOf(task.id) > -1) {
return "task_to_cut"
}
return "";
};
There are two types of styles applied for these classes:
1. opacity
.task_to_cut.gantt_row.odd,
.task_to_cut.gantt_task_line {
opacity: 0.5;
}
2. bordering
.task_to_copy.gantt_row.odd,
.task_to_copy.gantt_task_line {
border: 2px dotted LightSkyBlue;
}
Also, disable the round_dnd_dates config so that tasks can be moved to any position and Gantt won’t snap them to the timeline cells.
After dividing the task, its duration may become more or less than 1 day. Once the task is moved to a new position, Gantt recalculates the task duration, which will be rounded to the nearest integer number. Then Gantt recalculates the end date depending on the task duration.
If the task duration becomes 0, the task will shrink and it will be inconvenient to drag it. So it is necessary to modify the duration parameter to be greater than 0.
task.duration = task.duration || 1
});
In fact, it is possible to calculate the task duration in other units and show this parameter differently (e.g. in fractional units). But we don’t want to make things more complicated in this tutorial so we won’t consider this scenario. But you can see how it works in this sample.
These are the main points that you should know to add a custom context menu to your Gantt project like in our sample.
Conclusion
As you can see, the use of a context menu can significantly enhance the functionality and user experience of a Gantt app. If you decide to go with DHTMLX Gantt for your project management app, you don’t need any third-party tools to implement a custom context menu. The Menu widget from the Suite library is an ideal tool for this purpose. You can test the functional capabilities of both products free of charge by downloading 30-day trial versions.