We’ve already described how to integrate our Scheduler component into meteor app using special packages. Though it was easiest way to integrate dhtmlxScheduler, we now release this article that shows you how to integrate dhtmlxScheduler with Meteor JavaScript framework manually in case you want to get it more flexible for some specific customization.
Before we start our integration, make sure that Meteor platform is installed according to Meteor. If everything is OK, let’s move on and prepare our app.
You can jump to a complete Scheduler with Meteor demo that is already available on GitHub.
4 steps to prepare our app
Step 1. First of all, we need to create an app. For this, run the following command in your terminal:
Here is how we run the app:
meteor
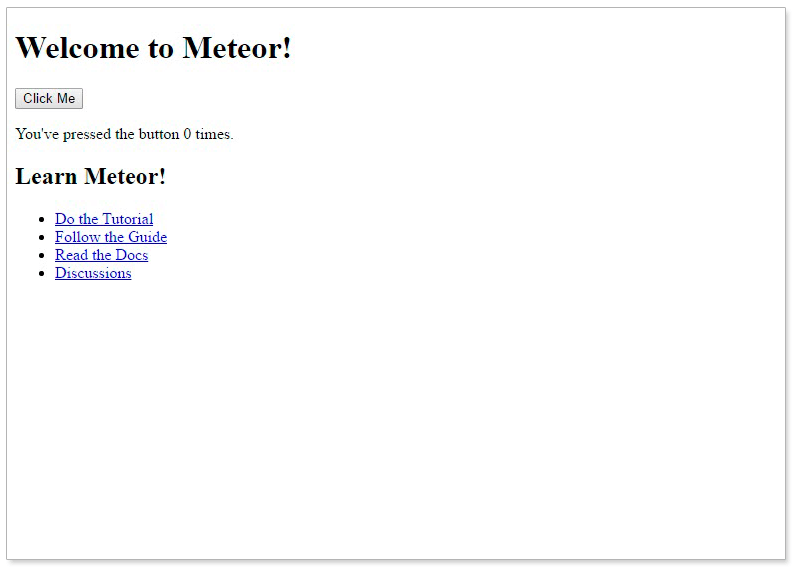
Now if we open http://127.0.0.1:3000/ we should see a page like this:
Step 2. Then its time to install dhtmlxScheduler. To do this, run the following command:
Let’s also install the helper package to load static files. For this purpose run the next:
Create file static-assets.json in the application root and put the following code to it to define folders with scheduler images to load as static files:
"map": {
"node_modules/dhtmlx-scheduler/codebase/imgs/": "imgs/",
"node_modules/dhtmlx-scheduler/codebase/imgs_contrast_black/": "imgs_contrast_black/",
"node_modules/dhtmlx-scheduler/codebase/imgs_contrast_white/": "imgs_contrast_white/",
"node_modules/dhtmlx-scheduler/codebase/imgs_dhx_terrace/": "imgs_dhx_terrace/",
"node_modules/dhtmlx-scheduler/codebase/imgs_flat/": "imgs_flat/",
"node_modules/dhtmlx-scheduler/codebase/imgs_glossy/": "imgs_glossy/"
}
}
Step 3. Create imports/ui/scheduler folders and create scheduler.html file inside it. Here we’ll define template with necessary blocks for scheduler.
Add the following code to it:
Also we need to create scheduler.js in this folder. Now we need to put scheduler initialization code to it:
import 'dhtmlx-scheduler/codebase/dhtmlxscheduler.css';
import ‘./scheduler.html’;
Template.scheduler.onRendered(function () {
let container = this.$(“.dhx_cal_container”)[0];
scheduler.init(container, new Date(2017, 2, 16), “week”);
});
Here we’re initializing scheduler after template rendering.
Step 4. Open client/main.html file and put the following code to add our scheduler template to body:
{{> scheduler}}
The next step is to open client/main.js file and import our scheduler.js to entry point:
import ‘../imports/ui/scheduler/scheduler.js’;
import ‘./main.html’;
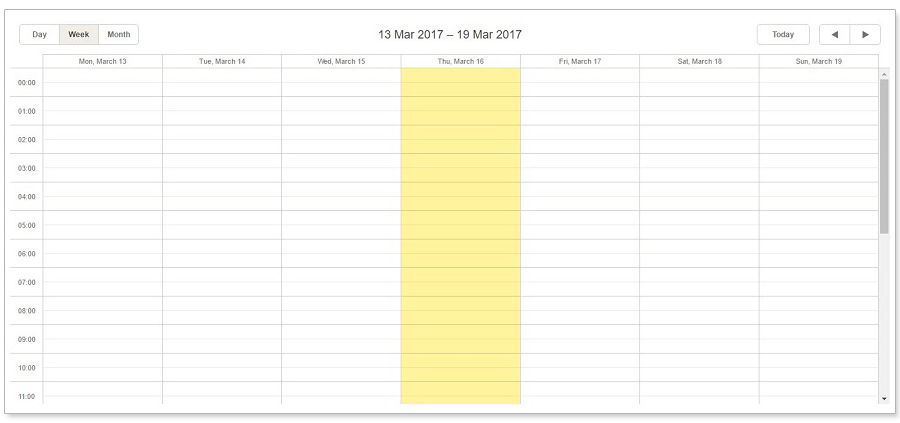
Now if we run our application, we should see an empty scheduler on the page:
Data Saving
Create API folder inside imports folder, and then create events.js module inside. Here we create new mongo collection for events and export it.
export const Events = new Mongo.Collection(‘events’);
We should import this module on the server to create MongoDB collection and allow client to get data. Open server/main.js and add following this:
Also we should update our client side. Now we want to set up two-way sync between scheduler and our mongo collection, so each time scheduler data is modified – it will be immediately reflected in mongo and vice versa. Open imports/ui/scheduler/scheduler.js to put the following:
import 'dhtmlx-scheduler/codebase/dhtmlxscheduler.css';
import ‘./scheduler.html’;
import {Events} from ‘../../api/events.js’;
Template.scheduler.onRendered(function () {
let container = this.$(“.dhx_cal_container”)[0];
scheduler.init(container, new Date(2017, 2, 16), “week”);
let parseEventData = (data)=> {
let event = {};
for (let property in data) {
if (property == “_id”) {
event[“id”] = data[property];
}
else {
event[property] = data[property];
}
}
return event;
};
let serializeEvent = (event) => {
let data = {};
for (let property in event) {
if (property.charAt(0) == “_” || property == “id”) continue;
data[property] = event[property];
}
return data;
};
let eventsCursor = Events.find();
let events = [];
let renderTimeout = null;
eventsCursor.observe({
added(data) {
let event = parseEventData(data);
if (!scheduler.getEvent(event.id)) {
events.push(event);
}
clearTimeout(renderTimeout);
renderTimeout = setTimeout(()=> {
scheduler.parse(events, “json”);
events = [];
}, 5);
},
changed(data) {
let event = parseEventData(data);
let originalEvent = scheduler.getEvent(event.id);
if (!originalEvent) return;
for (let key in event) {
originalEvent[key] = event[key];
}
scheduler.updateView();
},
removed(data){
let event = parseEventData(data);
if (scheduler.getEvent(event.id)) {
scheduler.deleteEvent(event.id);
}
}
});
scheduler.attachEvent(“onEventAdded”, (eventId, event) => {
let data = serializeEvent(event);
let newId = Events.insert(data);
scheduler.changeEventId(eventId, newId);
});
scheduler.attachEvent(“onEventChanged”, (eventId, event) => {
let data = serializeEvent(event);
Events.update(eventId, {$set: data});
});
scheduler.attachEvent(“onEventDeleted”, (eventId) => {
Events.remove(eventId);
});
});
Also here we add scheduler events handlers to put events changes to collection. So, when event is added, changed or deleted, we add corresponding changes to collection.
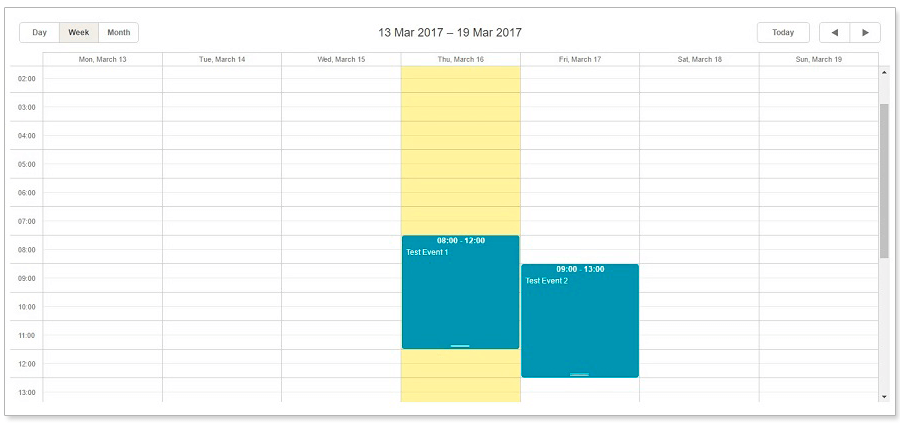
Now we can add some initial events. Do so, run the following code in your terminal:
db.events.insert({_id: "1", start_date: new Date(2017, 2, 16, 8, 0), end_date: new Date(2017, 2, 16, 12, 0), text: "Test Event 1"});
db.events.insert({_id: "2", start_date: new Date(2017, 2, 17, 9, 0), end_date: new Date(2017, 2, 17, 13, 0), text: "Test Event 2"});
Now we get a working example. It should load data from the server side and save changes.
Thus you have a demo of a real-time scheduling calendar based on Meteor JS Framework and dhtmlxScheduler (feature-rich booking/appointment calendar). Grab the demo from GitHub to study the integration and customize according to your needs.