We are excited to present the official release of DHTMLX To Do List 1.2. This minor update comes with only three main novelties but all of them are designed to significantly improve user experience with our JavaScript To Do List.
First of all, we’ve added the ability to set a priority level for one or multiple selected tasks at once. Moreover, now you can enable several end-users to conveniently work on the same tasks and see each other’s changes in real time by implementing a multi-user backend. And finally, there is an opportunity to enrich your JavaScript To Do list with a Table view using Grid from our Suite library.
Task Priority
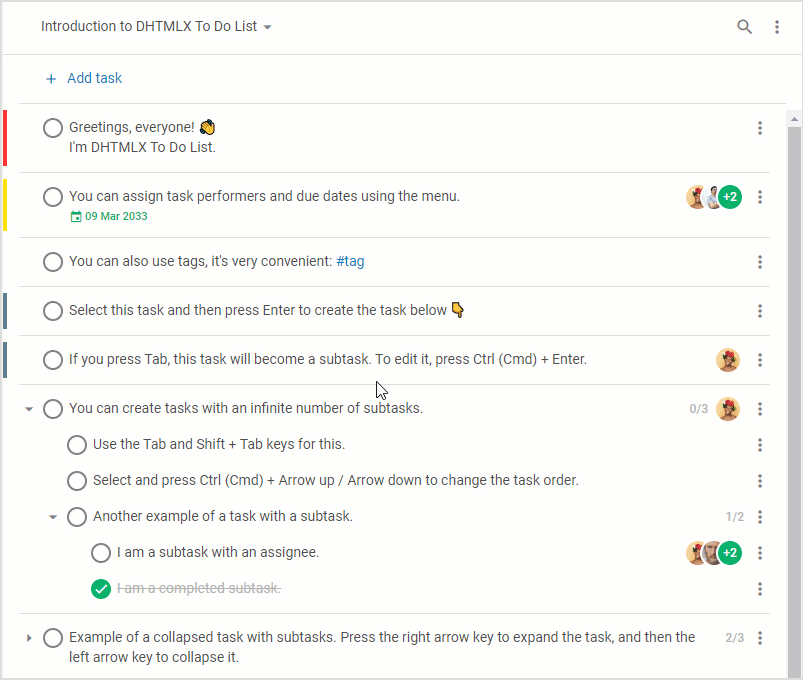
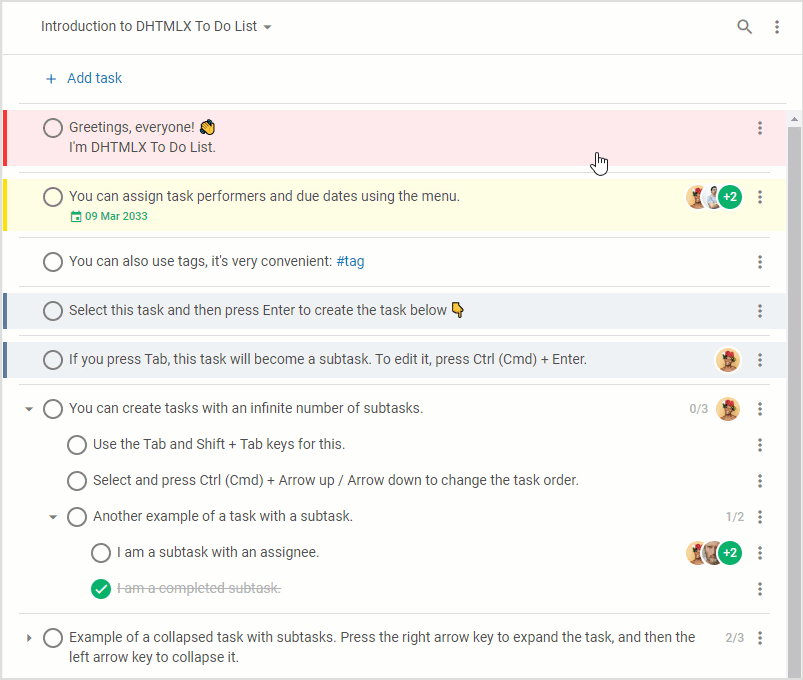
Prioritizing is one of the key criteria for enhancing task management productivity. Starting from v1.2, you can enable end-users to organize tasks in a JavaScript To Do List in accordance with their importance by setting a priority level for all of them or resetting it when necessary. With this feature at hand, end-users can make the whole workflow more predictable and tackle each task on a timely basis.
In practice, now it is possible add a priority status to any number of selected tasks in two ways:
- via a dropdown list in the task context menu
The priority menu offers available priority levels for tasks. Once the required option is clicked, the task will be highlighted with a particular color corresponding to a given priority level. The menu also includes the option for resetting the given priority status.
 Check the sample >
- via keyboard shortcuts
To specify the task priority with a keyboard, end-users should press “Alt+ID” of the needed priority level. By default, the priority ID is indicated by numbers (1, 2, 3, and 0) starting with 1 for the top priority task and increasing by one for each lower level and 0 for tasks without priority.
When it comes to adding this feature to your To Do List, you should specify the list of priority elements using the newly added priorities configuration property. In fact, this property is an array of objects describing priority elements. It takes the following parameters:
- id (required) – sets an ID for the element which stands for the priority level. By default, there are 4 priority levels:
1 – high priority level
2 – medium priority level
3 – low priority level
0 | null – no priority
- label (required) – names a priority element
- color (optional) – sets a color for a given priority element
- hotkey (optional) – defines a custom combination of hotkeys for setting a specific priority level
// other parameters
priorities: [
{
id: 1,
label: "Critical",
color: "#f33",
},
{
id: 2,
label: "Major",
color: "rgba(255, 225, 0, 1)",
},
... // other priority settings
],
});
Besides the default list including 4 options (such as High, Medium, Low, and No Priority), you can make your own list of priority elements and add custom hotkey combinations for them as shown in the example above.
The tasks property of our To Do List also received the priority parameter intended for specifying an initial priority status.
{
...
priority?: number | null,
},
{...} // more task objects
];
To configure how a task with a certain priority level should be shown in the list of tasks, it is necessary to specify the priority parameter in the taskShape object. This parameter has two boolean attributes:
- cover – enables/disables highlighting of the whole task with the color related to its priority level
- label – enables/disables the display of a priority label added to a given task
...
taskShape: {
priority: {
cover: true,
label: true,
},
},
});
Moreover, now end-users can sort tasks according to their priority via the context menu in the toolbar.
Synchronizing Simultaneous Multiple User Actions
Such task management tools as our To Do list are very popular in business apps used by companies of various sizes. Therefore, it is great to have the ability to ensure a good user experience for any number of users at once. Specifically for this release, our development team prepared a new demo dedicated to implementing a JavaScript To Do list with a multi-user backend.
Using this useful addition under the hood, multiple end-users can simultaneously manage the same tasks in the list and their actions will be synchronized without page reloading.
To add a multi-user backend to a web project, first of all, you need to get authorization on the server before the To Do List initialization using the login() function:
var token = sessionStorage.getItem("login-token");
if (token) {
return Promise.resolve(token);
}
return fetch(url + "/login?id=1")
.then(raw => raw.text())
.then(token => {
sessionStorage.setItem("login-token", token);
return token;
});
}
This function should return the server token that is crucial for all subsequent interactions with the server. The token is included in each request as the value of the Remote-Token header in the following way:
const restProvider = new RestDataProvider(url);
restProvider.setHeaders({
"Remote-Token": token,
});
After the initialization completion, it is required to add websockets aimed to listen for events from the server:
const events = new RemoteEvents(url + "/api/v1", token);
// get client handlers
const handlers = todoUpdates(
list.api,
restProvider.getIDResolver()
);
// add client handlers for server events
events.on(handlers);
Apart from that, you can also specify your own logic for processing server events. To this end, the handlers object passed to RemoteEvents.on(handlers) should have the following structure:
"tasks": tasksHandler: function(obj: any),
"projects": projectsHandler: function(obj: any)
}
When any change occurs on the backend, the server returns the name of the modified item. These names may vary depending on the server implementation.
The data that should be updated on the frontend will be placed in the obj argument of the function(obj: any) function. There is a type: string field serving to clarify the operation. It can take the following values:
- for tasks – “add-task”, “update-task”, “delete-task”, “move-task”, and “clone-task”
- for projects – “add-project”, “update-project”, and “delete-project”
Find more details on adding custom server event handlers on the client-side in the documentation.
By integrating the multi-user backend into your app, you can significantly facilitate collaboration between end-users and allow them to keep track of any changes via the UI in real time.
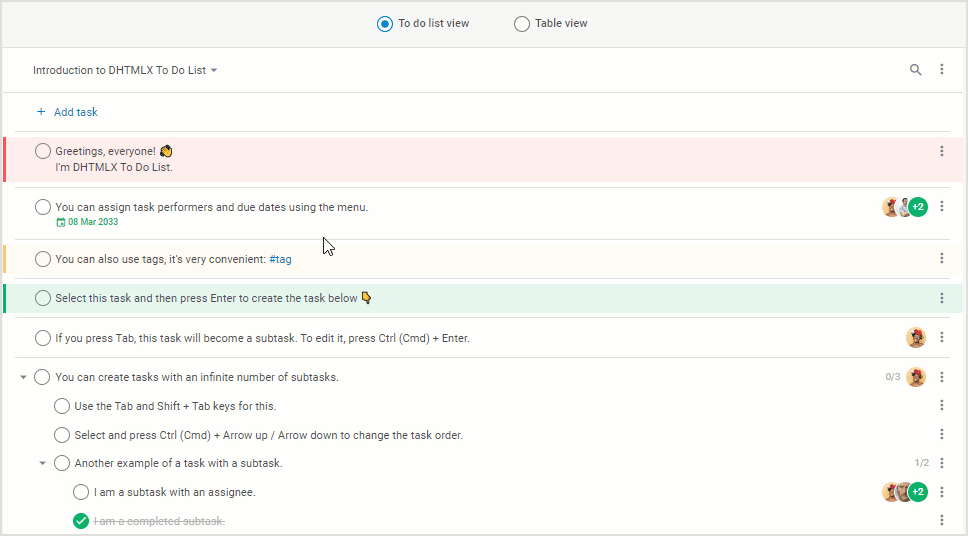
Presenting Task Data with Grid Widget
The ability to present data in a tabular format is frequently requested in modern business apps. That is why our development team created a new demo that vividly demonstrates a JavaScript To Do list with the embedded Grid view. It is implemented with the use of the corresponding JavaScript Grid widget from our Suite library. Thus, end-users get a great opportunity to manage task data with two powerful instruments in one.
 Check the sample >
As you can see, it is possible to add and handle tasks in both views and all changes will be synchronized.
These are the main features delivered in DHTMLX To Do List v1.2 and you can review them one more time in the “What’s new” section of our documentation. Be sure to also take a look at migration notes to v1.2.
To estimate all the novelties in your own scenarios, you can download a free 30-day trial version. For our current clients, v1.2 is available in their Client’s Area.