The DHTMLX JS booking calendar widget is the latest addition to our portfolio of JavaScript tools for project management apps. It is designed to help dev teams build custom booking systems enriched with features for conveniently making appointments on the web.
What makes it even more powerful is its seamless integration with the DHTMLX JavaScript scheduling component, enabling developers to build more advanced and feature-rich scheduling solutions. In this guide, we’ll walk you through the process of combining these two components on the frontend. Next time, we’ll cover the backend part, where all the data is stored and converted for each component separately.
Example of Using DHTMLX Booking with Scheduler Component
It is hard to imagine a modern hotel, healthcare clinic, or beauty salon without a reliable booking system. Such tools allow organizations to streamline their operations by offering clients a hassle-free way to make appointments and reservations online.
It is not easy to find a ready-made solution that meets all the technical requirements and functional capabilities of a particular business model. That’s where DHTMLX Booking and Scheduler can make a difference. Using these fully compatible JavaScript UI components, dev teams can build a custom appointment scheduling solution that complies with specific requirements with less time and effort.
Our team prepared the integration demo that vividly demonstrates how the DHTMLX Booking widget can be combined with the Scheduler within a single solution for a medical center.
The demo consists of three main sections – Doctor Schedule, Booking, and Client Reservations.
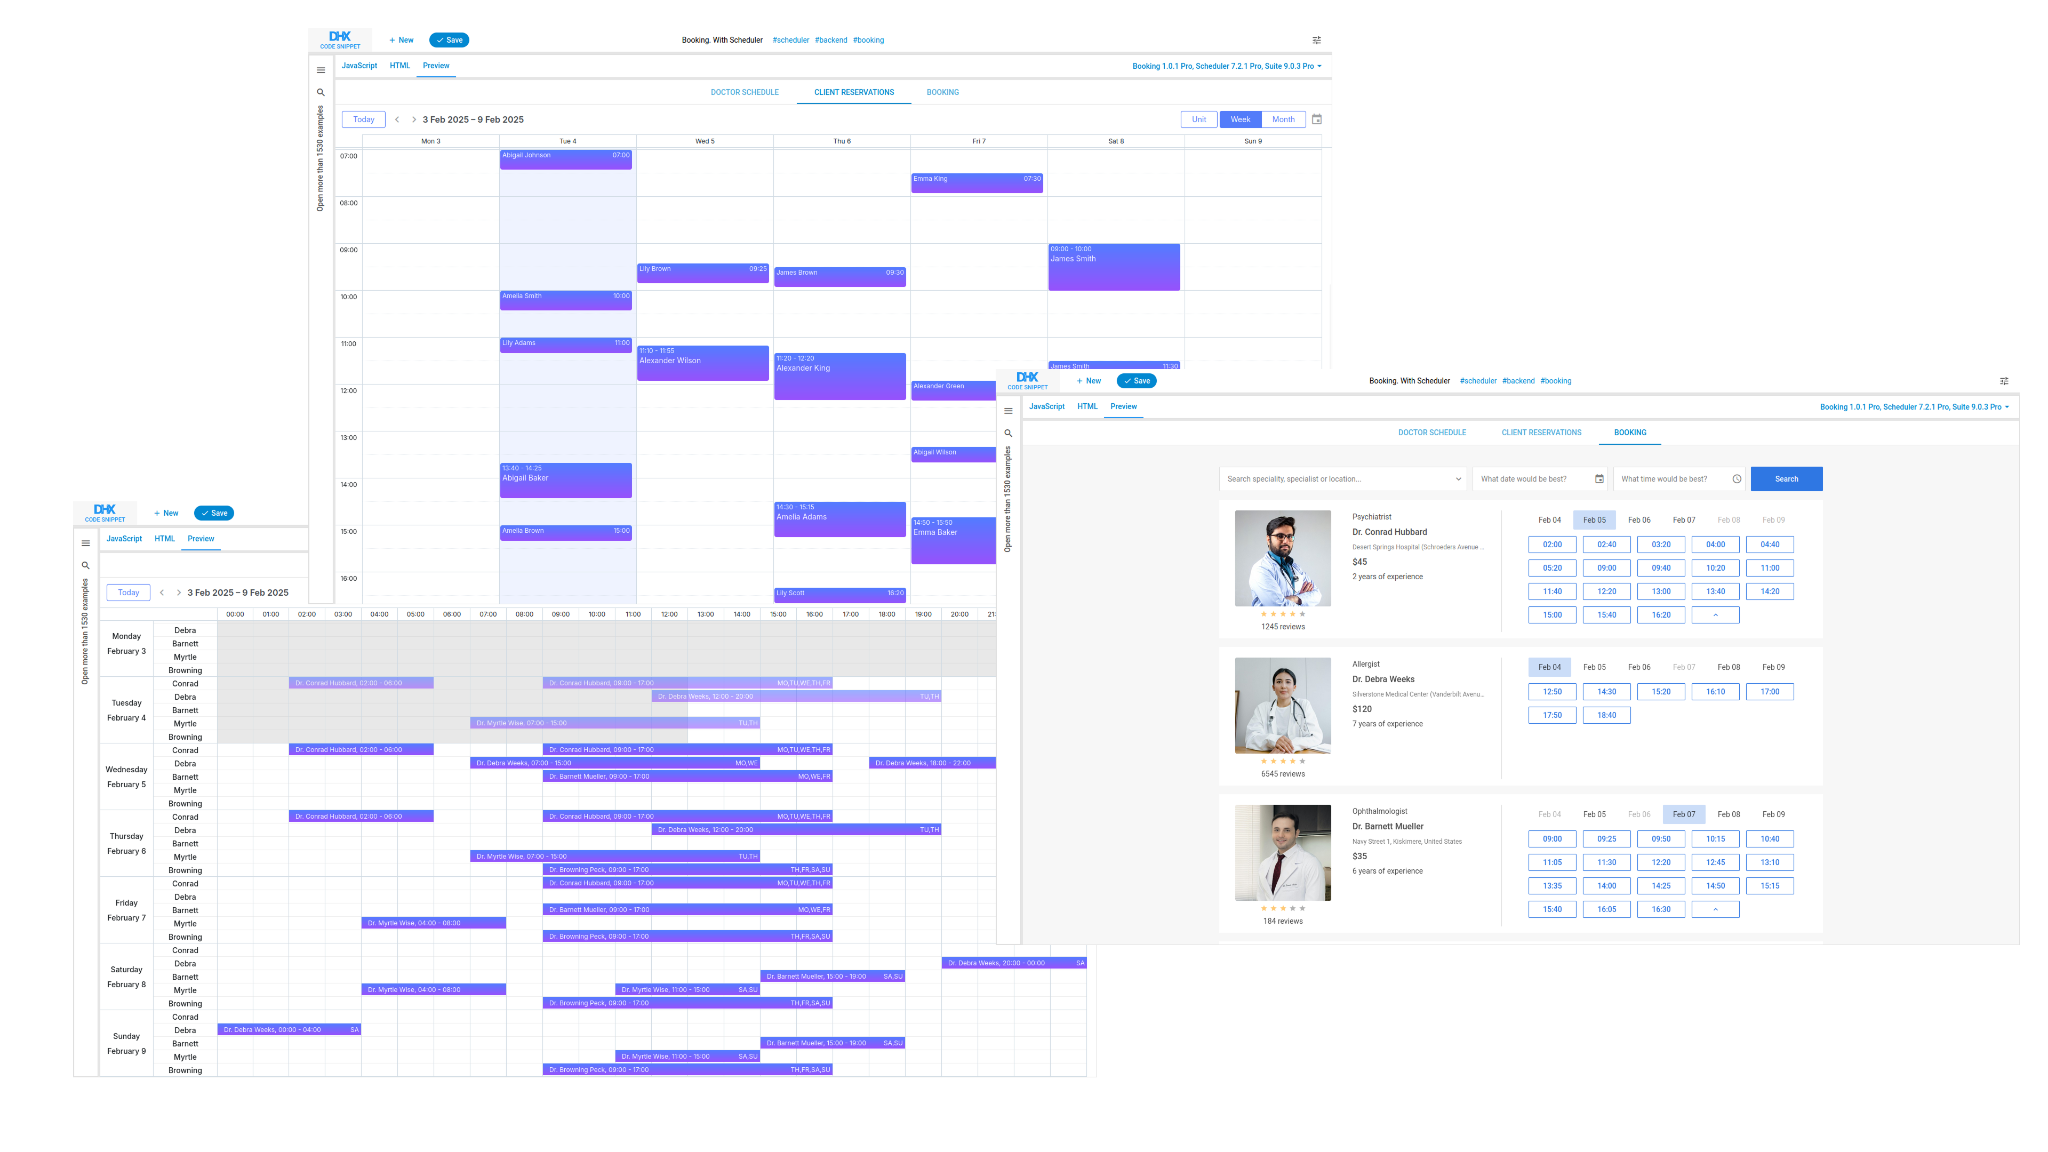
It is necessary to mention the main functional concepts used in each section of our demo:
- The Scheduler’s Timeline view presents periods of doctors’ availability using single and recurring events (Doctor Schedule).
- The Booking widget generates available time slots from Scheduler data (events).
- Reserved time slots are displayed in the auxiliary section based on Scheduler (Client Reservations).
The trickiest part of this integration is converting Scheduler events to Booking slots, which occurs on the server side.
In this article, you will learn how to configure both DHTMLX components, thereby preparing them for achieving the main goal on the server-side.
Configuring Scheduler and Booking Components on Frontend
Before delving into the configuration peculiarities of all three sections implemented in our demo, we want to clarify several important details related to time slots (i.e. time units available for booking), recurrence, and timestamps.
There are two approaches to working with time slots in DHTMLX Booking:
- Showing schedules with only available time slots via the availableSlots parameter of the data property (for scenarios without recurrences).
- Showing schedules with recurring events/recurring patterns and already reserved time slots using the slots array and usedSlots parameter of the data property. This approach is used in our integration demo.
Since the Booking widget currently supports only weekly recurring events, it is necessary to exclude other recurrence options available in Scheduler in its config.
And lastly, we have to mention that Booking works with timestamps in the local timezone. When dealing with global timestamps, it is required to perform a corresponding conversion before sending these timestamps to Booking (and vice versa before saving the data back). Conversion instructions are provided on this page.
Let us review how to configure each section separately and emphasize the main aspects of this process.
Doctor Scheduler Section
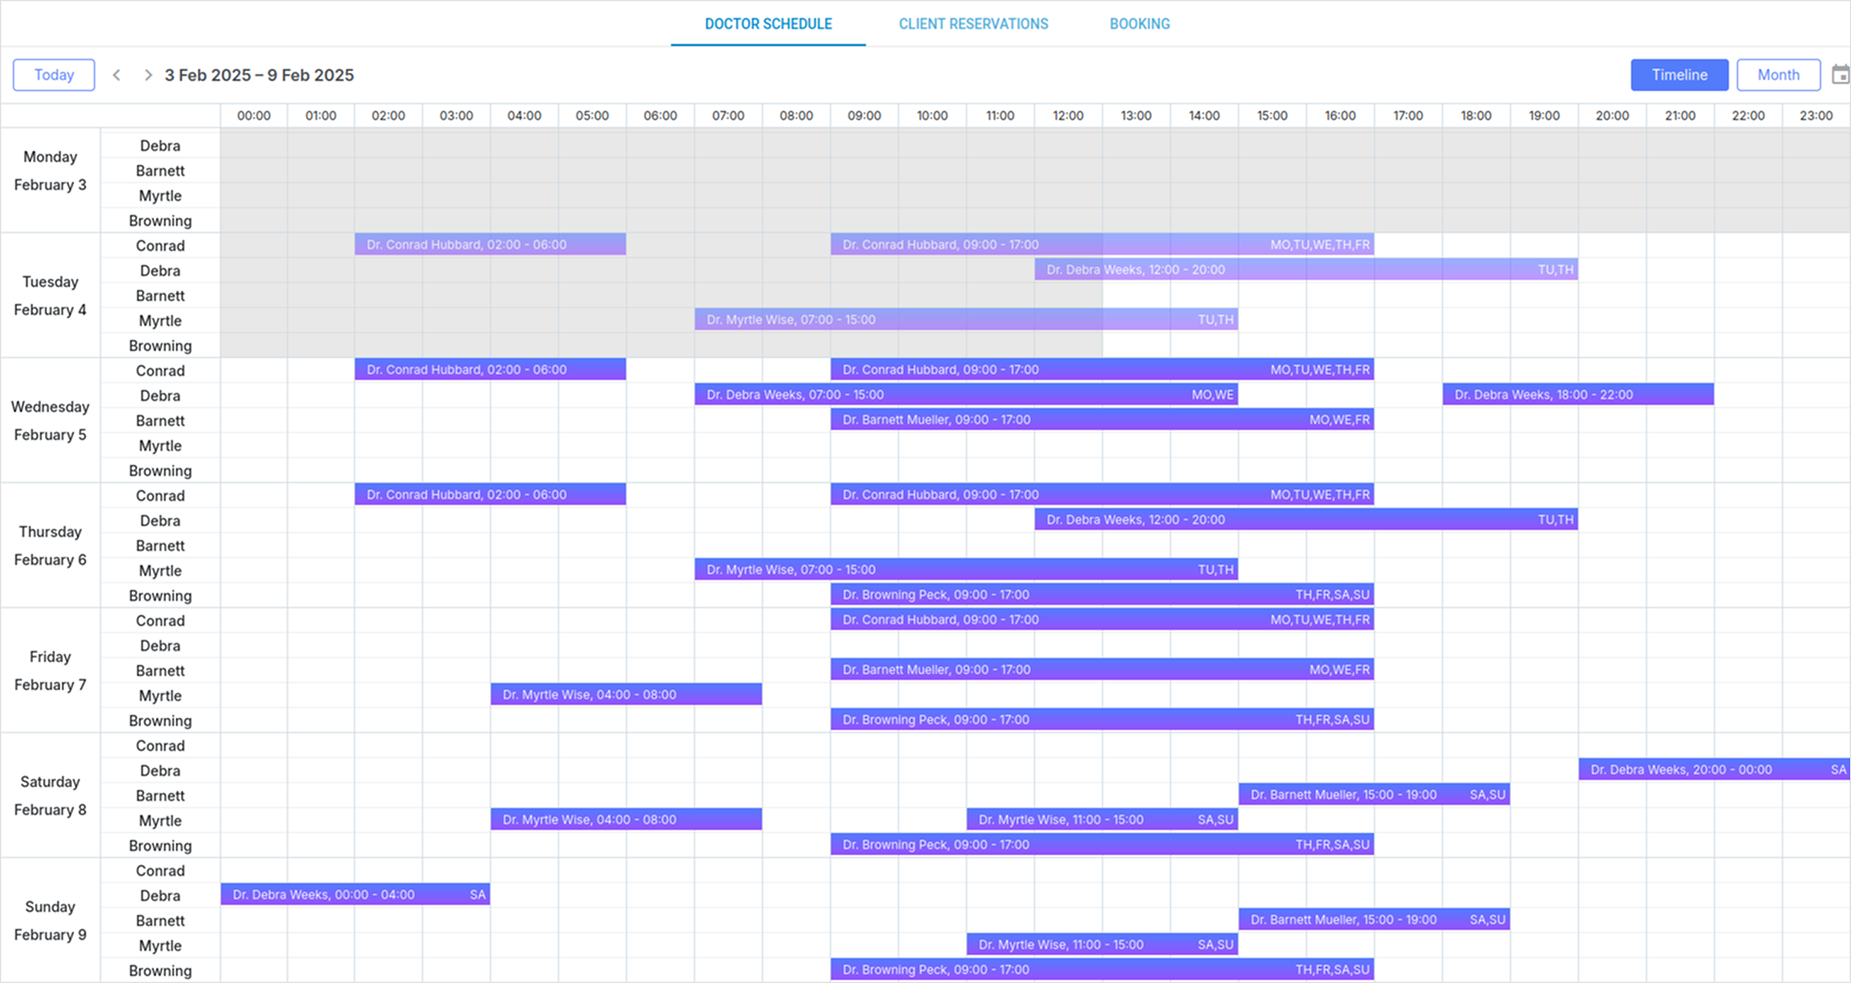
First of all, it is necessary to create a separate Scheduler instance for the Doctor Schedule section with the Timeline view. It is done the following way:
schedulerWidget = Scheduler.getSchedulerInstance();
schedulerWidget.plugins({
timeline: true,
daytimeline: true,
recurring: true,
tooltip: true,
minical: true
});
schedulerWidget.createTimelineView({
name: "timeline",
...
});
schedulerWidget.init("doctor_scheduler", utcDate, "timeline");
First, you need to load doctors’ schedules. After that, you initialize the DataProcessor and bind the Scheduler instance for integration with the backend, where all the data will be stored:
if (dp) dp.destructor();
dp = new scheduler.DataProcessor(URL("/doctors/worktime"));
dp.init(scheduler);
Since the Booking widget works well either with weekly schedules or arbitrary dates, you need to adjust Scheduler to create repetitive weekly events. To do that, you set a custom form for editing recurring events via schedulerWidget.form_blocks.recurring.render:
return /* custom HTML for form */;
};
Apart from the Timeline view and recurrence of events, the configuration of this section also includes other extensions (plugins) such as a mini calendar and tooltips. The full list of available Scheduler plugins can be found on this page.
Using templates provided in Scheduler API, you can change the appearance of timeline elements, specify display of past events, and add custom content in event bars and tooltips.
Booking Section
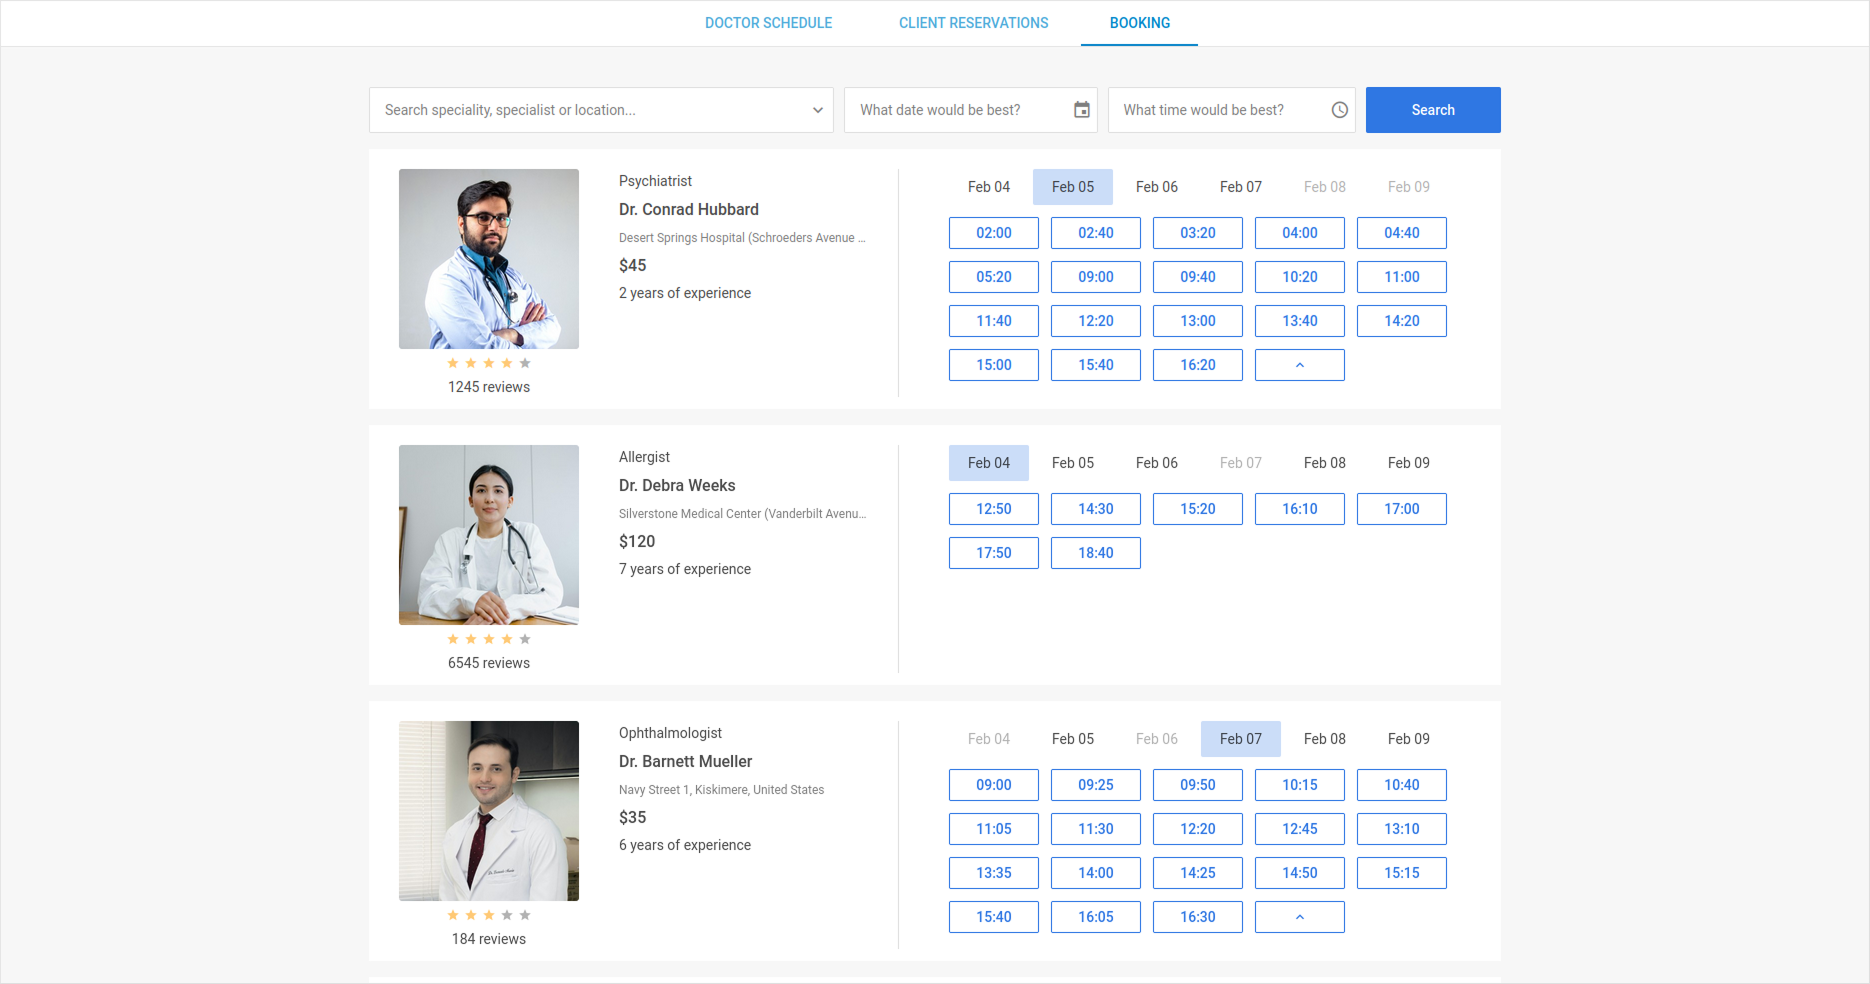
You’ll need our JavaScript booking widget to add this section. It offers most of the required functionality out of the box, so you’ll only need to initialize the widget and synchronize data.
You initialize the Booking widget and load doctors’ data with their schedules and already booked slots from the backend, after converting all global timestamps into local ones.
start: utcDate(),
end: utcDate(/*add 2 years*/),
})
fetch(URL("/units"))
.then(res => res.json())
.then(units => {
// convert timestamps
...
bookingWidget.setConfig({ data: units });
});
You need to create a handler for processing reservations of time slots and convert local timestamps to global ones. This handler sends a POST request to the server, the data is saved in the same collection that is used when displaying data in the Client Reservation section:
const { confirm, slot, data } = event;
const info = { /*event data*/}; // convert timestamps
fetch(URL("/doctors/reservations"), {
method: "POST",
body: JSON.stringify(info),
}).then(response => {
if (response.ok) confirm.done();
else confirm.error();
});
});
Finally, we can proceed to the Client Reservation section.
Client Reservations Section
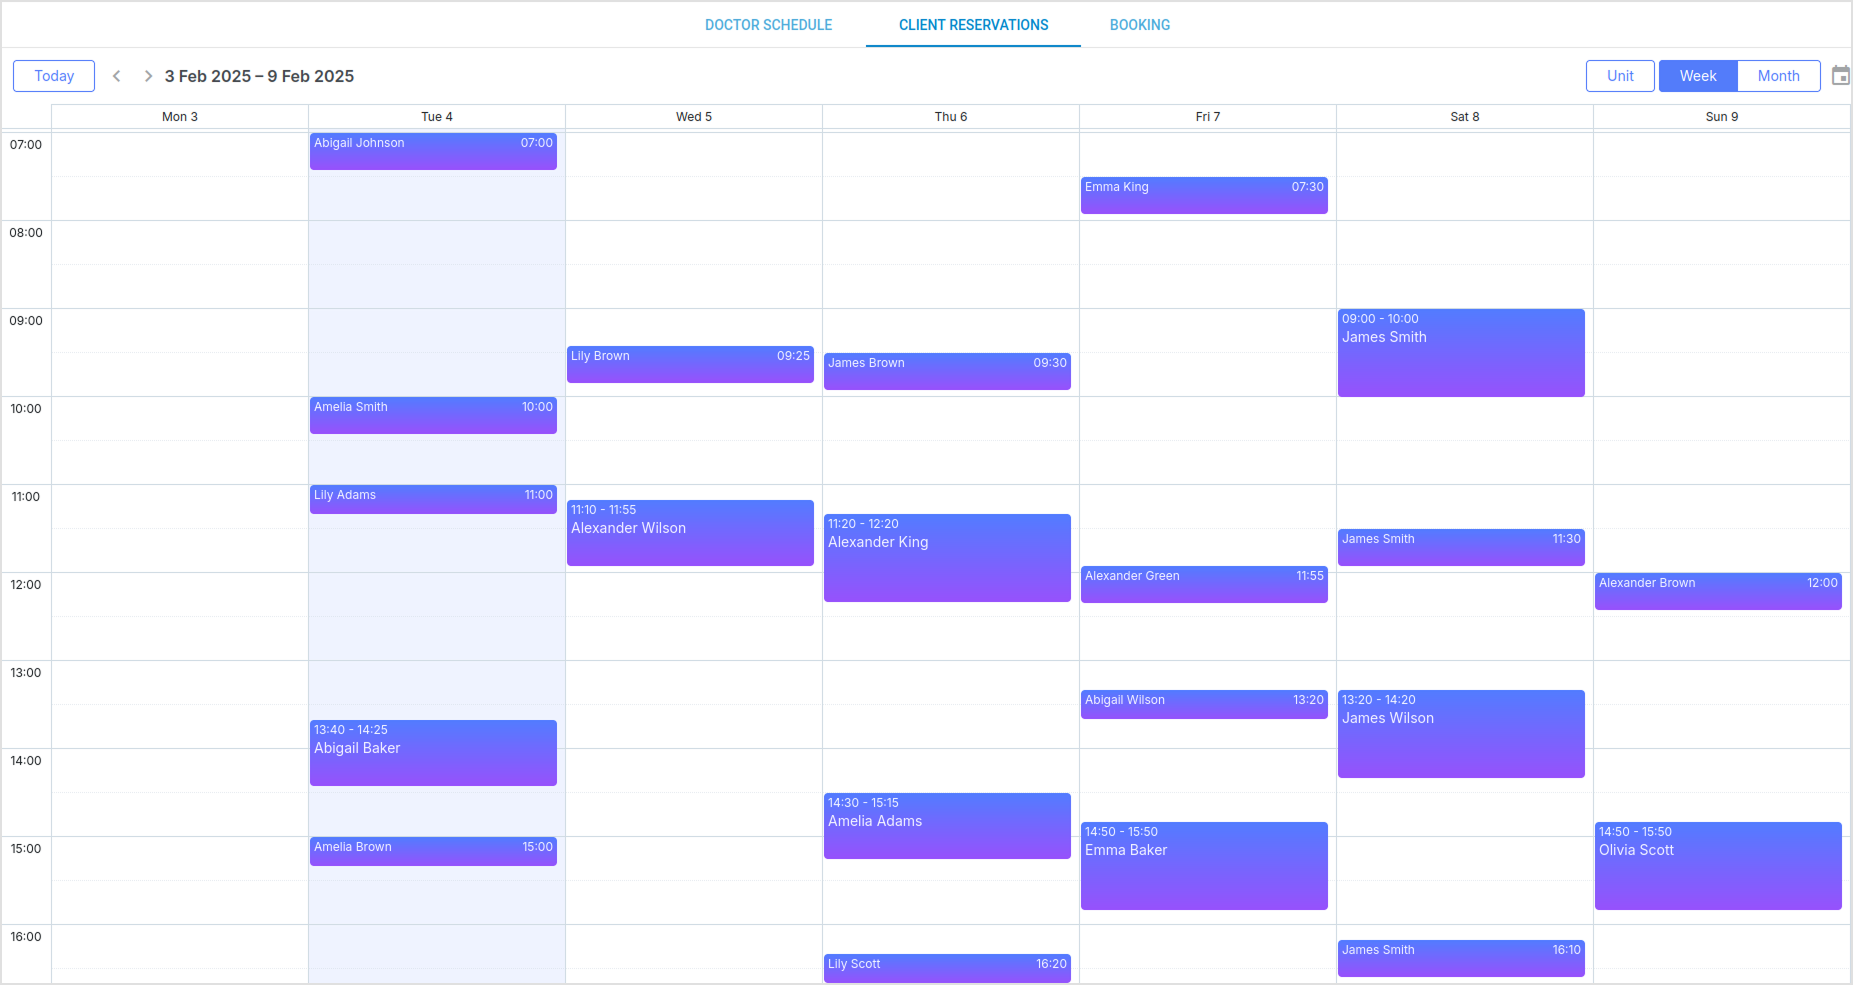
Client Reservations is an auxiliary section of our integration demo aimed to visualize reserved time slots via Scheduler views.
It is configured similarly to the Doctor Schedule section, but the config itself is different.
For this section, you set the Unit view with week units:
schedulerWidget = Scheduler.getSchedulerInstance();
schedulerWidget.plugins({
units: true,
...
});
schedulerWidget.createUnitsView({
name: "week_unit",
property: "doctor_id",
list: doctors,
days: 3,
});
schedulerWidget.init("client_scheduler", utcDate, "week_unit");
First, you need to get data on doctors and scheduled appointments (i.e., client reservations). As a preparatory step, you should convert the time to a local timezone.
To load this data from the backend, you’ll need the following code:
schedulerWidget.ajax.get(URL("/doctors")),
schedulerWidget.ajax.get(URL("/doctors/reservations")),
]).then(([doctorsReq, eventsReq]) => {
let events = JSON.parse(eventsReq.response);
...
schedulerWidget.parse(events);
});
The configuration of this section includes Units view, readonly mode, mini calendar (date picker), and a popup with event details (quick info). Apart from that, we also added a couple of customizations for the Quick Info window and vertical text display in the Unit view .
That’s it. These are the main steps required to implement the frontend part of the booking solution like in our demo using DHTMLX components.
Wrapping Up
As you can see, DHTMLX products allow for building feature-packed booking systems for streamlined appointment scheduling tailored to various industries. Extensive functional capabilities of the Scheduler component (customizable calendar views, recurring events, etc.) combined with the ready-made UI for managing reservations of the Booking widget give you everything you need to deliver a modern booking solution for the web.
Next time, you will learn the main peculiarities of data conversion required for integration of DHTMLX Booking with Scheduler on the backenв like in our demo.