If you’re starting a new project in PHP, you’d probably won’t build it from scratch but will use some framework instead.
Whether you use Laravel, Symfony, CodeIgniter or any other framework, each of them provides its own means for implementing data access layer. Having such resources at hand, you may want to step aside from our traditional approach with dhtmlxConnector which may look like a ‘black box’ to the rest of the project. You’d rather choose to build data access with tools your framework provides in order to keep everything under your control.
Specially for working with frameworks Gantt provides a simplified protocol for CRUD operations which can be easily integrated with REST API on the server.
To illustrate this possibility, we’ll create a web application using the Slim framework and REST API on the server side. MySQL will serve as a data storage. Let’s start our work.

Initializing the project
Running ahead of time, you may find a ready demo on GitHub. To learn how it works, follow the tutorial.
So, to begin with, we need to initialize our project. For this, let’s complete the following steps:
Step 1. Creating a project
Instead of creating an application from scratch, we’ll import Slim boilerplate project Slim-Skeleton.
It can be easily installed with the help of composer using the following command:
or
if you have composer installed globally.
Then we should check if it works fine and run the PHP built-in webserver. Go to the app folder and run webserver:
php -S 0.0.0.0:8080 -t public public/index.php
Now open http://127.0.0.1:8080 in a browser. You should see the default Slim page.
Step 2. Download DHTMLX Gantt
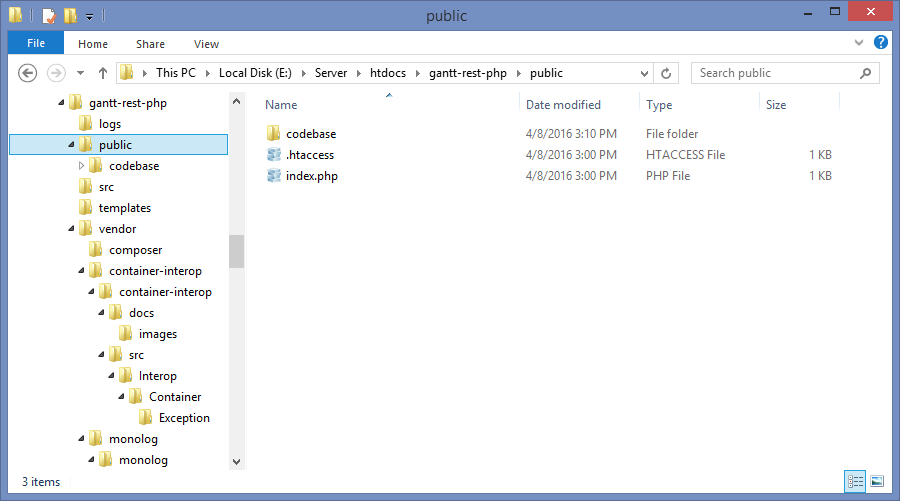
Download the Gantt Chart and unzip the archive’s content to the “public” folder. The resulting structure of folders should look as follows:
Alternatively, you can install it from Bower by running the next command:
Or from NPM with the help of the command below:
Step 3. Initializing Gantt and dataProcessor and setting connection between them
Open templates/index.phtml and replace its content with the following one:
<html>
<head>
<meta http-equiv="Content-type" content="text/html; charset=utf-8">
</head>
<script src="./codebase/sources/dhtmlxgantt.js" type="text/javascript" charset="utf-8"></script>
<link rel="stylesheet" href="./codebase/dhtmlxgantt.css" type="text/css" charset="utf-8">
<style type="text/css">
html, body{ height:100%; padding:0px; margin:0px; overflow: hidden;}
</style>
<body>
<div id="gantt_here" style='width:100%; height:100%;'></div>
<script type="text/javascript">
gantt.config.xml_date = "%Y-%m-%d %H:%i:%s";
gantt.init("gantt_here");
gantt.load("/data");
var dp = new gantt.dataProcessor("/data");
dp.init(gantt);
dp.setTransactionMode("REST");
</script>
</body>
</html>
In the above code we have done the following:
- set the gantt.config.xml_date property to the “%Y-%m-%d %H:%i” value, in order to transform the data coming from the server into the readable format for dhtmlxGantt
- created a gantt on the page and enabled data loading from the database
- initialized dataProcessor and attached the dhtmlxDataProcessor object to the dhtmlxGantt object
- set the REST mode for dataProcessor
Now on opening http://127.0.0.1:8080/, you should see an empty gantt.
Step 4. Configuring the database
Let’s proceed with preparing a database. We need to create tables. Let’s do it in the same way as it’s described in the documentation.
Step 5. Populating tables with data
At this point we should add some test data into the gantt_tasks table. There’s a ready SQL sample that you can use for this:
INSERT INTO `gantt_tasks` VALUES ('2', 'Task #1', '2013-04-06 00:00:00', '4', '0.5', '10', '1');
INSERT INTO `gantt_tasks` VALUES ('3', 'Task #2', '2013-04-05 00:00:00', '6', '0.7', '20', '1');
INSERT INTO `gantt_tasks` VALUES ('4', 'Task #3', '2013-04-07 00:00:00', '2', '0', '30', '1');
INSERT INTO `gantt_tasks` VALUES ('5', 'Task #1.1', '2013-04-05 00:00:00', '5', '0.34', '10', '2');
INSERT INTO `gantt_tasks` VALUES ('6', 'Task #1.2', '2013-04-11 13:22:17', '4', '0.491477', '20', '2');
INSERT INTO `gantt_tasks` VALUES ('7', 'Task #2.1', '2013-04-07 00:00:00', '5', '0.2', '10', '3');
INSERT INTO `gantt_tasks` VALUES ('8', 'Task #2.2', '2013-04-06 00:00:00', '4', '0.9', '20', '3');
Loading data into Gantt
The next step is to implement data loading. During Gantt initialization on step 3 from the previous chapter we added the following line:
It will send an AJAX request to the specified url, expecting to get a JSON response with Gantt data (see the format details). So, we should add the route for “/data”.
Open the index.php file and add the following code right after $app declaration:
{
$pdoSettings = array(
PDO::ATTR_ERRMODE => PDO::ERRMODE_EXCEPTION,
PDO::ATTR_DEFAULT_FETCH_MODE => PDO::FETCH_ASSOC
);
return new PDO("mysql:host=localhost;dbname=gantt", "root", "root", $pdoSettings);
}
$app->get('/data', function($request, $response) {
$conn = getConnection();
$result = array();
$result["data"] = array();
foreach($conn->query("SELECT * FROM gantt_tasks") as $row){
$row["open"] = true;
array_push($result["data"], $row);
}
$result["links"] = array();
foreach ($conn->query("SELECT * FROM gantt_links") as $link){
array_push($result["links"], $link);
}
$response->withJson($result);
return $response;
});
In the above code we read all the tasks and links from database and set them to an object ($result). Also we specified the “open” property to define that the tasks tree should be open by default.
Finally, we sent the $result object to the client side as JSON.
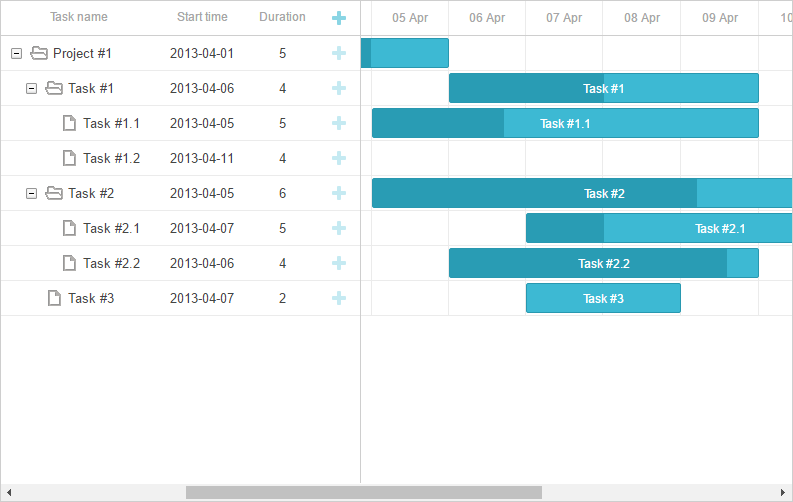
If you open http://127.0.0.1:8080/ now, you should see gantt with data added at the previous stage (see Step 5 for data details).
Updating data on the server
To make our application complete, we need to add the most important functionality – the one that will allow sending changes made on the client side to the server. For this we have added a couple of code lines in the index.html file:
dp.init(gantt);
dp.setTransactionMode("REST");
For each action on the client (adding, changing or removing data in the chart) dataProcessor will send an AJAX request. This request will contain all necessary data to save changes on the server. Since dataProcessor is used in the REST mode, it will send the corresponding HTTP verbs for different operations. The details for CRUD requests are given in the documentation.
So, let’s proceed with adding into the index.php file all the URLs and handlers we need:
function prepareResponse($res, $action, $tid = NULL){
$result = array(
'action' => $action
);
if(isset($tid) && !is_null($tid)){
$result['tid'] = $tid;
}
$res->withJson($result);
return $result;
}
//Gets an event from the request data
function getEvent($data)
{
return array(
':text' => $data["text"],
':start_date' => $data["start_date"],
':duration' => $data["duration"],
':progress' => isset($data["progress"]) ? $data["progress"] : 0,
':parent' => $data["parent"]
);
}
//Gets a link from the request data
function getLink($data){
return array(
":source" => $data["source"],
":target" => $data["target"],
":type" => $data["type"]
);
}
//Insert task action
$app->post('/data/task', function($request, $response){
$event = getEvent($request->getParsedBody());
$conn = getConnection();
$query = "INSERT INTO gantt_tasks(text, start_date, duration, progress, parent) ".
"VALUES (:text,:start_date,:duration,:progress,:parent)";
$conn->prepare($query)->execute($event);
return prepareResponse($response, "inserted", $conn->lastInsertId());
});
//Update task action
$app->put('/data/task/{id}', function($request, $response){
$sid = $request->getAttribute("id");
$event = getEvent($request->getParsedBody());
$conn = getConnection();
$query = "UPDATE gantt_tasks ".
"SET text = :text, start_date = :start_date, duration = :duration, progress = :progress, parent = :parent ".
"WHERE id = :sid";
$conn->prepare($query)->execute(array_merge($event, array(":sid"=>$sid)));
return prepareResponse($response, "updated");
});
//Remove task action
$app->delete('/data/task/{id}', function($request, $response){
$sid = $request->getAttribute("id");
$conn = getConnection();
$query = "DELETE FROM gantt_tasks WHERE id = :sid";
$conn->prepare($query)->execute(array(":sid"=>$sid));
return prepareResponse($response, "deleted");
});
//Insert link action
$app->post('/data/link', function($request, $response){
$link = getLink($request->getParsedBody());
$conn = getConnection();
$query = "INSERT INTO gantt_links(source, target, type) VALUES (:source,:target,:type)";
$conn->prepare($query)->execute($link);
return prepareResponse($response, "inserted", $conn->lastInsertId());
});
//Update link action
$app->put('/data/link/{id}', function($request, $response){
$sid = $request->getAttribute("id");
$link = getLink($request->getParsedBody());
$conn = getConnection();
$query = "UPDATE gantt_links SET ".
"source = :source, target = :target, type = :type ".
"WHERE id = :sid";
$conn->prepare($query)->execute(array_merge($link, array(":sid"=>$sid)));
return prepareResponse($response, "updated");
});
//Remove link action
$app->delete('/data/link/{id}', function($request, $response){
$sid = $request->getAttribute("id");
$conn = getConnection();
$query = "DELETE FROM gantt_links WHERE id = :sid";
$conn->prepare($query)->execute(array(":sid"=>$sid));
return prepareResponse($response, "deleted");
});
Since Gantt operates with two kinds of entities – tasks and links – we need two sets of routes,
We have introduced two sets of routes: “/data/task” – for requests connected to operations with tasks and “/data/link” for requests related to operations with links.
There are also three types of requests are specified: POST – to add a new item into the database, PUT – to update an existing record and DELETE – to delete a record.
On each action a JSON object with the type of the performed operation will come. The response for the insert action will also include the id of the new record in the database that will be applied on the client side. If the operation failed, the “error” type should be returned.
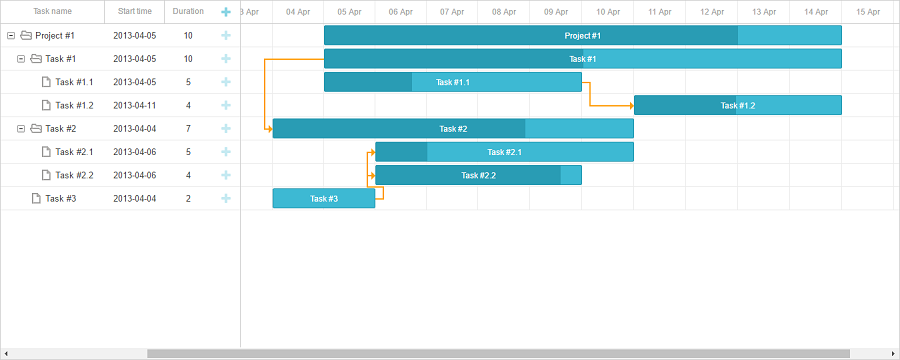
Well, everything is ready for now. Let’s run our application, open http://127.0.0.1:8080 and enjoy a nice Gantt chart we’ve just created.
That’s it. You may find a ready demo on GitHub. We’ve tried to make our tutorial easy to reproduce and understand. There are other captivating materials are waiting ahead. Stay tuned!